crwdns2933423:0crwdne2933423:0
crwdns2947577:0crwdnd2947577:0crwdne2947577:0

iHome IBT16 Power Switch Replacement

crwdns2942213:0crwdne2942213:0

    1. iHome IBT16 Power Switch Replacement, Base Plate: crwdns2935265:01crwdnd2935265:01crwdnd2935265:02crwdne2935265:0 iHome IBT16 Power Switch Replacement, Base Plate: crwdns2935265:01crwdnd2935265:02crwdnd2935265:02crwdne2935265:0
      • Make sure to flip the device over to get into the correct orientation

      • Using the Philips #00 Screwdriver, unscrew and remove the four 9mm black screws on the base plate of the device.

      • Make sure to keep these screws in a safe location so you don't lose them

      crwdns2952109:0crwdne2952109:0

      crwdns2917038:0crwdne2917038:0

    2. iHome IBT16 Power Switch Replacement: crwdns2935265:02crwdnd2935265:01crwdnd2935265:02crwdne2935265:0 iHome IBT16 Power Switch Replacement: crwdns2935265:02crwdnd2935265:02crwdnd2935265:02crwdne2935265:0
      • Using the plastic opening tool, insert into the crack between the base plate and the main body of the device

      • Using a lever like motion, push the opening tool down thus lifting the plate

      • You will need to use your fingers to lift the base plate off the main body of the device

      • The motherboard is directly underneath the base plate

      crwdns2952109:0crwdne2952109:0

      crwdns2917038:0crwdne2917038:0

    1. iHome IBT16 Power Switch Replacement, Power Switch: crwdns2935265:03crwdnd2935265:01crwdnd2935265:02crwdne2935265:0 iHome IBT16 Power Switch Replacement, Power Switch: crwdns2935265:03crwdnd2935265:02crwdnd2935265:02crwdne2935265:0
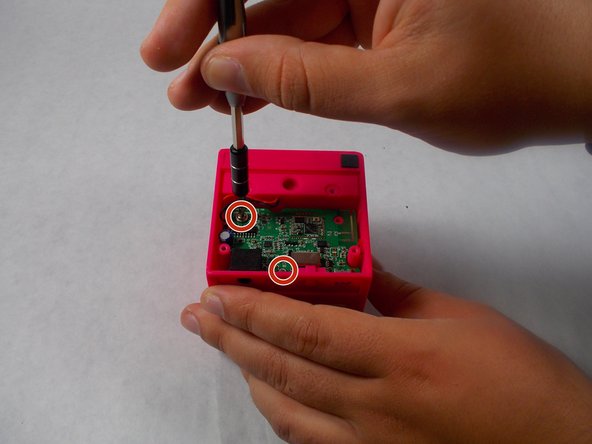
      • Using the Philips #00 screwdriver, unscrew and remove the two silver 10mm screws holding the motherboard

      • Don't misplace the screws! Keep them in a safe place while working on the device

      • Make sure to ground yourself prior to continuing at this point

      crwdns2952109:0crwdne2952109:0

      crwdns2917038:0crwdne2917038:0

    2. iHome IBT16 Power Switch Replacement: crwdns2935265:04crwdnd2935265:01crwdnd2935265:01crwdne2935265:0
      • Using the plastic opening tool, pull the motherboard out of the casing

      • Make sure to lift it out at an angle to the back, as the plastic power switch is attached to the board and can be broken

      crwdns2952109:0crwdne2952109:0

      crwdns2917038:0crwdne2917038:0

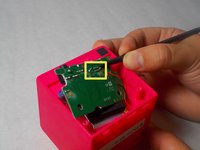
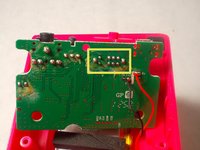
    3. iHome IBT16 Power Switch Replacement: crwdns2935265:05crwdnd2935265:01crwdnd2935265:02crwdne2935265:0 iHome IBT16 Power Switch Replacement: crwdns2935265:05crwdnd2935265:02crwdnd2935265:02crwdne2935265:0
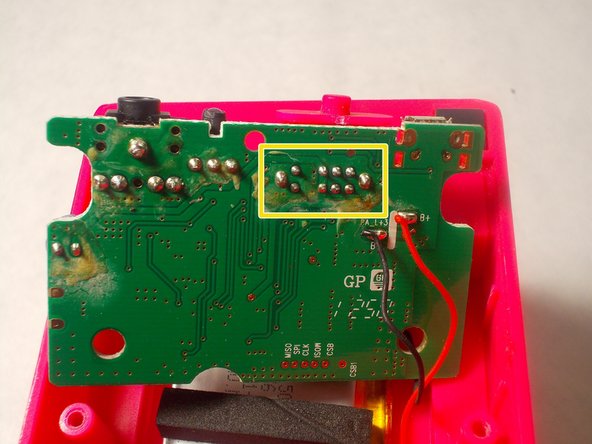
      • Desolder the 10 points holding the power switch to the motherboard

      • Once complete, simply remove the switch from the board

      crwdns2952109:0crwdne2952109:0

      crwdns2917038:0crwdne2917038:0

crwdns2915888:0crwdne2915888:0

To reassemble your device, follow these instructions in reverse order.

crwdns2935221:0crwdne2935221:0

crwdns2935227:0crwdne2935227:0

Ryan Edwards

crwdns2935283:003/21/17crwdne2935283:0

331 crwdns2915208:0crwdne2915208:0

crwdns2935297:03crwdne2935297:0

crwdns2935287:0crwdne2935287:0

UMass Dartmouth, Team S3-G6, Botvin Spring 2017 crwdns2935289:0UMass Dartmouth, Team S3-G6, Botvin Spring 2017crwdne2935289:0

UMASSD-BOTVIN-S17S3G6

crwdns2931471:02crwdne2931471:0

crwdns2935297:060crwdne2935297:0

crwdns2947412:00crwdne2947412:0

crwdns2917038:0crwdne2917038:0

crwdns2936625:0crwdne2936625:0:

crwdns2936751:024crwdne2936751:0 4

crwdns2936753:07crwdne2936753:0 19

crwdns2936753:030crwdne2936753:0 57

crwdns2942667:0crwdne2942667:0 1,128