crwdns2915892:0crwdne2915892:0
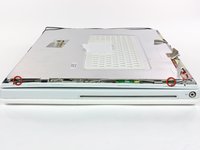
Replace a damaged LCD in your iBook G4 14" 1.42 GHz.
crwdns2942213:0crwdne2942213:0
-
-
Use a coin to rotate the battery locking screw 90 degrees clockwise.
-
-
-
Lift the battery out of the computer.
-
-
-
Use a 1.5 mm hex screwdriver to remove the two hex screws on either side of the display (four screws total).
-
If you don't have a 1.5 mm hex driver, you can probably get these screws out with a T6 Torx screwdriver. However, if you use a T6 Torx driver you'll be more likely to strip the screws.
-
-
-
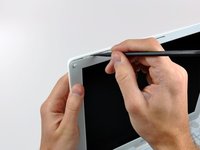
Insert the flat end of a spudger perpendicular to the face of the display into the gap between the front and rear bezels near the upper left corner of the display.
-
Rotate the spudger away from the display to pry the rear bezel off the front bezel.
-
-
-
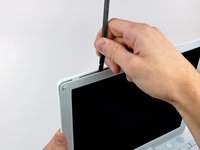
Run your spudger along the top edge of the front display bezel to evenly separate the two bezels.
-
-
-
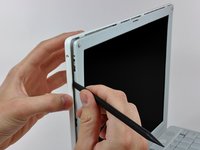
Working down from the upper left corner, use the flat end of a spudger to pry the rear bezel away from the left edge of the display.
-
-
-
-
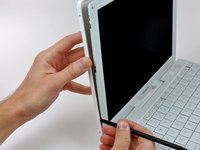
Use the flat end of a spudger to pry the rear bezel away from the right edge of the display.
-
If necessary, pry along the bottom edge of the rear bezel to separate it from the display assembly.
-
-
-
Lift the rear bezel off the display assembly.
-
-
-
Close the display.
-
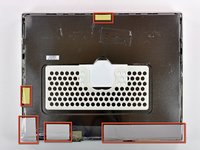
Remove the several pieces of tape securing the thin metal LCD cover to the display.
-
Carefully remove the piece of foil tape covering the display data cable connection.
-
-
-
Remove the Phillips screw near the right display hinge.
-
Use the tip of a spudger to remove the small spacer under the screw you just removed.
-
-
-
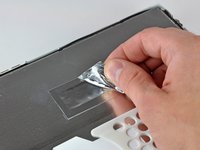
Pull the foil/braided pieces of tape off the aluminum frame of the clutch hinges.
-
-
-
Remove the two Phillips screws securing the left and right sides of the LCD to the frame of the clutch hinges (four screws total).
-
-
-
Carefully remove the thin steel LCD cover.
-
-
-
Disconnect the display data cable by pulling the cable away from the socket on the LCD.
-
-
-
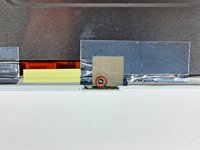
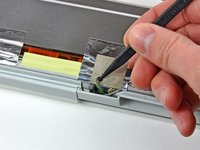
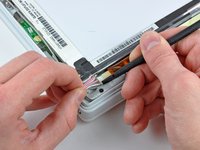
Remove the strip of yellow tape securing the display data cable to the metal LCD frame.
-
-
-
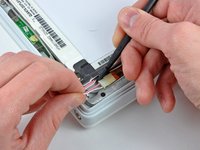
Disconnect the backlight cable from the inverter.
-
-
-
Lift the LCD out of the display assembly.
-


To reassemble your device, follow these instructions in reverse order.
To reassemble your device, follow these instructions in reverse order.
crwdns2935221:0crwdne2935221:0
crwdns2935229:07crwdne2935229:0

crwdns2947410:01crwdne2947410:0
Im not sure where they get the difficulty ratings from- I found this to be about a 20 minute job- one word of warning - before you order your screen you need to find out if the connector your model uses is a 20pin (about 1 inch long) or 30pin (about 1 1/2 inches long) This means you need to pop off the case and pull up that little metal foil BEFORE you order. Other than that, the hardest part is probably getting that back light cable back in the hole (and it only goes one way) I used a set of my wife's tweezers, and I use a small flat head eyeglass screwdriver to get the case off.