crwdns2933803:02crwdne2933803:0
crwdns2933797:0Bryan Beardcrwdnd2933797:0crwdne2933797:0
crwdns2936043:0crwdne2936043:0 crwdns2933505:0crwdne2933505:0 Bryan Beard
- crwdns2933769:0crwdne2933769:0
- crwdns2933771:0crwdne2933771:0
- crwdns2933801:0crwdne2933801:0
crwdns2933807:0crwdne2933807:0
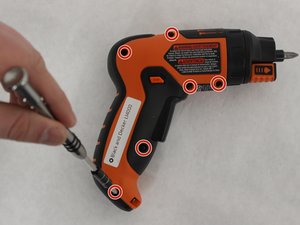
| + | [* red] Remove all six of the 12-mm long case screws with a Philips #1 Screwdriver. These screws can be found on the side of the LI4000 with the "Warning" sticker. |
|---|---|
| + | [* yellow] The next two screws for removal are 4-mm Hexagonal #2.5. These are very small case screws that can be found underneath the two stickers from Step 1. |
| + | [* icon_note] Make sure that the screwdriver is in the position displayed in the first image, with the holes for the case screws facing up before moving on to the next step. |
crwdns2933777:01crwdne2933777:0
crwdns2933779:0crwdne2933779:0
crwdns2915182:0crwdne2915182:0
crwdns2933777:02crwdne2933777:0
crwdns2933779:0crwdne2933779:0

crwdns2915182:0crwdne2915182:0
crwdns2933777:03crwdne2933777:0
crwdns2933779:0crwdne2933779:0

crwdns2915182:0crwdne2915182:0