crwdns2933803:03crwdne2933803:0
crwdns2933797:0Ralph Rileycrwdnd2933797:0crwdne2933797:0
crwdns2936043:0crwdne2936043:0 crwdns2933505:0crwdne2933505:0 Ralph Riley
- crwdns2933769:0crwdne2933769:0
- crwdns2933771:0crwdne2933771:0
- crwdns2933801:0crwdne2933801:0
crwdns2933807:0crwdne2933807:0
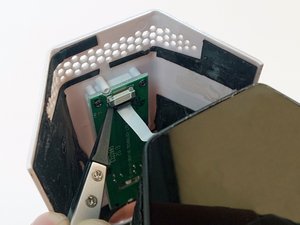
| + | [title] Detaching back housing |
|---|---|
| + | [* red] After getting through the adhesive, lift the back casing open as pictured. |
| + | [* icon_caution] Warning: CAREFUL! A flex connector holds the buttons on the back casing to the unit, so don’t be too eager pulling the back casing away. |
| + | [* red] Disconnect the flex connector by simply pulling it downwards with a pair of flat-head tweezers |
| + | [* red] Then, remove the button PCB panel with a Phillips #0 screwdriver. |
crwdns2933777:01crwdne2933777:0
crwdns2933779:0crwdne2933779:0

crwdns2915182:0crwdne2915182:0
crwdns2933777:02crwdne2933777:0
crwdns2933779:0crwdne2933779:0
crwdns2915182:0crwdne2915182:0
crwdns2933777:03crwdne2933777:0
crwdns2933779:0crwdne2933779:0

crwdns2915182:0crwdne2915182:0