crwdns2915892:0crwdne2915892:0
Use this guide to learn how to replace the glitching or shattered LCD screen of your Zeki TBQG884B.
Electronics are a big part of our lives and when they break it can be a great inconvenience. An LCD screen can stop working for many reasons such as the device's old age, overheating, or impact damage. A screen that isn't working properly means the potential loss of important information like passwords, class notes, or childhood pictures.
As a note of precaution, please be aware that the LCD screen is connected directly to the motherboard and assembled with the front frame. Remember to carefully follow the instructions so as to not damage your device as a whole.
This guide requires soldering, please visit the How To Solder and Desolder Connections guide for more information and advice.
Look at the teardown guide for instructions on general disassembly.
crwdns2942213:0crwdne2942213:0
-
-
Remove the two screws from the end of the device where the ports are located using a Phillips #1 screwdriver.
-
-
-
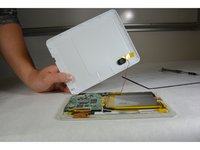
Place the tablet down so that the screen is facing away from you.
-
Insert the tip of your opening tool into the small gap between the gray and white plastic covering. Pry it open and you should hear the clips opening up.
-
Gently work your way around the perimeter of the tablet's edge.
-
-
-
Remove the back cover
-
Remove any tape on the speaker and detach the speaker from the back plate.
-
-
-
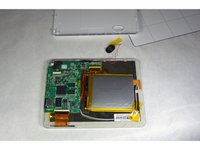
Disconnect the Wi-Fi antenna cable from the motherboard.
-
-
-
-
Using the Phillips #1 screwdriver, remove the three screws from the motherboard..
-
-
-
Open the ZIF connector. Then, remove the ribbon that connects the motherboard and the screen.
-
-
-
Disconnect the other ZIF connector on the opposite side of the motherboard.
-
-
-
Remove the motherboard and now reinsert all connectors into a new motherboard.
-
-
-
Use an opening tool to detach the clip between the front frame, and the metal loader.
-
-
-
Lift the metal loader up and separate it from the LCD screen.
-


To reassemble your device, follow these instructions in reverse order.
To reassemble your device, follow these instructions in reverse order.
crwdns2935221:0crwdne2935221:0
crwdns2935229:02crwdne2935229:0
crwdns2915084:0crwdne2915084:0

IUPUI, Team 1-3, Harley Fall 2015 crwdns2935289:0IUPUI, Team 1-3, Harley Fall 2015crwdne2935289:0
IUPUI-HARLEY-F15S1G3
crwdns2931471:05crwdne2931471:0
crwdns2935297:05crwdne2935297:0