crwdns2915892:0crwdne2915892:0
Over time, the battery life can run low and stop recharging. This guide will show you how to replace the battery. You will need a plastic opening tool, tweezers, a Phillips #00 screwdriver, a heat gun, and a plastic spudger to complete this guide.
crwdns2942213:0crwdne2942213:0
-
-
Flip the phone over so that the back panel of the phone is facing up.
-
Wedge the plastic opening tool between the black outer panel and the silver side panel.
-
Push down on the plastic opening tool to separate the back panel from the rest of the phone.
-
Continue to do this around all sides of the phone until the back panel has popped all the way off.
-
-
-
Using your fingers, slide the SIM card all the way out of the phone.
-
-
crwdns2935267:0crwdne2935267:0Tweezers$4.99
-
Remove the yellow Kapton tape by using the tweezers to peel it up and away from the device.
-
-
-
Using the Phillips #00 screwdriver, remove the two 3.0 mm screws located near the top of the phone, next to the rear camera.
-
-
-
Remove the fingerprint sensor flex cable, using the plastic opening tool to lift it out.
-
-
-
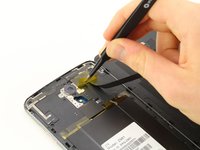
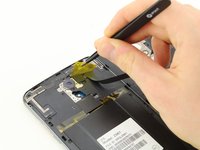
Using the tweezers, peel back the yellow Kapton tape located on the right side of the phone.
-
-
-
-
Using the Phillips #00 screwdriver, remove the 15, 3.0 mm rear panel screws located around the perimeter of the phone.
-
-
-
Flip the phone over so that the screen is facing up.
-
Wedge the plastic opening tool between the screen and the rear panel.
-
Push up on the opening tool to separate the panel from the phone.
-
Continue to do this around the entire phone until the rear panel is no longer connected to the device.
-
-
crwdns2935267:0crwdne2935267:0Tweezers$4.99
-
Use the tweezers to peel off the yellow Kapton tape.
-
-
-
Use the plastic opening tool to remove the connectors on the motherboard.
-
-
-
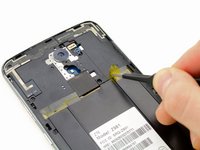
Use tweezers to remove the antenna. The antenna comes up on the right side of the phone, by the battery, and is attached to the motherboard.
-
-
-
Using the #00 Phillips screwdriver, remove the 3.0 mm screw located on the right edge of the phone, above the battery.
-
-
-
Wedge the plastic opening tool underneath the motherboard which is located at the top of the phone.
-
Push down on the plastic opening tool, lifting the motherboard away from the phone.
-
Continue to do this around all sides of the motherboard until it is fully removed from the phone.
-
-
crwdns2935267:0crwdne2935267:0Tweezers$4.99
-
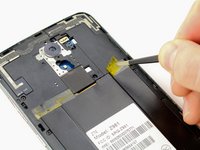
Use tweezers to peel off the tape at the bottom of the phone.
-
-
-
Wedge the plastic opening tool under the charging port board at the bottom of the phone.
-
Push down on the plastic opening tool so the board pulls away from the phone.
-
Continue to do this around the charging port board until it comes all the way off the phone.
-
-
-
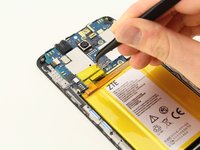
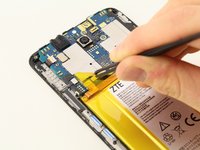
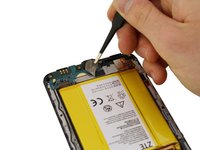
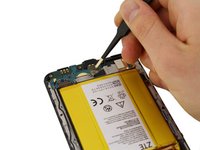
Use a heat gun to heat the adhesive under the battery.
-
Heat the battery for 1 minute then check if it is pliable. If needed, heat in intervals of 10 seconds until the battery can be removed.
-
-
-
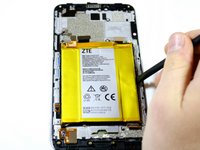
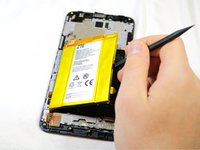
Use a nylon spudger to pry the battery from the phone.
Great instructions, however, if you - like me - just want to replace the battery: steps 10-15 are not necessary. After step 9, proceed to 16. Makes it a whole lot easier
Battery change worked, but now the screen is not working. Any ideas?
I accidentally ripped open the plastic on the grey side of the battery. Is it still okay to use?
After installing the new battery I got, my display wasn’t coming on. For me, I just didn’t seat the display connector (next to the top most antenna post). Disconnecting it and reseating it did the trick.
Also, you can run a thin plastic card (like a gift card) behind the battery to gradually work at the adhesive behind it. Just pop up a side with a spudger for clearance and shimmy the card back and forth to gradually remove the adhesive.
-


To reassemble your device, follow these instructions in reverse order.
To reassemble your device, follow these instructions in reverse order.
crwdns2935221:0crwdne2935221:0
crwdns2935229:018crwdne2935229:0

crwdns2915084:0crwdne2915084:0

Cal Poly, Team S17-G3, Livingston Spring 2018 crwdns2935289:0Cal Poly, Team S17-G3, Livingston Spring 2018crwdne2935289:0
CPSU-LIVINGSTON-S18S17G3
crwdns2931471:04crwdne2931471:0
crwdns2935297:016crwdne2935297:0
crwdns2947412:014crwdne2947412:0
This is much more difficult than it is depicted; while I’m not an electrician, I’ve acquired skills as a sailor over the past 8 years. Damage to the device is nearly guaranteed. I would NOT recommend trying this operation.
Have you actually tried? With the proper tools and care it doesn’t seem that difficult. But then I was a computer tech and repaired laptops. For anyone inexperienced or lacking patience, you’re probably right.
It’s actually pretty easy. I’m guessing your main concern is ESD… You can avoid electrostatic discharge by using the proper tooling and ESD mats.
The instructions were good. Please note the cable under the yellow tape is very thin and not really visible against the backdrop. Mine tore and made camera not function correctly.
Also note, I couldn't remove the last screw off the motherboard. It was too tightly inserted and was stripping by attempts. I turned my phone face down with gorilla glass against a heating pad on a low setting for just a few minutes to warm the adhesive on the battery. Keep the top section with the motherboard off the heating pad. This was the easiest thing to remove. Use a plastic spatula not a metallic one.
Just hit camera to ‘restore default' and camera seems fine. Guess this step was needed after reinstallation. So, only the fingerprint feature was slighted due to torn cable. I've had my phone nearly 3 years and never used that feature.
The time I needed to do the replacement was longer than the 20-25 minute estimate, because I made sure to double-check each step as I went in order to do it right.
While I wouldn’t recommend it, I softened the battery adhesive with a hair dryer, but the downside is that the battery is much more difficult to remove because the adhesive doesn’t soften as much (if at all), increasing the risk of physical/puncture damage to the battery during that step.
Anyway, I enjoyed this project, and the guide was great! It’s nice to be able to repair my own stuff, saving money and electronic waste in the process.
Pretty solid guide, thanks for posting. The hardest two steps are the first, and the 17th. In the first step, I was unable to remove the back cover using the plastic tool alone, and instead carefully used a very thin metal tool to get the process started. At that point, the plastic tools were sufficient to complete removal. In contrast, for step 17, I strictly used the plastic tool as indicated and via slow, steady application of force removed the battery. Heat may have helped but is not strictly necessary, or at least, I did not require it.
All in all a great guide, thanks again.
Anybody know the parts number to use when replacing the ZMAX pro battery
Li3934T44P8h876744 thats for the original 3400MaH
Yes! “lacking patience” type people probably will damage the phone. This sucks that it’s this hard to remove battery.
Great guide and easy to follow! Was able to complete this repair with ease!
what is the best battery to use to replace my old one ….i see alot of knock-off products
All this is not necessary to change the battery. Only need to go to step 8! DONT pull the mother board and DONT pull the charge board SKIP all that then just disconnect and pull the battery then install the new battery. If you pull the boards you may have problems and waste a lot of time at the least! Other than your instructions that have TOO many unnecessary steps it is well done and good reference to see inside the phone before trying to change the battery so Thanks for that : )