crwdns2933423:0crwdne2933423:0

ZTE ZMAX Z970 Power Button Replacement

crwdns2942213:0crwdne2942213:0

  1. ZTE ZMAX Z970 Power Button Replacement, Battery: crwdns2935265:01crwdnd2935265:01crwdnd2935265:02crwdne2935265:0 ZTE ZMAX Z970 Power Button Replacement, Battery: crwdns2935265:01crwdnd2935265:02crwdnd2935265:02crwdne2935265:0
    • Insert a fine point tool into the hole on the top left side of the phone to remove the SIM and SD card trays.

    • Pull out the trays.

  2. ZTE ZMAX Z970 Power Button Replacement: crwdns2935265:02crwdnd2935265:01crwdnd2935265:02crwdne2935265:0 ZTE ZMAX Z970 Power Button Replacement: crwdns2935265:02crwdnd2935265:02crwdnd2935265:02crwdne2935265:0
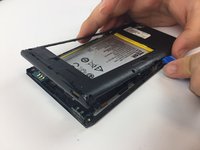
    • Insert a plastic opening tool into the groove between the phone’s back cover and casing.

    • Move the plastic opening tool along the edges of the phone to unclip the two pieces.

  3. ZTE ZMAX Z970 Power Button Replacement: crwdns2935265:03crwdnd2935265:01crwdnd2935265:03crwdne2935265:0 ZTE ZMAX Z970 Power Button Replacement: crwdns2935265:03crwdnd2935265:02crwdnd2935265:03crwdne2935265:0 ZTE ZMAX Z970 Power Button Replacement: crwdns2935265:03crwdnd2935265:03crwdnd2935265:03crwdne2935265:0
    • Remove the ten 1.2mm screws with a Phillips #000 screwdriver.

  4. ZTE ZMAX Z970 Power Button Replacement: crwdns2935265:04crwdnd2935265:01crwdnd2935265:02crwdne2935265:0 ZTE ZMAX Z970 Power Button Replacement: crwdns2935265:04crwdnd2935265:02crwdnd2935265:02crwdne2935265:0
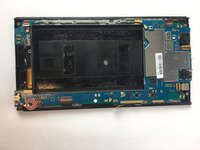
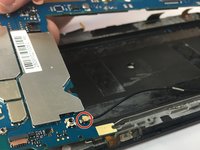
    • Remove the mid frame with the plastic opening tool.

  5. ZTE ZMAX Z970 Power Button Replacement: crwdns2935265:05crwdnd2935265:01crwdnd2935265:02crwdne2935265:0 ZTE ZMAX Z970 Power Button Replacement: crwdns2935265:05crwdnd2935265:02crwdnd2935265:02crwdne2935265:0
    • Disconnect the battery from the motherboard.

  6. ZTE ZMAX Z970 Power Button Replacement: crwdns2935265:06crwdnd2935265:01crwdnd2935265:02crwdne2935265:0 ZTE ZMAX Z970 Power Button Replacement: crwdns2935265:06crwdnd2935265:02crwdnd2935265:02crwdne2935265:0
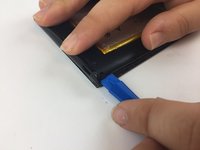
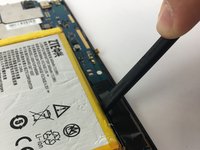
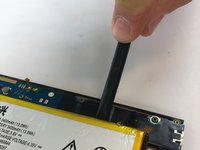
    • Wedge a spudger underneath the battery and gently pry upwards to remove the battery.

    • Once free from the glue, remove from device.

    • The glue holding down the battery is strong so work slow and cautiously to avoid starting a fire.

  7. ZTE ZMAX Z970 Power Button Replacement, Power Button: crwdns2935265:07crwdnd2935265:01crwdnd2935265:03crwdne2935265:0 ZTE ZMAX Z970 Power Button Replacement, Power Button: crwdns2935265:07crwdnd2935265:02crwdnd2935265:03crwdne2935265:0 ZTE ZMAX Z970 Power Button Replacement, Power Button: crwdns2935265:07crwdnd2935265:03crwdnd2935265:03crwdne2935265:0
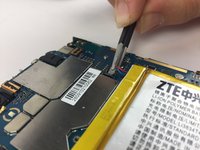
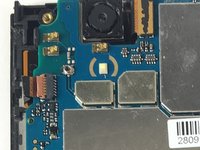
    • Remove the black tape covering the motherboard.

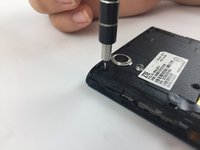
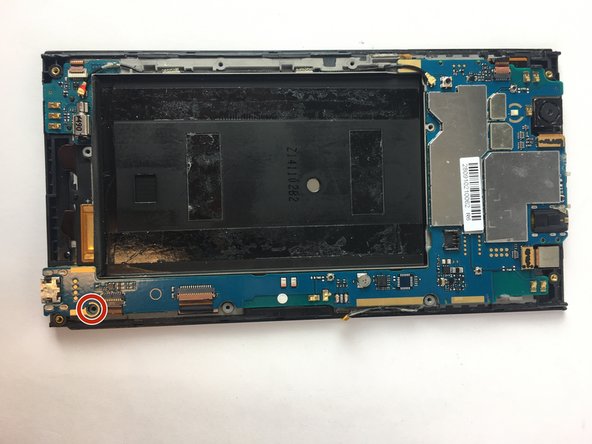
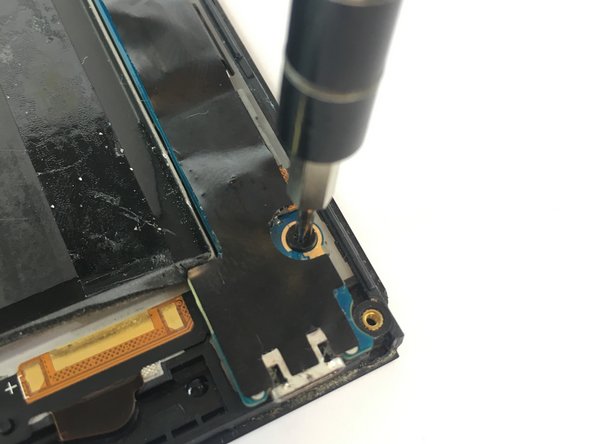
    • Remove the single 1.2mm screw with a Phillips #000 screwdriver.

  8. ZTE ZMAX Z970 Power Button Replacement: crwdns2935265:08crwdnd2935265:01crwdnd2935265:03crwdne2935265:0 ZTE ZMAX Z970 Power Button Replacement: crwdns2935265:08crwdnd2935265:02crwdnd2935265:03crwdne2935265:0 ZTE ZMAX Z970 Power Button Replacement: crwdns2935265:08crwdnd2935265:03crwdnd2935265:03crwdne2935265:0
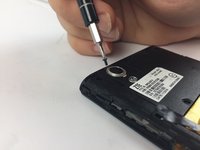
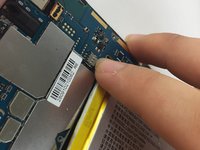
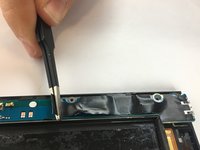
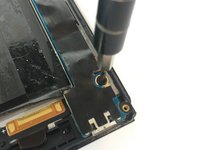
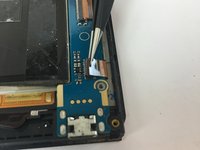
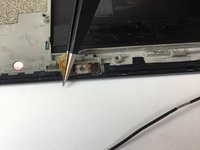
    • Use the flat end of the spudger to release the upper left and right prongs that secure the motherboard.

    • Detach the antenna cable.

  9. ZTE ZMAX Z970 Power Button Replacement: crwdns2935265:09crwdnd2935265:01crwdnd2935265:03crwdne2935265:0 ZTE ZMAX Z970 Power Button Replacement: crwdns2935265:09crwdnd2935265:02crwdnd2935265:03crwdne2935265:0 ZTE ZMAX Z970 Power Button Replacement: crwdns2935265:09crwdnd2935265:03crwdnd2935265:03crwdne2935265:0
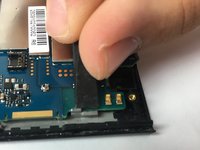
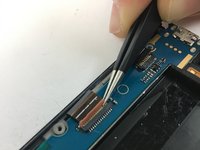
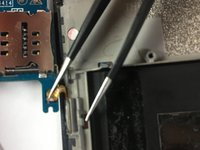
    • Lift up the tan flap on the three ZIF connectors.

    • Pull the ribbon out of the now unlocked ZIF connectors.

  10. ZTE ZMAX Z970 Power Button Replacement: crwdns2935265:010crwdnd2935265:01crwdnd2935265:02crwdne2935265:0 ZTE ZMAX Z970 Power Button Replacement: crwdns2935265:010crwdnd2935265:02crwdnd2935265:02crwdne2935265:0
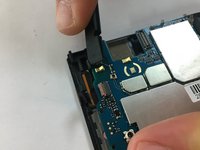
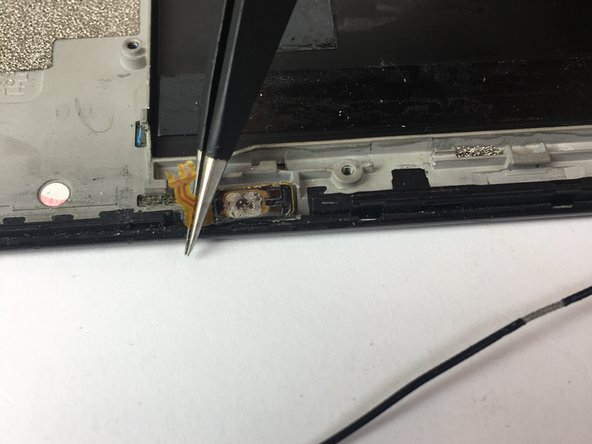
    • Lift the covering panel below the motherboard covering and connecting the power button.

    • Disconnect the circuit tape of the power button and remove the power button.

    • The power button in these photos has been damaged and not soldered to the motherboard.

    • The new power button will have to be desoldered to the mother board.

crwdns2915888:0crwdne2915888:0

To reassemble your device, follow these instructions in reverse order.

Burak Cengiz

crwdns2935283:002/15/18crwdne2935283:0

480 crwdns2915208:0crwdne2915208:0

crwdns2935297:04crwdne2935297:0

crwdns2915084:0crwdne2915084:0

USF Tampa, Team S17-G3, Boczar Spring 2018 crwdns2935289:0USF Tampa, Team S17-G3, Boczar Spring 2018crwdne2935289:0

USFT-BOCZAR-S18S17G3

crwdns2931471:03crwdne2931471:0

crwdns2935297:010crwdne2935297:0

crwdns2944067:00crwdne2944067:0

crwdns2917038:0crwdne2917038:0

crwdns2936625:0crwdne2936625:0:

crwdns2936751:024crwdne2936751:0 0

crwdns2936753:07crwdne2936753:0 1

crwdns2936753:030crwdne2936753:0 13

crwdns2942667:0crwdne2942667:0 530