crwdns2915892:0crwdne2915892:0
Has your ZTE Quest’s rear-facing camera been badly scratched or damaged? This guide will provide instructions on how to replace your camera. All you need is a plastic opening tool, some tweezers, and a JIS #000 screwdriver.
crwdns2942213:0crwdne2942213:0
-
-
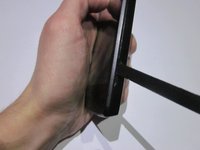
Orient the device so that the inset on the right side of the device is facing you.
-
Insert the spudger into the inset and carefully remove the back panel.
-
-
-
Use the ribbon to remove the exposed battery.
-
-
-
Use the JIS #000 screwdriver to remove the six 3.0mm screws placed in the back of the ZTE Quest.
-
-
-
-
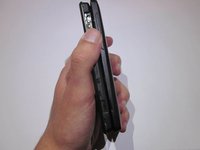
Carefully pry open the back panel with the plastic opening tool.
-
-
crwdns2935267:0crwdne2935267:0Tweezers$4.99
-
Use a pair of tweezers to gently disconnect the ribbon cable connector from its socket.
-
-
-
Pull back the tape encasing the brown ribbon cable connector.
-
Remove the ribbon cable from its socket.
-
-
-
Unplug the flat-top connector by using a pair of tweezers to pry up each side before removing the connector from its socket.
-
-
-
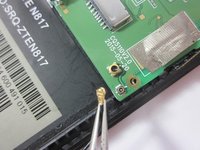
Disconnect the coaxial connector in the bottom right corner of the motherboard.
-
-
crwdns2935267:0crwdne2935267:0Tweezers$4.99
-
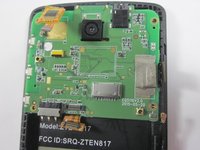
Flip the motherboard over and find the camera’s flat-top connector.
-
Gently pry up each side of the connector with a pair of tweezers before fully removing it.
-


To reassemble your device, follow these instructions in reverse order.
crwdns2935221:0crwdne2935221:0
crwdns2935227:0crwdne2935227:0

crwdns2935287:0crwdne2935287:0

UMass Dartmouth, Team S3-G6, Peak Fall 2018 crwdns2935289:0UMass Dartmouth, Team S3-G6, Peak Fall 2018crwdne2935289:0
UMASSD-PEAK-F18S3G6
crwdns2931471:03crwdne2931471:0
crwdns2935297:010crwdne2935297:0