crwdns2915892:0crwdne2915892:0
Follow this guide to disassemble the ZTE Blade Spark device and replace the rear-facing camera.
-
-
First, apply heat evenly on the back cover using a heat sack to soften the adhesive.
-
-
-
Now, carefully remove the back cover.
-
-
-
Once opened, Locate and remove all exposed screws using a Phillips-Head screwdriver and set them aside.
-
-
-
To remove the inner white panel/cover, use a plastic opening tool to loosen from each side.
-
-
-
-
After removing the white plastic panel, you should see a black metal battery cover.
-
To remove the metal battery cover, remove the screws from the panel using a Phillips screwdriver if you have not yet done so.
-
-
-
Then, simple lift to remove the metal battery cover.
-
-
-
You have reached the Fingerprint Scanner, the device Battery, and Front Facing Camera.
-
-
-
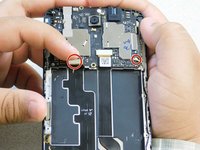
Proceeding with disassembly, next up is the top chipset which the Rear Facing Camera is attached to.
-
To detach the chipset and reach the Rear Camera, locate and disconnect five power connectors surrounding the top chipset (as shown in images).
-
-
-
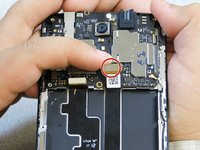
Once you have the power connectors disconnected from the top chipset, use a Phillips screwdriver to remove the final screw located at the very top of the chipset (as shown in image).
-
-
-
Then, simply lift chipset from top and detach from the device frame.
-
-
-
You have now reached the final replacement component of the device, the Rear Facing Camera!
-
For step-by-step instructions on replacing any of the device components covered throughout the disassembly process, check out our ZTE Blade Spark Replacement guides.
-


To reassemble your device, follow these instructions in reverse order.
crwdns2935221:0crwdne2935221:0
crwdns2935229:02crwdne2935229:0

crwdns2935287:0crwdne2935287:0

Gateway, Team S1-G6, Johnson Spring 2018 crwdns2935289:0Gateway, Team S1-G6, Johnson Spring 2018crwdne2935289:0
GCC-JOHNSON-S18S1G6
crwdns2931471:02crwdne2931471:0
crwdns2935297:02crwdne2935297:0