crwdns2915892:0crwdne2915892:0
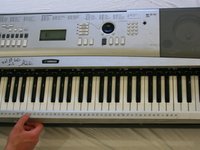
Learn to remove and replace a broken key for your keyboard with this guide. The process is fairly simple and mostly requires the removal of screws.
crwdns2942213:0crwdne2942213:0
-
-
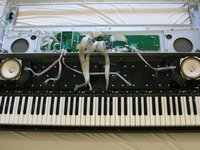
Turn the keyboard over so that the keys are facing the ground.
-
-
-
Pop the tabs on the battery casing and remove it from the back plate.
-
-
-
Locate the six batteries and remove them from the battery cavity.
-
-
-
Remove the six 10mm screws at the top of the backplate.
-
-
-
-
Remove the seven 12mm screws in the middle of the back plate.
-
-
-
Remove the eight 10mm screws from the side and the bottom of the back plate.
-
-
-
Lifting from the front and the back of the face plate equally, pull the face plate up and then back, away from the keyboard.
-
-
-
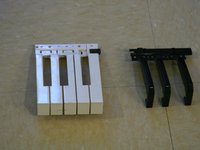
Remove the 32mm screws that hold keys down.
-
-
-
Remove the block of keys that holds the key you wish to install.
-
To do this, apply a small force away from the top of the keys and slightly toward the floor.
-
If done correctly, the block of keys will come to a slight downward angle.
-
-
-
Press the tab on the back side of the block of keys out and detach the black keys.
-
-
-
Remove the individual white key(s) or the black key set(s) that require replacement.
-


To reassemble your device, follow these instructions in reverse order.
To reassemble your device, follow these instructions in reverse order.
crwdns2935221:0crwdne2935221:0
crwdns2935229:07crwdne2935229:0
crwdns2915084:0crwdne2915084:0

Cal Poly, Team 2-62, Propen Fall 2012 crwdns2935289:0Cal Poly, Team 2-62, Propen Fall 2012crwdne2935289:0
CPSU-PROPEN-F12S2G62
crwdns2931471:02crwdne2931471:0
crwdns2935297:06crwdne2935297:0
crwdns2947412:03crwdne2947412:0
Excellent, Although I've got a different type of yamaha keyboard, still good inside info.
Great article. Thank you so much.
The instructions were very good and easy to understand. Question on the same subject. How about keys that have popped up on the key bed.