crwdns2915892:0crwdne2915892:0
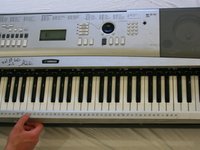
Use this guide to install a replacement keyboard display.
crwdns2942213:0crwdne2942213:0
-
-
Turn the keyboard over so that the keys are facing the ground.
-
-
-
Pop the tabs on the battery casing and remove it from the back plate.
-
-
-
Locate the six batteries and remove them from the battery cavity.
-
-
-
Remove the six 10mm screws at the top of the backplate.
-
-
-
Remove the seven 12mm screws in the middle of the back plate.
-
-
-
-
Remove the eight 10mm screws from the side and the bottom of the back plate.
-
-
-
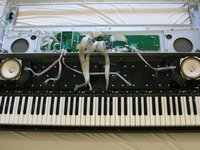
Lifting from the front and the back of the face plate equally, pull the face plate up and then back, away from the keyboard.
-
-
-
Locate the main circuit board in the middle of the detached face plate.
-
-
-
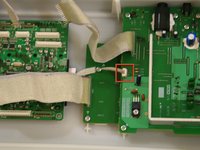
Use a plastic opening tool or spudger to carefully pry up the beige ribbon connectors and remove the wires from them.
-
Use a slightly upward force as parallel to the ground as possible.
-
Be sure to unplug the smaller ribbon that connects to a different circuit board.
-
-
-
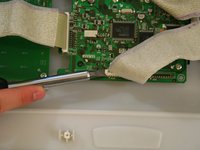
Move the ribbons out of the way, and remove the eight 10mm screws in the middle that hold the circuit board down.
-
Remove the two 12mm screws in the corner of the circuit board.
-
-
-
Completely remove the circuit board from the face plate.
-
-
-
Slide out the screen from its case on the circuit board.
-


To reassemble your device, follow these instructions in reverse order.
To reassemble your device, follow these instructions in reverse order.
crwdns2935221:0crwdne2935221:0
crwdns2935229:02crwdne2935229:0
crwdns2915084:0crwdne2915084:0

Cal Poly, Team 2-62, Propen Fall 2012 crwdns2935289:0Cal Poly, Team 2-62, Propen Fall 2012crwdne2935289:0
CPSU-PROPEN-F12S2G62
crwdns2931471:02crwdne2931471:0
crwdns2935297:06crwdne2935297:0