crwdns2933423:0crwdne2933423:0

Yamaha GA-10 Speaker Replacement

crwdns2942213:0crwdne2942213:0

  1. Yamaha GA-10 Speaker Replacement, Speaker: crwdns2935265:01crwdnd2935265:01crwdnd2935265:03crwdne2935265:0 Yamaha GA-10 Speaker Replacement, Speaker: crwdns2935265:01crwdnd2935265:02crwdnd2935265:03crwdne2935265:0 Yamaha GA-10 Speaker Replacement, Speaker: crwdns2935265:01crwdnd2935265:03crwdnd2935265:03crwdne2935265:0
    • Turn the amp so the back is facing you.

    • Using the Phillips #0 screwdriver, remove the two screws found at the back-bottom of the amp.

    • Remove the panel that partially covers the speaker.

  2. Yamaha GA-10 Speaker Replacement: crwdns2935265:02crwdnd2935265:01crwdnd2935265:02crwdne2935265:0 Yamaha GA-10 Speaker Replacement: crwdns2935265:02crwdnd2935265:02crwdnd2935265:02crwdne2935265:0
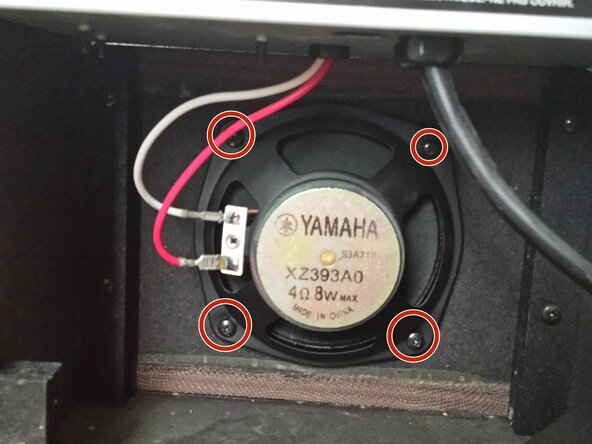
    • Remove the four PH00 screws securing the speaker.

  3. Yamaha GA-10 Speaker Replacement: crwdns2935265:03crwdnd2935265:01crwdnd2935265:01crwdne2935265:0
    • Remove the speaker from the amp to see the two wires connecting it more clearly.

  4. Yamaha GA-10 Speaker Replacement: crwdns2935265:04crwdnd2935265:01crwdnd2935265:01crwdne2935265:0
    • Gently pull the wires out of the speaker one at a time.

crwdns2915888:0crwdne2915888:0

To reassemble your device, follow these instructions in reverse order.

Joel H Murphey

crwdns2935283:005/21/19crwdne2935283:0

133 crwdns2915208:0crwdne2915208:0

crwdns2935295:0crwdne2935295:0

crwdns2915084:0crwdne2915084:0

University of Advancing Technology, Team S1-G3, Beam Summer 2019 crwdns2935289:0University of Advancing Technology, Team S1-G3, Beam Summer 2019crwdne2935289:0

UAT-BEAM-SU19S1G3

crwdns2931471:02crwdne2931471:0

crwdns2935303:01crwdne2935303:0

crwdns2947412:00crwdne2947412:0

crwdns2917038:0crwdne2917038:0

crwdns2936625:0crwdne2936625:0:

crwdns2936751:024crwdne2936751:0 0

crwdns2936753:07crwdne2936753:0 1

crwdns2936753:030crwdne2936753:0 9

crwdns2942667:0crwdne2942667:0 599