crwdns2915892:0crwdne2915892:0
Use this guide to remove the screen assembly of your Xiaomi Redmi 2 for repair or replacement of any parts attached.
crwdns2942213:0crwdne2942213:0
-
-
Use the flat end of the spudger to remove the back panel from the mid-frame and front body.
-
-
-
Insert your finger into the curved opening of the mid-frame.
-
Lift the battery and remove.
-
-
-
Remove twelve 3.4 mm Phillips #000 screws securing the mid-frame to the front body.
-
-
-
Slide the spudger between the mid-frame and front body, gradually prying the two bodies apart as you slide the spudger around the perimeter of the phone.
-
-
-
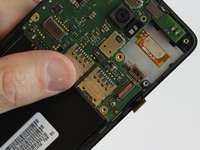
Remove the 3.4 mm Phillips #000 screw that holds the motherboard to the front body.
-
-
crwdns2935267:0crwdne2935267:0Tweezers$4.99
-
Using one prong of the tweezers, pry back the brown clip located on top of the LCD ribbon connector.
-
-
-
-
Using one prong of the tweezers, pry the ribbon clip away from the motherboard.
-
-
-
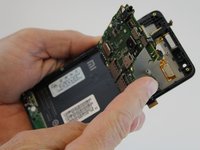
Lift and hinge the motherboard with your fingers.
-
-
-
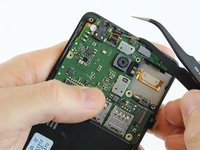
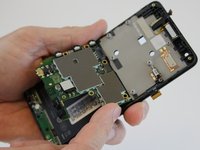
Using one prong of the tweezers, lift and pry back the metal clip positioned over the front proximity sensor ribbon connector.
-
-
-
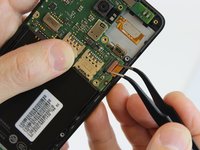
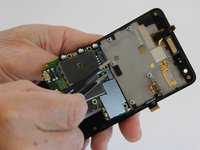
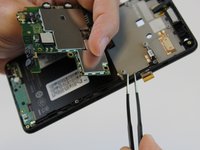
Using the tweezers, pull the antenna connector from the motherboard.
-
-
-
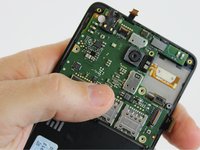
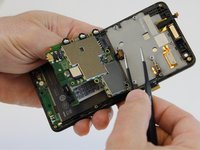
Lift the motherboard out of the front cover and set aside.
-
-
-
Using the nylon or metal spudger, gently pry the front speaker from the screen assembly.
-
-
-
Using your fingers, gently lift the front speaker from the screen assembly.
-
-
-
Remove the 2.9 mm Phillips #000 screw that holds the PCB circuit board to the screen assembly.
-
-
crwdns2935267:0crwdne2935267:0Tweezers$4.99
-
Using the tweezers, lift the antenna connector from the PCB circuit board.
-
-
-
Using the nylon or metal spudger, gently pry back the top of the PCB circuit board from the screen assembly.
-
-
-
Using the nylon or metal spudger, pry back the silver clip covering the ribbon connector.
-
-
-
Carefully lift the PCB circuit board from the screen assembly and set aside.
-
The screen assembly is pictured to the left of the circuit board and is now ready for repair or replacement.
-


To reassemble your device, follow these instructions in reverse order.
To reassemble your device, follow these instructions in reverse order.
crwdns2935221:0crwdne2935221:0
crwdns2935229:031crwdne2935229:0
crwdns2915084:0crwdne2915084:0

USF Tampa, Team 1-3, Leahy Fall 2015 crwdns2935289:0USF Tampa, Team 1-3, Leahy Fall 2015crwdne2935289:0
USFT-LEAHY-F15S1G3
crwdns2931471:02crwdne2931471:0
crwdns2935297:05crwdne2935297:0
crwdns2947412:02crwdne2947412:0
ok so good is can service nice
Touch is not working after replacing full LCD, Brought new display & changed again but no luck, Display is okay but touch not working.