crwdns2915892:0crwdne2915892:0
The battery is the component that powers all the other aspects of your Xiaomi Mi A2 (Model M1804D2SG). The use and charging cycle of a battery can cause it to degrade in its charging capacity and over time your phone may not hold a charge as much as it used to. If your Xiaomi Mi A2 is not turning on make sure to follow the steps outlined in this troubleshooting guide before resorting to a replacement.
If your battery is swollen, take appropriate precautions. Do not heat your phone. If needed, you can use a dropper or syringe to inject isopropyl alcohol (90+%) around the edges of the back cover to weaken the adhesive. Swollen batteries can be very dangerous, so wear eye protection and exercise due caution, or take it to a professional if you’re not sure how to proceed.
For optimal performance, calibrate your newly installed battery: Charge it to 100% and keep charging it for at least 2 more hours. Then use your device until it shuts off due to low battery. Finally, charge it uninterrupted to 100%.
crwdns2942213:0crwdne2942213:0
-
-
Turn off your phone before proceeding.
-
Remove SIM card tray from phone.
-
-
-
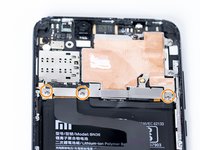
Remove the two 2.7mm Pentalobe #2 screws from the bottom of the phone.
-
-
-
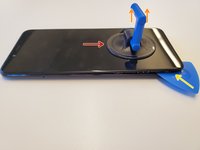
Grab a suction cup tool and place it near the bottom of the phone.
-
Pull up on the suction cup to slightly lift the LCD Panel from the body of the phone.
-
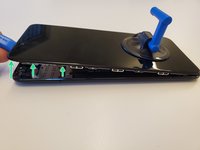
Starting from the bottom, slide in a plastic opening tool between the gap of the LCD and the phone.
-
Using a combination of the plastic opening tool and picks, slide around the gaps to unhook the clips, unhinging the panel from the body of the phone.
-
Flip the phone screen towards the bottom of the device and lay the screen facing down.
-
-
-
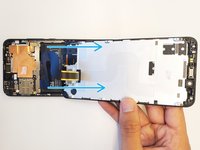
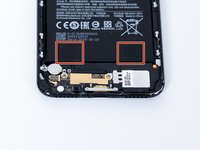
To access the ribbon cable connectors we must remove the metal bracket.
-
Remove the three 2.4mm Philips #0 screws that hold the panel down.
-
-
-
-
Using a plastic spudger remove the battery connector ribbon cable by getting underneath the connector and gently lifting it off.
-
Using a plastic sudger remove the screen connector ribbon cable by lifting from the underneath.
-
After you remove the ribbon cable the panel should be free to remove and replace.
-
-
-
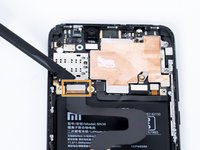
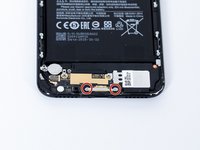
Remove the two 3.8mm Phillips #0 screws holding down the lower metal bracket.
-
-
-
Remove the loud speaker. There are three 2.4mm Phillips #0 screws you need to remove, and one (upper right) is underneath the Xiaomi water sticker.
-
-
-
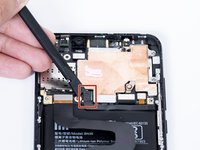
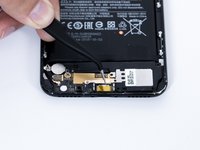
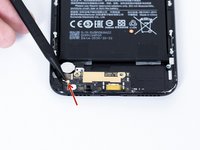
Unplug the antenna wire with a spudger tool.
-
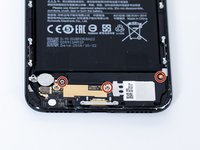
Remove another 2.4mm Phillips #0 screw near vibration motor.
-
-
-
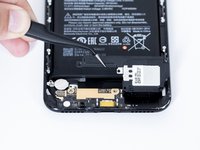
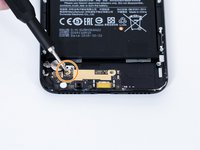
Use a spudger tool to remove the cable from the connector.
-
-
crwdns2935267:0crwdne2935267:0Tweezers$4.99
-
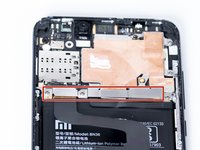
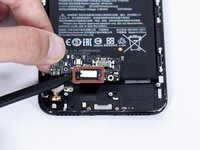
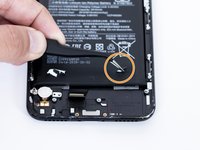
On the bottom of the battery are two pull tabs. They are glued on to the battery similarly like a sticker.
-
To remove the battery pull these pull tabs downwards. WARNING: proceed with extreme caution, avoid bending or puncturing the battery.
-
You can use tweezers to lift the pull tabs from the battery. Pull downwards and the adhesive will slowly be removed from the battery.
-
-
-
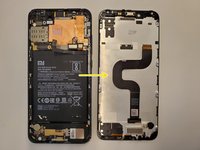
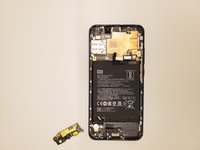
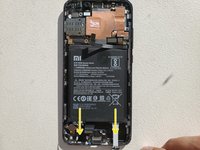
Gently remove battery from its housing.
-


To reassemble your device, follow these instructions in reverse order.
To reassemble your device, follow these instructions in reverse order.
crwdns2935221:0crwdne2935221:0
crwdns2935229:014crwdne2935229:0
crwdns2915084:0crwdne2915084:0

UC Santa Barbara, Team S27-G27, Bator Fall 2019 crwdns2935289:0UC Santa Barbara, Team S27-G27, Bator Fall 2019crwdne2935289:0
UCSB-BATOR-F19S27G27
crwdns2931471:03crwdne2931471:0
crwdns2935297:04crwdne2935297:0
crwdns2947412:04crwdne2947412:0
I tried to remove the battery and tried to remove those strips carefully but the both broke so is there another way i could remove the battery
The link for the replacement battery is wrong, it leads to a battery for the xiaomi mi a2 lite which doesn’t fit into the mi a2 because the connector is at a different position
I just replaced the battery and just a heads up if anyone is struggling to remove the screen from the body - there was adhesive, so warm it up a little if it doesn’t lift easily. Reminded me a bit of iPhone 6s screen removal as the screen was near the same structure, cable was in different place.
I struggled to follow step 10 to get the strips off the battery. the strips just broke into small bits and left lots of adhesive behind. Ended up prising the battery off the stickers which I wouldn't recommend at all - battery was bending etc... but it worked - once you get enough daylight under the battery to fit a spudger, you can break the adhesive bond bit by bit using that.