crwdns2915892:0crwdne2915892:0
This guide will show you how to remove and replace the optical disc drive on the Xbox One S. This procedure is necessary if your gaming system will not read any gaming disks or movies. The tools necessary are a screwdriver (i.e. a Torx Security Screwdriver) and any slim pry tool. This process requires gentle hands and patience, as it can take more than a few minutes. Light soldering may be required when dealing with the drive’s wires.
crwdns2942213:0crwdne2942213:0
-
-
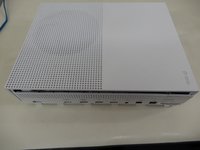
Flip the Xbox One S so that the bottom of the case is facing upward.
-
-
-
Begin by working at the case on the rear where the warranty sticker is located. Insert the plastic opening tool into the gap between the bottom of the case and the grated top side. Then find the clips in between that hold the case in place. Use the opening tool to pop the clips out. The best method is to pry the black case away from the bottom.
-
Use the opening tool to pop the clips out. The best method is to pry the black case away from the bottom.
Be careful not to damage the pairing button on this part
Important!!
You've to start from the back corner where is the information label, because there is a main clip behind a warranty sticker
They should add this to the guide! I didnt know that, and did some minor damage to the bottom piece where that main clip is.
I dont mind because it's my own Xbox, but what if it belonged to a customer?
They should add this to the guide! I didnt know that, and did some minor damage to the bottom piece where that main clip is.
I dont mind because it's my own Xbox, but what if it belonged to a customer?
💯% same opinion!
This was hard! I tried using plastic pry tools, but they did not work. A metal tool did, but make sure to watch a video or two, to see what you actually are dealing with. After the videos it went quite smoothly.
I legitimately cannot open the case where the warranty sticker is, ive tried everything, im resorting to a fork to try and open this
nothing is moving... not sure what I am doing wrong but I can't feel any clips anywhere. I'm genuinely scared to break something.
undid all the clips on the back and nothing moves more than a few millimeters... is there actually a good guide out there that doesn't promote breaking plastic?
-
-
-
Once all of the clips are opened, remove the bottom part of the case.
-
-
-
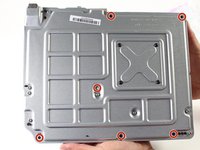
Use a T10 Torx screwdriver to remove the six green 50 mm long screws from the metal case labeled F1 through F6.
My F3 isn't coming out. The screwdriver isn't sitting tight like it is for the other ones. Any idea on how to fix that?
-
-
-
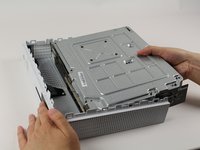
Gently separate the interior case from the white exterior case using the appropriate method.
-
Pry the white plastic sides outwards at the rear to separate from the plastic I/O shield.
Essential tip: be sure to slide the metal housing backward, away from the from of the case as pictured above, rather than upward. If not, you can easily break off the teeny momentary switches on the IR blaster board!
“appropriate method is not descriptive like Mr. Ross’s comment. The original poster should edit the description to ensure people do in fact remove the box from the case appropriately. I would also add arrows to the picture.
____________⬆️
↖️Yes! I see it the same way!↗️
⬅️Arrows are always a good thing!➡️
↙️Can't do anything wrong with them! ↘️
____________⬇️
😅😅
I didn't realize that metal ribbon was connecting the case to the console and I yanked it w out realizing it was there. How o I get a replacement?
-
-
-
-
Flip the interior case so it is fan side upward.
-
-
-
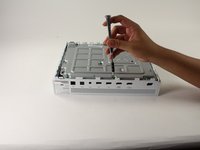
To access the hardware within the casing, you can pop and lift the top panel of the casing. It should come right off.
-
-
-
To replace the hard drive, flip over the console and remove the two 10 mm T-10 Torx screws, C3 and C5, from the backside of the Xbox One S.
Some of my silver were gold screws, so just letting people know to look out for that!
The Torx screw circled on the left is actually C5
I found the same. On my Xbox One S, it's C3 and C5 that hold in the hard drive caddy. C4 holds in the optical disk caddy.
jamesr -
Yeah, C3 and C5 on my console too.
Funny thing on my console rev t t3 built feb 2018 it’s C4 and C5
The instructions fail to mention that the top metal cover can be lifted off at this point without undoing any more screws.
-
-
-
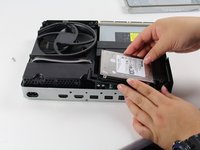
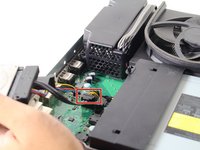
Gently disconnect the hard drive from the motherboard (at the two plastic connector bodies).
Do not disconnect the connector in the second image! There are tiny prongs that bend easily and if bent just a tad bit they will break off. I had first hand experience with this and I ended up breaking my Xbox because I could not put that cable back on.
Do not remove the cable!!!! You can change while the cables are plugged. It took 2 hours trying to put mm precisely all the little pins because of the removal of the cables.
Please update the post, I could easily end up as the Aaron, breaking the XBOX completly.
Yes, this has also happened to me the connectors had broken and the pins bent and snapped off.
c3 and c5 are reversed in the pictures
-
-
-
To remove the optical disc drive, remove the silver 10 mm T-10 Torx screw labeled "C4."
The image shows screw 'C4' witch is the correct screw. 'C5' is for the HDD.
-
-
-
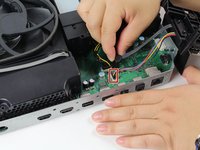
Pull the disc drive slightly off the motherboard and disconnect the plastic connectors from the motherboard.
-
-
-
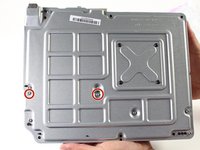
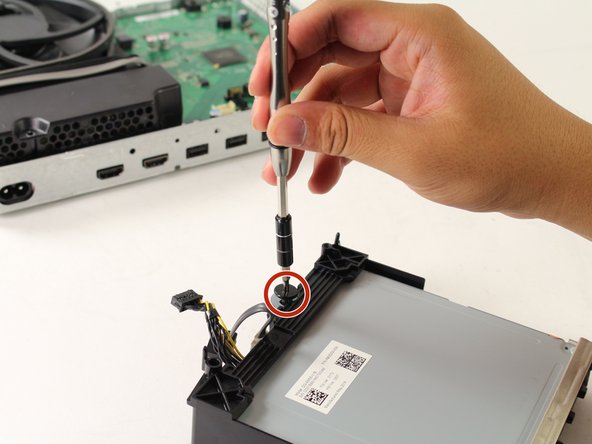
Remove the black, flat Torx screw from the bottom of the optical drive.
-
-
-
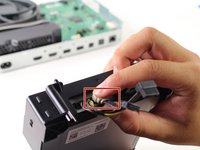
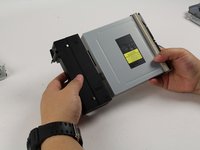
Detach the wires from the disc drive and slide the drive out.
It’s not sliding out!
Wie heißt das graue Kabel das ihr zum Schluss herauszieht? bei mir sind die Kontakte abgebrochen und ich brauche ein neues!!!
Hey.. nach dem Austausch sagt mir “XBOX” dass das Laufwerk nicht verfügbar ist, aber die XBOX trotzdem verwendbar ist???
Do you have a tutorial for swapping the daughter board for the Blue-Ray drive since is required for it to function?
-


To reassemble your device, follow these instructions in reverse order.
To reassemble your device, follow these instructions in reverse order.
crwdns2935221:0crwdne2935221:0
crwdns2935229:029crwdne2935229:0
crwdns2915084:0crwdne2915084:0

Cal Poly, Team S22-G3, Livingston Spring 2017 crwdns2935289:0Cal Poly, Team S22-G3, Livingston Spring 2017crwdne2935289:0
CPSU-LIVINGSTON-S17S22G3
crwdns2931471:04crwdne2931471:0
crwdns2935297:059crwdne2935297:0
crwdns2947412:09crwdne2947412:0
Why do you have to replace the motherboard when replacing the optical disc drive?
because Microsoft puts a security code on the motherboard to pair the drive with the motherboard. so if they don’t match, all it will do is read DVDs and not play any games. Depending on the drive, sometimes you have to Unsolder and resolder the wires going to the motherboard. Other times, it can just be a series of clips for 2 cables and a plug.
If you learned basic soldering in High School, it isn’t too hard to solder.
Lawrence -
what do you need to solder, pics please…
Helped me get to the optical drive in order to disassemble it and remove a coin that was blocking the motor (gotta love toddlers). Thanks!
Is this what is to be done if the laser unit seems to be faulty?
I have a friend who couldn’t wait for me to replace his optical drive so he did it himself without proper instructions and forgot to replace the cd drive motherboard on the new drive. He ended up throwing away the old drive and now his Xbox gets stuck on an update error. Is there anyway to just bypass the drive and just use it as a digital version?
On the Xbox 360 you had to swap the PCB from the drive onto the new one. It's that what you mean when you mention the “paired motherboard" or do you actually mean the motherboard from the XBOX ONE?
Replaced still not working
Thanks for this, quick and easy fix to gain access to the optical drive and repair it (toddlers love to shove things in there!). For step 10, my XBox had it labeled C5 but the image is correct for placement.