crwdns2915892:0crwdne2915892:0
If you want to replace the hard drive with one that has a larger capacity, this guide will teach you how to replace the hard drive.
crwdns2942213:0crwdne2942213:0
-
-
Flip the Xbox One S so that the bottom of the case is facing upward.
-
-
-
Begin by working at the case on the rear where the warranty sticker is located. Insert the plastic opening tool into the gap between the bottom of the case and the grated top side. Then find the clips in between that hold the case in place. Use the opening tool to pop the clips out. The best method is to pry the black case away from the bottom.
-
Use the opening tool to pop the clips out. The best method is to pry the black case away from the bottom.
-
-
-
Once all of the clips are opened, remove the bottom part of the case.
-
-
-
-
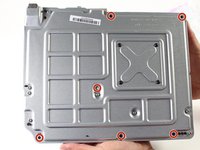
Use a T10 Torx screwdriver to remove the six green 50 mm long screws from the metal case labeled F1 through F6.
-
-
-
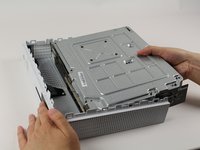
Gently separate the interior case from the white exterior case using the appropriate method.
-
Pry the white plastic sides outwards at the rear to separate from the plastic I/O shield.
-
-
-
Flip the interior case so it is fan side upward.
-
-
-
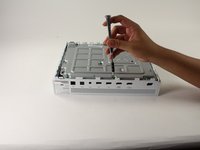
To access the hardware within the casing, you can pop and lift the top panel of the casing. It should come right off.
-
-
-
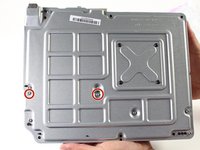
To replace the hard drive, flip over the console and remove the two 10 mm T-10 Torx screws, C3 and C5, from the backside of the Xbox One S.
-
-
-
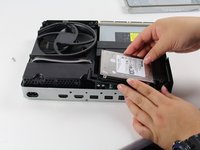
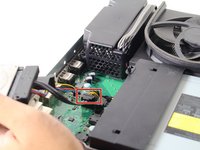
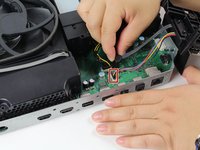
Gently disconnect the hard drive from the motherboard (at the two plastic connector bodies).
-


To reassemble your device, follow these instructions in reverse order.
To reassemble your device, follow these instructions in reverse order.
crwdns2935221:0crwdne2935221:0
crwdns2935229:016crwdne2935229:0
crwdns2915084:0crwdne2915084:0

Cal Poly, Team S22-G3, Livingston Spring 2017 crwdns2935289:0Cal Poly, Team S22-G3, Livingston Spring 2017crwdne2935289:0
CPSU-LIVINGSTON-S17S22G3
crwdns2931471:04crwdne2931471:0
crwdns2935297:059crwdne2935297:0
crwdns2947410:01crwdne2947410:0
My F3 isn't coming out. The screwdriver isn't sitting tight like it is for the other ones. Any idea on how to fix that?