crwdns2915892:0crwdne2915892:0
Stuck disk? Having trouble installing that new game, or loading up your Blu-ray copy of Con Air? Follow this guide to replace a broken optical drive in your Xbox One.
crwdns2942213:0crwdne2942213:0
crwdns2936621:0crwdne2936621:0
-
-
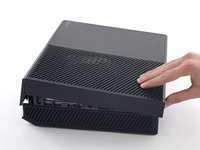
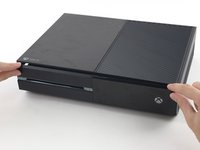
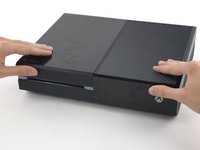
To open your Xbox, you're going to have to cut or peel up this tamper-evident tape. But don't worry—Microsoft can't legally void your warranty, as long as you don't damage anything. Have fun!
-
-
-
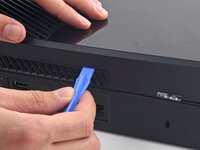
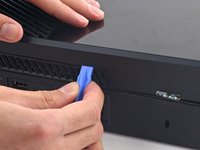
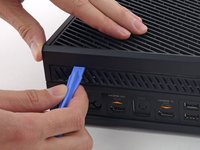
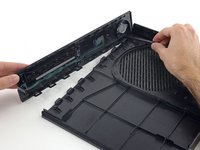
Use a plastic opening tool to pry up and remove the plastic vent that surrounds the side USB port.
-
The vent is fairly flexible, and held in place with weak plastic clips—start prying from the back and peel it out.
- 플라스틱 오프닝 도구를 애용해서 측면 usb 포트를 둘러싼 통풍구를 들어올려 분리하세요.
- 이 통풍구는 무척 유연하며 연약한 플라스틱 클립으로 고정되어 있습니다. 뒤쪽에서부터 들어올려 분리하고 떼어냅니다.
-
-
-
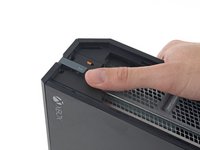
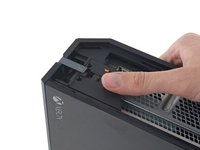
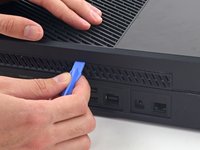
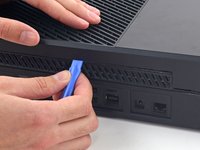
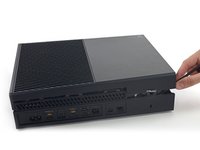
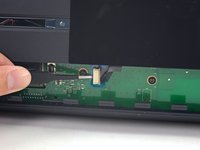
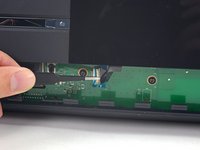
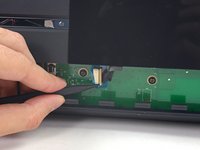
Slide the tab straight back and remove it.
Do u sell that plastic tag I need it
Here is What's Stated in Step-3 : (There is a small plastic tab that reinforces the front corner of the Xbox.) Actually, the "Tab" is NOT SMALL at all. See the Picture: The "TAB" is the Piece that this Person has their Thumb on, is the Tab that you NEED TO SLIDE TOWARDS THE "REAR" of the Unit. You will be able to tell How this Large Tab Holds the Top and the Bottom Case Covers together. Take Note how to Replace this tab back where it Belongs, when you are putting the Case Covers back together. Hope that this comment will help you. 6-29-2017
- xbox의 전면 모서리를 지지하는 작은 플라스틱 탭이 있습니다.
- 뒤쪽으로 똑바로 밀어서 제거하세요.
What is this small tab referred to as?
What is it called i need to order one.
-
-
-
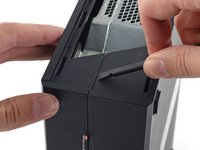
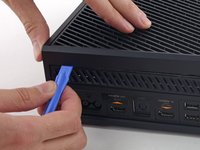
Insert the flat end of a spudger between the upper and lower case where they meet at the rear of the side vent opening.
prying does not work. my spudger is causing damage. my soft. plastic. spudger. and the %#*@ thing does not move. this is a common issue with the instructions on this site. you write instructions like you assume people have extensive repair experience. describe the plastic tab. add detail. because simply prying WILL damage the case. hire a %#*@ writer. cause you guys do not know how to precisely convey important detail. constant problem with tech companies actually. no writers.
- 벗겨낸 통풍구쪽부터 상판과 하판 사이의 틈으로 spudger의 평평한 끝을 밀어넣습니다.
- 플라스틱 클립들이 꽤 강하기 때문에 생각보다 강한 힘을 사용해야 합니다.
- 케이스를 완전히 열 때까지 spudger를 계속 끼워두세요. 클립이 강해서 작업도중 다시 닫힐 수도 있습니다.
it would be very very nice that the part, that you sell, will Fix. This an ols Tutorial. The new opening tools that you sell, will not help anything, cause there is no flat sign on the side. you link these tools at this tutorial, but never tested, if the new tools work. so i tell this you, no they dont fit. Thanks for nothing.
I ve made it this far with only a Lego membership card and a flimsier amusement park card (I'm a big year old)
I had to use a 1/32nd flathead screw driver. In the corner to get it started push the top joint of the case down and up will simultaneously pulling up and down to seperate the seam. You will need a 3rd hand to insert the 1/32nd flathead and pry up to get the case started.
I had a virgin never opened xbox day one og so that might be why I had to do it this way.
even the wikihow instructions are better
It’s easier if you push the top empty area part of the plastic with your finger, and stick the spudger about 3/4” (2 cm) away from the back of the xbox and start prying. You have to do this because that is the only spot where there are no clips in the way. If you do any less or more distance, the clips are in the way, and you’ll never be able to pry open the Xbox because the tool can’t get in.
A youtube video I found explains this step better. You are meant to pull up on one half and push down on the other, this separates the two halves. Then use a spudger on the rear of the console to separate the clip right under the warranty sticker, then move down the back of the console to the other clips
I found it easier to pull apart the pieces from the seam, pull the left side (the side on the upper half of the Xbox) down, while pulling the right side up (The side on the lower half of the xbox).
-
-
-
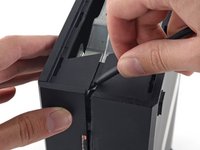
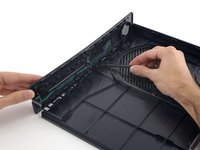
Insert a plastic opening tool between the upper and lower case to separate the clip over the rear vent.
- 상판과 하판 사이에 끼인 후면 단자판은 여러개의 클립으로 고정되어 있습니다.
- 플라스틱 오프닝 도구로 후면 통풍구의 클립들을 분리하세요.
-
-
-
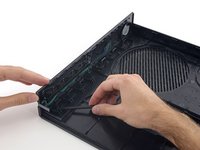
Keep moving along the rear of the Xbox, prying up clips.
- 후면을 따라서 계속 클립을 들어서 분리하세요.
- spudger가 제대로 꽂혀 있는지 중간중간 확인하세요. spudger가 빠질정도로 케이스가 분리 되더라도 남은 클립들이 매우 탄력적이라서 방심하면 도로 닫히기 십상입니다. 원활한 진행을 위해 spudger가 잘 꽂혀서 사이를 벌리도록 유지하세요.
-
-
-
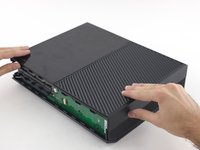
Keep popping clips. It may help to slide the plastic opening tool across the clips.
- 클립들을 계속해서 분리합니다. 클립들을 가로질러 플라스틱 오프닝 도구를 주욱 미는 것이 도움이 될수도 있습니다.
- 후방 케이스를 따라 분리하면 상판이 열릴 기미가 보여야 합니다. 만약 열릴 기미가 보이지 않는다면 모서리부터 플라스틱 오프닝 도구로 분리를 시작하고 usb포트가 없는 쪽을 따라서 클립 분리를 다시 시도하세요.
-
-
-
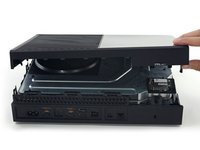
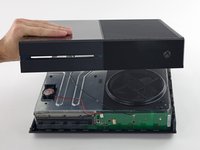
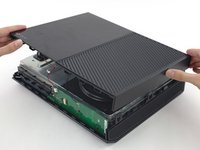
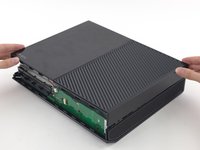
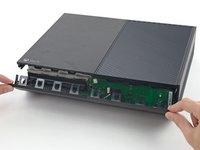
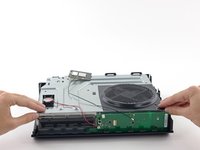
Starting with the spudger you left in the crack, pry the upper case up to free the last few clips.
-
Lift the upper case slightly and shift it to give access to the front panel board.
I got confused here. I couldn’t unclip the front panel at all. I found out that if I open the case like a clamshell (or a book, with the front being the spine of the book) I popped right off easily.
Yeah, I saw your comment afterwards but this is exactly what I ended up doing as well. just a note for anyone reading this be careful of the flex cable as it does seem to put a questionable amount of strain on it when you open it in this manner.
"Lift the upper case slightly and shift it" isn't descriptive enough for this step. Also, pictures of actually getting the front panel loose would be really helpful.
I tried fixing my Xbox one faceplate because for some reason, and when I took it off my cable stopped working. Even after repair so now I either use a disc to turn it on or my controller.
-
-
-
crwdns2935267:0crwdne2935267:0Tweezers$4.99
-
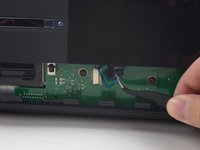
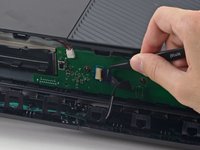
Use tweezers to lift the blue plastic retaining loop over the white connector on the board.
-
Use the tip of a spudger to push the connector's locking tab toward the cable to unlatch it.
I recently took my Xbox one apart to clean it and for some reason it's on for a couple minutes then it cuts off
Or anyone else who has this problem or reads this on this thread, which is not the correct thread for this question by the way, here is a link to the forum for that. It could be any of a number of issues including overheating, Portland elation, or infestation, among others.
Is there somewhere that I can buy a replacement zif connector
-
-
-
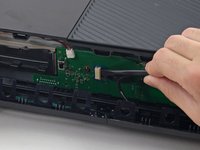
Use tweezers to pull the cable straight out of the connector on the board.
-
Remove the upper case.
I broke that peice that white connector peice what can I do?
-
-
-
Use the flat end of a spudger to free the clips securing the front panel to the upper case.
-
Remove the front panel from the rest of the upper case.
-
-
-
Replace the top part of the upper case.
-
Line up the clips and press firmly to re-seat them around the perimeter.
-
-
-
Support the front panel near the front of the Xbox.
-
Use tweezers to replace the front button cable in its ZIF socket.
-
Use the flat end of a spudger to push the ZIF lock to the left to secure the cable.
My Xbox stopped working after this thanks
Mine did as well, its possible it may be the same reason. For me I had to unplug and plug it back in a few times and then clean off the contacts with isopropyl alcohol. Seems simple but if you haven’t already, I would try it.
-
-
-
With the front panel at a 45 degree angle, interlock its plastic hooks with those in the lower case.
-
Push the top of the front panel into the Xbox, like closing a mailbox. Press firmly so that the clips securing the front panel to the upper case lock securely.
-
-
-
Gently pull up on the speaker cable connector to disconnect it from the front panel board.
-
Use the flat end of a spudger to disconnect the antenna cable from the front panel board.
If this connector is broken off, will that prevent the control panel to not work at all and NOT turn on? Is there a fix or work around IF this connector is broken off?
-
-
-
Remove the two 9.5 mm T8 Torx screws from the WI-Fi board.
-
Lift the Wi-Fi board straight up from its socket in the upper metal case.
-
Leaving the Wi-Fi board antenna cable in place, move the Wi-Fi board aside, exposing the screw labeled "C3" that was beneath it.
When reassembling- put the outer ones on first to secure the port to the metal. Then putting the wi-fi board into the port will be easy
Will a cracked WiFi Board affect network connectivity?
The T9 fit but was a tad big, for me the T8 worked fine
Where can i get a T9
-
-
-
Remove the eight 65 mm Torx T10 screws from the top of the upper metal case.
Two of the 8 were stripped even before attempting to remove….ugggh
-
-
-
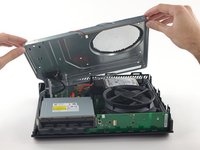
Lift—but do not remove—the upper metal case.
-
-
-
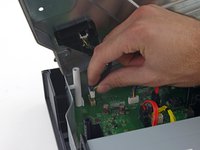
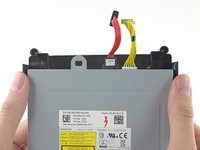
Disconnect the Wi-Fi board interconnect cable from the motherboard.
This connector may be exceptionally difficult to remove, and it is not strictly necessary for the replacement of the hard drive if you are careful.
Gave up on trying to unplug this and took out the 3 torx screw that was mounting the black connector on the other end 😈 way easier
-
-
-
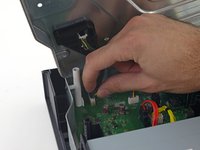
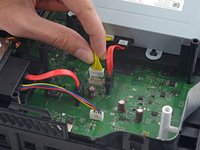
Disconnect the optical drive power and SATA data cables from the motherboard.
-
-
-
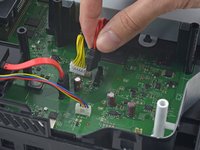
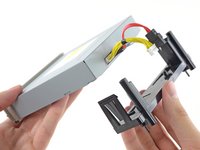
Remove the optical drive assembly from the Xbox.
-
-
-
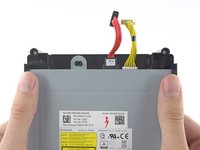
Push the clips outward and then slide the tray off the drive.
-
-
-
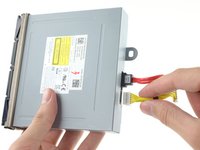
Remove the optical drive power and SATA data cables.
Und es wird nicht funktionieren, falscher DVD Key
Won`t work wrong DVD Key…..
El xbox one va en un código único con la tarjeta madre, al reemplazar la unidad por h a nueva no funciona. Debe quitar la tarjeta principal del blue ray y cambiarla a la unidad vieja para que funcione. The xbox one work with the pcb unique code married on the main board you should change board from the old one to the new blue ray device. They do not work only replacing the unit.
Si la reemplazo que pasó debo hacer yo la reemplace y ahora me da un error me imagino que es por la controladora
Pudiesen indicar cuál es el paso para flashear la unidad
-


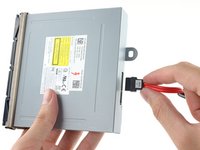
To reassemble your device, follow these instructions in reverse order.
To reassemble your device, follow these instructions in reverse order.
crwdns2935221:0crwdne2935221:0
crwdns2935229:086crwdne2935229:0

crwdns2947412:045crwdne2947412:0
I torn down my one to attempt to see why it stopped reading disc, i discovered that it wasn't a spinning issue but that the disc popped back out just a bit leading to why it will not spin. Any way of fixing that?
there is a black bar that rolls the disc into the tray try cleaning that (you will have to fully open the disc drive)
What kind of optical drive should I use?
Once replacing the optical drive does one need to flashit/swap pcb boards. Has Microsoft stopped hard coding these.
I would like to know the answer to this as well. My xbox has a terrible time loading discs. If I use the hold method to install the disc it will eventually read it.
Yes, you will still need the swap over the PCB. I have no idea why they didn't cover this in the repair tutorial here...
Yes you would need to swap the PCB board from the new one with the old one. This requires you to open both new and old disk drives and unsolder the old and new PCBs and resolder the old one into the new disc drive. The dont tell you that or show that probably for the same reason the dont sell the drive separate from the paired mother board (40 from Ebay for the drive vs 99 + S&H for the drive and board here).
Yes you have to swap the pcb boards over for the new drive to work
I think the issue w/ my one is the pcb board. my little brother put something in and tried taking it out w/ a knife. Therefore, i believe the board is probably faulty. What should I do or is it unfixable now
12667 -
How do you swap the pcb boards to the new drive?
This whole thing could have been done without trying to remove connects from the mother board. The Wifi board connector could have been removed and put back by using the screws and not trying to pull on the connection to the mother board. Now I have on wire to try and reconnect to the interconnector.
I am looking for step by step instructions on installing new optical drive in Xbox one, including any parts from the old drive that need to be switched over.
Replaced optical drive in Xbox one, will not read disk. With the recent update the Xbox gives the error code E100 00000703 80910008. After some research it appears the Xbox one is bricked now. The console will not update or perform a factory reset. Is my Xbox One done for good? Can someone help?!?!
You need to put your old drive back in to take the update, the drives are hard coded/matched to the console. Once you've done that you'll need to swap the control PCB from your old drive to the new one and everything will work fine from then on. Of course you could just swap the PCB now and then take the update.
What is a PCB and how do I swap that? I just ordered a replacement drive and it had a letter in it saying it needed to be "flashed" with my consoles security key?
I also need help because after replacing the optical driver with a new one, taking the control PCB from the older one (the new one didn't have the control PCB) but it doesn't read disks.
What can I do to make it work?
Due to the speaker connection being so flimsy, I found it easier/safer to disconnect the speaker from the black plastic speaker holder. Push back the two rear clips with the spudger and the speaker pops off easily.
Also, I'd recommend using a metal pry bar rather than a plastic spudger to pop open the main case. The clips are so strong it permanently deformed my plastic spudger when forcing it in.
Xbox one DVD drive model numbers
so if i have OEM replacemen part can i just putt it in and it works or do i have still pair them if my replacement part and original is same
You guys nay take in consideration get the EXACT SAME model of your optical disk reader or else it'll throw back an error.. You either get the exact same model or take the trouble of replacing the PBC boards inside those disk to prevent error (didn't known this before trying myself and found myself stuck with an incompartuble disk reader :(
Sounds to me like the serial numbers have also been hard coded to the motherboard and/or hard drive. Simply replacing with an "identical" BD drive won't work. The model and firmware may be the same, but the serial number is not. Microslop... Tightwads!!!
Any ideas why or how to solve the problem of the disc not grabing it in? do i have to re-solder anything else?
did you get this problem solved? i have just put everything back together and now the disc only goes in 1/4 of the way and then you can hear/see the belt slip with in the drive. Please help me!
Did you solve this issue? if so how? i have the old board in the new drive and had the xbox all back together went to insert a disc and it went in 1/4 of the way and the the belt started slipping. Please help?!
How do you tell if you have the correct pcb board and mother board are there matching serial numbers or something else
Awesome write up. My daughter shoved a nickel in the BD-Rom Drive. Followed the steps to get the drive out and pulled the drive apart to retrieve the rogue coin. Had a bit of difficulty with the front panel ribbon cable, it’s a pain to reattach. Anyway, thank you!
Where to buy a new optical drive
How do I flash the new drive so it will be able to read game disks?
How do I flash the new drive so it will read game disks?
Do you have to solder
i would defenitly say when you start having read issues with these blueray drives just spend the 30 $ by the optical laser and replace it . will brobably end up saving you 40 on a new board from what i know and ive seen the boards are still encoded together. and thanks fixit my repair was 100 % succesfull great part clean nicely packaged couldnt ask for more. tbh if you are a begginer to xbox teardowns etc the drive is not the place to start i have torn mine down and rebuilt it like 6 times swapping hhds with ssds etc and the drive was a little more complicated and delicate when you dive into it
and to answer guy above me there is no soldering involved on an xbox if you are only replacing mechanical parts in this case from what i see from the tutorial it left out the bit of swapping a motherboard but if you are just getting the issues with the drive now refrain from taking it apart and or misplacing the drive beause more then likely the board on the blueray drive is still good wich means should just be an optical replacement not to much more difficult and you would not have to swap motherboard on main unit again thanks fixit team!
So I switched the daughter board and soldered but it won't take disks?
You have to desolder/ solder the black and red leads from the worm gear drive motor, nto the main board of the OG game disk drive, I think they are reversed. Make a note of witch way they came off the board.
I replaced my disc drive and now it will read the discs but says that there is a problem with the disc drive. Do I have to try to update the disc reader or is the drive I bought just garbage?..
I replace my optical drive and it is still saying not reading disc. Any advice?
I get a new disc drive and I took my Xbox apart and took the old one out and but the new one in and it anit take the disc in
great tutorial! thanks! i read through the instructions and pictures, and then watched the video as i took apart my xbox one to replace the optical drive. i did swap the xbox pcb board because everyone and their mother on the interwebs seemed to say that i would need to. i have one of the original xbox ones. microsoft isn’t servicing them any more.
Et ça ne marchera pas…
il faut démonter la carte du lecteur d’origine pour la remplacer sur le nouveau.
sans cela la xbox ne reconnaitra pas votre lecteur, puisque il faut que celle ci soit d’origine.
Le post est incomplet
Yes, you do. Either the IC, or the whole daughter board.
the board inside original drive must be moved to new drive!!
I have a problem with my Xbox one x xbox has a problem to read the disc I don’t know how to fix that problem can anyone please send me the link if video how to do it my xbox name is Icoolman2009 or send me different account name is JollyLattice926 please help me out with my Xbox please
I just followed this tutorial, and I just wanted to say that the optical drives from Xbox One X and Xbox One S units work just fine in original Xbox One units. You do have to desolder the black and red wires from the old main circuit board in the drive and connect them back to the new drive, but after that it works perfectly.
ATTENZIONE: la guida è gravemente incompleta! È necessario anche sostituire sul nuovo drive la scheda elettronica di quello vecchio (ed è necessario usare il saldatore), se non lo fate l'Xbox identificherà il cambio di drive come una manovra fraudolenta e da quel momento non accetterà più nessun lettore, neanche quello corretto e non ho trovato nessun sistema per rimediare al danno!
If my xbox one is reading Bluray disc(xbox one games/ Bluray movies), but for DVD it work sometimes, sometimes it wont (xbox 360 games/ DVD), should i replace the whole bluray drive or Optical drive laser
In the United States the Magnuson-Moss Warranty Act of 1975 is a Federal Law that states that stickers and clauses are illegal. It says you can open your electronics without voiding the warranty, regardless of what language of that warranty says.
Dustin D'Amour - crwdns2934203:0crwdne2934203:0
Stickers are illegal!?
Brandon -
For anyone concerned, if you apply heat with a blow dryer or heat gun you can carefully remove the sticker without damaging it, making it impossible to know that the sticker was ever removed.
Kelton Stewart - crwdns2934203:0crwdne2934203:0
All the immature comments aside, thank you Dustin for sharing the information.
Wade - crwdns2934203:0crwdne2934203:0
xbox를 열기 위해서 이러한 위조방지 테이프를 자르거나 떼어내야 합니다. 하지만 걱정 마세요. 여러분이 무언가 직접적으로 망가트리지 않는한 ms는 보증을 취소하지 않습니다.
승대/SeungDae 정/Jeong - crwdns2934203:0crwdne2934203:0