crwdns2933423:0crwdne2933423:0

Xbox 360 Optical Drive Replacement

crwdns2862623:0crwdne2862623:0
crwdns2942641:0crwdne2942641:0
  1. Xbox 360 Optical Drive Replacement, Optical Drive: crwdns2935265:01crwdnd2935265:01crwdnd2935265:01crwdne2935265:0
    • Peel the silver tape securing the optical drive to the metal casing.

  2. Xbox 360 Optical Drive Replacement: crwdns2935265:02crwdnd2935265:01crwdnd2935265:01crwdne2935265:0
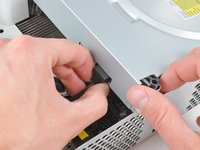
    • Slightly lift the optical drive upwards to gain clearance to disconnect the SATA and power connectors located on the backside of the optical drive.

    • Don't try to completely remove the optical drive just yet. Two cables still connect it to the motherboard.

  3. Xbox 360 Optical Drive Replacement: crwdns2935265:03crwdnd2935265:01crwdnd2935265:02crwdne2935265:0 Xbox 360 Optical Drive Replacement: crwdns2935265:03crwdnd2935265:02crwdnd2935265:02crwdne2935265:0
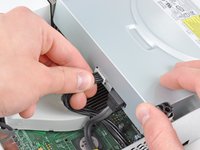
    • Grab the power connector by its cables and pull it straight out of its socket on the optical drive.

    • Disconnect the SATA data connector from its socket on the optical drive by pulling it straight away.

  4. Xbox 360 Optical Drive Replacement: crwdns2935265:04crwdnd2935265:01crwdnd2935265:01crwdne2935265:0
    • Lift the optical drive assembly out of the metal casing.

crwdns2915888:0crwdne2915888:0

To reassemble your device, follow these instructions in reverse order.

Walter Galan

694,576 crwdns2915208:0crwdne2915208:0

crwdns2935297:01,203crwdne2935297:0

crwdns2944067:00crwdne2944067:0

crwdns2917038:0crwdne2917038:0

crwdns2936625:0crwdne2936625:0:

crwdns2936751:024crwdne2936751:0 0

crwdns2936753:07crwdne2936753:0 0

crwdns2936753:030crwdne2936753:0 0

crwdns2942667:0crwdne2942667:0 1,683