crwdns2915892:0crwdne2915892:0
It should be noted that while this modification will add additional storage to your console, it violates the Xbox Live terms of service, and could potentially lead to your banishment from Xbox Live.
Here I show you the rather simple replacement of the actual hard drive in the 360's HDD enclosure. Microsoft makes it expensive or difficult to upgrade your hard drive by limiting your options with said upgrade. This guide deals with how to physically take the drive apart and replace it with your shiny, new WD HDD. Yes, for some reason it has to be a Western Digital drive. One from either of the following drive series:
-WD Scorpio Series BEVS/BEAS
-WD Scorpio Blue Series BEVS/BEVT
-WD Scorpio Black Series BEKT/BJKT
-WD VelociRaptor Series
I looked on Newegg.com and found a Scorpio Black 250GB drive spinning at 7200RPM with 16MB cache and 3.0Gb/s. for about $65. That is what I would probably recommend, being that it gives you the most bang for your buck, and is about half what MS will charge you for the 250GB drive.
crwdns2942213:0crwdne2942213:0
-
-
Here it is. The standard 20GB HDD for the Xbox 360.
-
Notice the proprietary adapter. Inside is just a pretty standard 2.5" SATA drive...
-
I took these pictures as I was putting it back together, hence the Microsoft warranty sticker looking a little funny.
 crwdns2952109:0crwdne2952109:0
-
-
-
It only voids the warranty for the drive, not the console, being as their warranties are separate.
-
Proceed to remove the four T6 Torx screws.
-
-
-
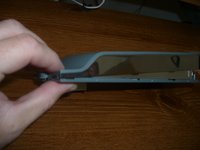
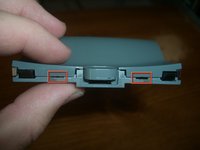
Holding the drive top up, gently pull the top half up from the bottom half. The back will rotate up as the front is connected by two plastic clips.
-
These clips are most easily undone by rotating the top enclosure to about 30º then lifting it up firmly.
-
-
-
-
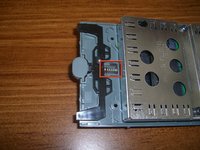
Remove the four T10 Torx screws.
-
Slide the cover towards the back of the enclosure and remove. There is a small dot of lock-tite on each screw, fyi.
-
-
-
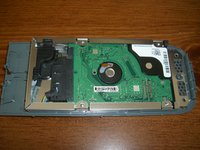
Here are the innards in all their glory.
-
The four screws that held the cover on also held the drive in place, so just pull off the SATA connector and the drive is almost free.
-
-
-
To actually get the drive out, you must bend the back of the plastic part of the bottom enclosure down a little bit. Doing so shouldn't break anything, just don't go overboard and bend it excessively.
-
-
-
All the parts disassembled. The adapter cable will probably come out as it doesn't seem to be attached directly, but removing it would have required bending the metal enclosure and I didn't want to mess with that.
-
I thought it interesting to note that the drive runs at 5V 0.62A when the enclosure states 5V 1A. I wonder where the other 380mA are going.
-
Also interesting to note: this is a Seagate drive, while the 250GB drive upgrade I mention in the description requires a WD drive. If I understood correctly, this is because the software to format the drive to be recognized by your 360 is written for the WD firmware.
-




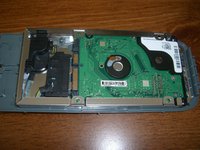


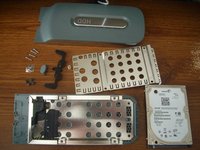
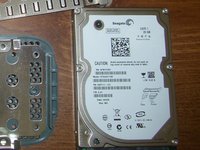
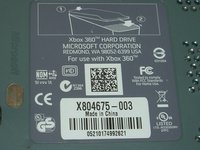
To reassemble your device, get your new hard drive and follow these instructions in reverse order.
crwdns2935221:0crwdne2935221:0
crwdns2935229:067crwdne2935229:0

crwdns2947412:06crwdne2947412:0
I happen to have an external HD enclosure (the original HD had a platter crash) that works perfectly to mount the XBox 360 HD to my PC for all sorts of uses, allowing for either USB or external SATA connectivity. :D
nonzerosum - crwdns2934203:0crwdne2934203:0 crwdns2950251:0crwdne2950251:0
Link to article seems to be down. Any mirrors? It woulb be much appreciated, Thanks
Chris Bersteinsson - crwdns2934203:0crwdne2934203:0 crwdns2950251:0crwdne2950251:0
Sounds and looks easy enough. But will replacing a 20 go drive with a 250 go drive now need any formatting or can I just plug it in and work?
James Mendez - crwdns2934203:0crwdne2934203:0 crwdns2950251:0crwdne2950251:0
Hola, buenas tardes, realice todos estos pasos y al instalar el disco no lo reconoce. Probe con otro disco y probe con el mismo que acababa de sacar y no lo reconoce. Enchufe el disco por medio de un cable al USB exterior y si lo reconoce.
Ahora supongo que es un problema en la coneccion del disco en su lugar original, puede ser en el cable o en el enchufe. Lo que quiero saber es si estoy bien orientado, o si existe algo que pase por alto y me esta generando este problema. Gracias
Pablo Farias - crwdns2934203:0crwdne2934203:0 crwdns2950251:0crwdne2950251:0
solo determitae marche di hardisk funzionano con la xbox 360 in piu devi installare il firmware o il software per farlo riconoscere e questo lo fai da pc ci sono molte guide in merito su youtube ciaooooooo
saxon sax - crwdns2934203:0crwdne2934203:0 crwdns2950251:0crwdne2950251:0
