crwdns2915892:0crwdne2915892:0
This guide will help you replace a damaged or broken eject button.
crwdns2942213:0crwdne2942213:0
-
-
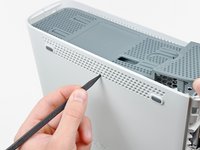
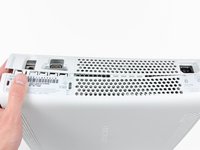
Grasp the hard drive assembly and press the release button while lifting its front edge.
-
Remove the hard drive assembly from the top vent.
 crwdns2952109:0crwdne2952109:0
-
-
crwdns2935267:0crwdne2935267:0Xbox 360 Opening Tool$4.99
-
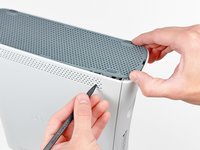
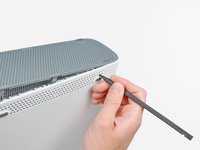
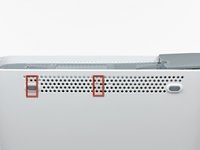
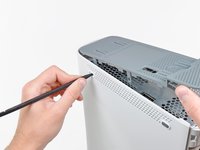
Insert the flat end of a spudger or the edge of an Xbox 360 opening tool into the small gap at the front edge of the bottom vent.
-
Pry the front edge of the bottom vent away from the faceplate.
-
-
-
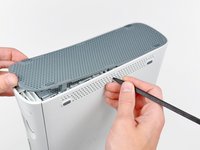
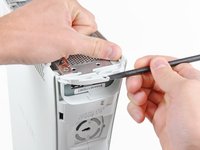
To release the clips, work from the front edge of the bottom vent.
-
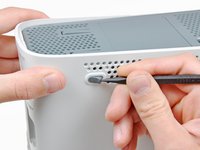
While slightly lifting the front edge of the bottom vent, use the tip of a spudger to push the clips closest to the front of the bottom vent towards the inside of the console.
-
-
-
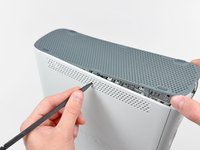
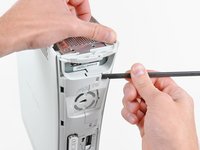
Repeat the same process to release the two center clips on the bottom vent.
-
-
-
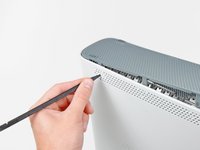
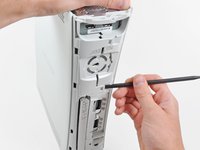
Use the tip of your spudger to release the clips on the bottom vent nearest the back of the Xbox.
-
-
-
Remove the bottom vent from the 360.
-
-
-
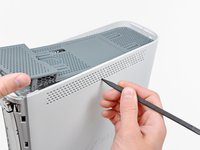
Insert the flat edge of a spudger between the faceplate and the outer casing near the power button.
-
Run your spudger along the edge of the faceplate to release the clips securing it to the front of the console.
-
-
-
Repeat the same motions as previously mentioned to release the left side of the faceplate.
-
-
-
-
Remove the faceplate from the front face of the console.
-
-
-
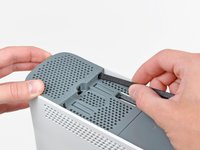
The top vent is secured to the console via clips. The first two clips are located underneath the top vent closest to the faceplate, as shown in the pictures.
-
-
-
Insert the flat end of a spudger into the small gaps previously mentioned to release the clips.
-
-
-
To release the clips, work from the middle of the top vent.
-
While slightly lifting the front edge of the top vent, use the tip of a spudger to push the clips closest to the center of the top vent towards the inside of the console.
-
-
-
Use the tip of your spudger to release the clip on the top vent nearest the back of the Xbox's upper case.
-
-
-
Use the tip of your spudger to release the clip on the top vent nearest the back of the Xbox.
-
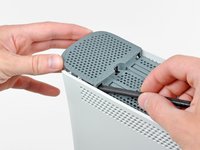
Remove the top vent from the 360.
-
-
-
Stand the console vertically with the top edge facing down.
-
Carefully peel the warranty sticker off the console.
-
-
-
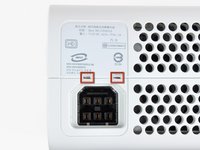
Use the flat end of a spudger to release the following latches:
-
Above the front-facing USB ports.
-
Beneath the front-facing USB ports.
-
Above the Memory Unit slots.
-
-
-
Insert the flat end of a spudger and pry upwards to release the last remaining latch located above the eject button.
-
-
-
Slightly lift the front portion of the lower case to ensure that the latches in the front have been completely released.
-
-
-
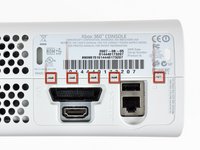
Press the Xbox 360 opening tool down into the clips securing the lower case to the upper case near the I/O ports.
-
While pressing down on the tool, push the lower and upper cases apart to separate the retaining clips.
-
-
-
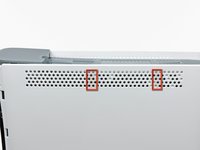
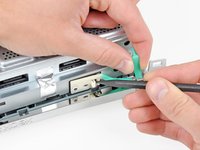
While pushing the upper and lower cases apart, use the tip of a spudger or the finger of an Xbox 360 opening tool to push the long clip highlighted in red toward the center of the 360.
-
The clip should release, leaving the clips near the power connector as the only thing holding the upper and lower cases together.
-
-
-
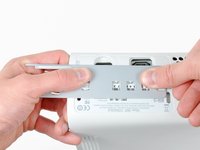
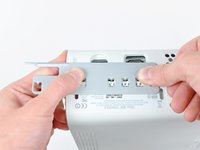
Press the Xbox 360 opening tool down into the two remaining clips near the power connector.
-
Push the upper and lower cases apart to fully release the retaining clips.
-
-
-
Grasp the back portion of the lower case and lift it upwards to separate it from the console.
-
-
-
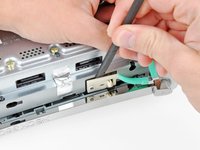
Use the tip of a spudger to release the clip securing the eject button to the metal casing.
-
Insert the flat end of a spudger between the eject button and the optical drive.
-
Pry the eject button off its retaining posts and remove it from the 360.
-


To reassemble your device, follow these instructions in reverse order.
crwdns2935221:0crwdne2935221:0
crwdns2935229:037crwdne2935229:0

crwdns2947410:01crwdne2947410:0
You have the most complete instruction i have seen so far.
John V.Cramer - crwdns2934203:0crwdne2934203:0 crwdns2950251:0crwdne2950251:0