crwdns2915892:0crwdne2915892:0
If no electricity flows through the toaster when plugged in, try replacing the electrical connection with this guide.
crwdns2942213:0crwdne2942213:0
-
-
Using a wedge, pry off the rubber pieces on the bottom of each foot of the toaster.
 crwdns2952109:0crwdne2952109:0
-
-
-
Remove the eight 8mm screws on each toaster foot using a Tri-point Y1 screwdriver.
-
-
-
Remove the crumb collector located on the bottom of the toaster.
-
-
-
Remove the three 8mm screws using the Tri-point Y1 screwdriver.
-
-
-
-
Remove the two 8mm screws on the bottom of the slide lever using a Tri-point Y1 screwdriver.
-
Once the screws are removed, detach the black plastic cover on the bottom of the slide lever.
-
-
-
Remove the final 8mm screw in the slide lever.
-
The lever can now pull away from the entire unit.
-
-
-
Remove toaster's outer shell by lifting straight up.
-
-
-
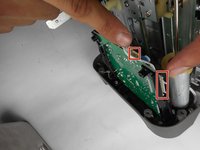
Disconnect the wire cluster that connects the lights and circuit board by pulling apart the two plastic connectors.
-
Remove the outer shell from the device.
-
-
-
Unscrew the ground wire using a Tri-point Y1 screwdriver. It is secured with an 8mm screw.
-
-
-
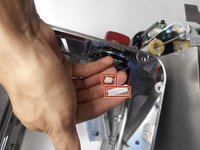
Use pliers to pull apart the three electrical connectors pictured in the graphic.
-
-
-
Replace the electrical connectors.
-


To reassemble your device, follow these instructions in reverse order.
crwdns2935221:0crwdne2935221:0
crwdns2935227:0crwdne2935227:0
crwdns2935287:0crwdne2935287:0

Cal Poly, Team S22-G5, Maness Spring 2018 crwdns2935289:0Cal Poly, Team S22-G5, Maness Spring 2018crwdne2935289:0
CPSU-MANESS-S18S22G5
crwdns2931471:04crwdne2931471:0
crwdns2935297:010crwdne2935297:0
crwdns2947410:01crwdne2947410:0
Thank you for you work on this toaster. My customer is happy.
Adam Hunsinger - crwdns2934203:0crwdne2934203:0 crwdns2950251:0crwdne2950251:0