crwdns2933423:0crwdne2933423:0

Wireless Xbox One Controller Bumper Assembly Replacement

crwdns2942213:0crwdne2942213:0

  1. Wireless Xbox One Controller Bumper Assembly Replacement, Bumper Assembly: crwdns2935265:01crwdnd2935265:01crwdnd2935265:01crwdne2935265:0
    • Remove the battery cover from the back of the controller by sliding it upwards.

  2. Wireless Xbox One Controller Bumper Assembly Replacement: crwdns2935265:02crwdnd2935265:01crwdnd2935265:03crwdne2935265:0 Wireless Xbox One Controller Bumper Assembly Replacement: crwdns2935265:02crwdnd2935265:02crwdnd2935265:03crwdne2935265:0 Wireless Xbox One Controller Bumper Assembly Replacement: crwdns2935265:02crwdnd2935265:03crwdnd2935265:03crwdne2935265:0
    • Using the halberd spudger, pry the grip casing upwards from the handle.

    • Remove the grip casing from both the left and right handles of the controller.

    • It helps to begin near the top of the grip casing near the trigger.

  3. Wireless Xbox One Controller Bumper Assembly Replacement: crwdns2935265:03crwdnd2935265:01crwdnd2935265:02crwdne2935265:0 Wireless Xbox One Controller Bumper Assembly Replacement: crwdns2935265:03crwdnd2935265:02crwdnd2935265:02crwdne2935265:0
    • Remove the five 9 mm Torx TR9 security screws from the top and bottom of the controller grip regions as well as from the center of the battery region.

    • The pins on the security screws can be broken off easily with a small flathead screwdriver for use of an ordinary Torx screwdriver if the security version is unavailable.

  4. Wireless Xbox One Controller Bumper Assembly Replacement: crwdns2935265:04crwdnd2935265:01crwdnd2935265:01crwdne2935265:0
    • Remove the back of the controller casing by lifting it up and off.

  5. Wireless Xbox One Controller Bumper Assembly Replacement: crwdns2935265:05crwdnd2935265:01crwdnd2935265:01crwdne2935265:0
    • Lift the internal assembly from the plastic controller case.

    • Handle gently; the motors on the bottom left and right are not firmly attached.

  6. Wireless Xbox One Controller Bumper Assembly Replacement: crwdns2935265:06crwdnd2935265:01crwdnd2935265:02crwdne2935265:0 Wireless Xbox One Controller Bumper Assembly Replacement: crwdns2935265:06crwdnd2935265:02crwdnd2935265:02crwdne2935265:0
    • Remove the top button panel from the controller by gently lifting up the hooks attached to the internals.

  7. Wireless Xbox One Controller Bumper Assembly Replacement: crwdns2935265:07crwdnd2935265:01crwdnd2935265:01crwdne2935265:0
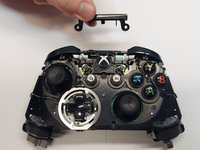
    • Detach the bumper assembly by sliding one bumper to the side away from the controller and then lifting upwards.

    • Gently follow the motion indicated by the arrows.

  8. Wireless Xbox One Controller Bumper Assembly Replacement: crwdns2935265:08crwdnd2935265:01crwdnd2935265:01crwdne2935265:0
    • Remove bumpers and replace by inserting a new bumper assembly.

crwdns2915888:0crwdne2915888:0

To reassemble your device, follow these instructions in reverse order.

crwdns2935229:04crwdne2935229:0

Patrick Ashman

crwdns2935283:001/30/23crwdne2935283:0

229 crwdns2915208:0crwdne2915208:0

crwdns2935295:0crwdne2935295:0

crwdns2915084:0crwdne2915084:0

Cal Poly, Team 2-2, Johann Winter 2023 crwdns2935289:0Cal Poly, Team 2-2, Johann Winter 2023crwdne2935289:0

CPSU-JOHANN-W23S2G2

crwdns2931471:03crwdne2931471:0

crwdns2935297:03crwdne2935297:0

crwdns2944067:00crwdne2944067:0

crwdns2917038:0crwdne2917038:0

crwdns2936625:0crwdne2936625:0:

crwdns2936751:024crwdne2936751:0 8

crwdns2936753:07crwdne2936753:0 60

crwdns2936753:030crwdne2936753:0 317

crwdns2942667:0crwdne2942667:0 4,803