crwdns2915892:0crwdne2915892:0
This guide will help you to replace the speakers if you are experiencing audio issues.
crwdns2942213:0crwdne2942213:0
-
-
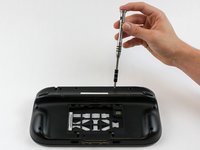
Place Gamepad face down and remove the two 4.7 mm screws with a Phillips size #00 screwdriver.
-
-
-
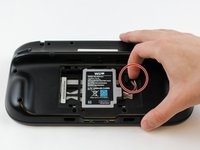
With your finger, press down and pull back on the battery connector plug.
-
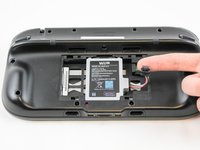
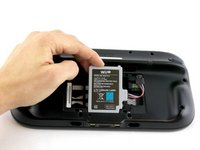
Remove the battery from the battery case.
Battery lifts up from the bottom not the top like the photo shows.
-
-
-
-
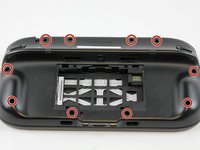
Remove 10 9mm screws with Tri-Wing size Y1 screwdriver around the outer case.
-
Lift up on the back of case.
I used a small blade tip to life up on the black squares that covered the screw holes. Replacing them after.. I skipped that as it seemed impossible they would even stick back down.
I am having trouble getting the two screws on the hand grips as the screws are too deep. What should I use to get them?
I ended up having to buy some cheap amazon screwdrivers and are very disappointed
-
-
-
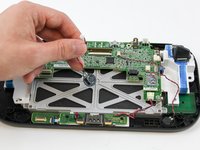
Unplug outer case rumble motor connector from the motherboard with your fingers.
Do not pull by the wires! If you do, you better be pretty good at soldering.
I agree. A circle over the plug would have been better as the picture looks like you just pull on the wires lol.
Chris -
Thanks for the comment. I did get a set of tweezers and the negative cable broke anyway. They really could have done a better job at using a different connector for that.
Great. Didn't pull on cord. Whole thing ripped off.
Why in the world is this thing so tightly connected?
Thanks for the comment. I did get a set of tweezers to try to pull it out but still ended up breaking the negative cable. They really could have used a better set of cables and connectors for this.
You don’t have to do this step!!!! Just open the switch while keeping this wire intact!!!!!
-
-
-
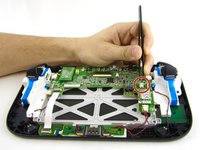
With your fingers, unplug the left speaker cable from the motherboard.
Speakers are connected with solder so removing them is not possible without requiring soldering later on. I left them both connected and instead of removing the motherboard completely I just "hinged" it carefully down to facilitate the work following step 18.
Thank you for offering this info because I spent 20 minutes between scratching my head and searching for any alternatives to just the image above, which had a wire nut/housing (and mine certainly did not). As I began to have an anxiety attack (
Mine also did not have connectors for the speaker. But like mentioned above, I was able to do repair WITHOUT the need to unsolder the speaker wires. Thanks!
-
-
crwdns2935267:0crwdne2935267:0Tweezers$4.99
-
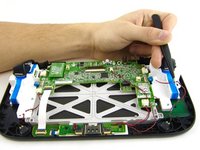
Remove the right speaker cable that's connected to the motherboard with the tweezers.
Note that on some units (presumably later ones), the speakers are soldered onto the motherboard.
-


To reassemble your device, follow these instructions in reverse order.
To reassemble your device, follow these instructions in reverse order.
crwdns2935221:0crwdne2935221:0
crwdns2935229:06crwdne2935229:0
crwdns2915084:0crwdne2915084:0

USF Tampa, Team 1-6, Sullivan Spring 2016 crwdns2935289:0USF Tampa, Team 1-6, Sullivan Spring 2016crwdne2935289:0
USFT-SULLIVAN-S16S1G6
crwdns2931471:04crwdne2931471:0
crwdns2935297:040crwdne2935297:0
crwdns2947410:01crwdne2947410:0
Awesome guide, replacement speakers worked flawlessly!!
tried to unscrew the 10 Tri-Wing size Y1 screw with my iFixIt toolkit
unfortunately the tool is too “fat” and short, it cannot reach 4 screws on the corners of the gamepad.
having the iFixIt toolkit and needing to purchase an additional slim screwdriver it’s a shame…
AJtriple - crwdns2934203:0crwdne2934203:0