crwdns2933423:0crwdne2933423:0

Whirlpool WED87HED Dryer Power Cord Replacement

crwdns2942213:0crwdne2942213:0

  1. Whirlpool WED87HED Dryer Power Cord Replacement, Safety Precautions: crwdns2935265:01crwdnd2935265:01crwdnd2935265:01crwdne2935265:0
    • Before you begin your repair, unplug your dryer.

    • Your power cord may have four prongs rather than three. The additional prong is a ground connection.

  2. Whirlpool WED87HED Dryer Power Cord Replacement, Unfasten the cover plate: crwdns2935265:02crwdnd2935265:01crwdnd2935265:01crwdne2935265:0
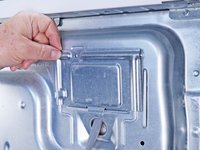
    • Use a 5/16 inch nut driver to remove the 16.2 mm-long cover plate screw.

  3. Whirlpool WED87HED Dryer Power Cord Replacement, Remove the cover plate: crwdns2935265:03crwdnd2935265:01crwdnd2935265:03crwdne2935265:0 Whirlpool WED87HED Dryer Power Cord Replacement, Remove the cover plate: crwdns2935265:03crwdnd2935265:02crwdnd2935265:03crwdne2935265:0 Whirlpool WED87HED Dryer Power Cord Replacement, Remove the cover plate: crwdns2935265:03crwdnd2935265:03crwdnd2935265:03crwdne2935265:0
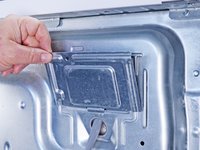
    • Remove the cover plate.

  4. Whirlpool WED87HED Dryer Power Cord Replacement, Disconnect the cord: crwdns2935265:04crwdnd2935265:01crwdnd2935265:01crwdne2935265:0
    • Mark the cables with a permanent marker if needed and take a picture or draw a diagram.

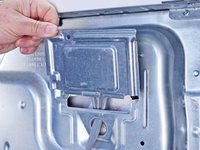
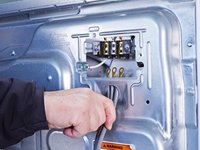
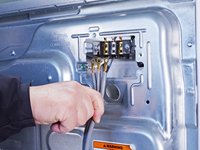
    • Use a Phillips driver or a 1/4 inch nut driver to remove the three 21.4 mm-long screws.

    • If your plug has 4 prongs, there will be a ground connection from the cord as well. Use a 5/16 inch nut driver to remove this connection.

  5. Whirlpool WED87HED Dryer Power Cord Replacement, Remove the cord: crwdns2935265:05crwdnd2935265:01crwdnd2935265:03crwdne2935265:0 Whirlpool WED87HED Dryer Power Cord Replacement, Remove the cord: crwdns2935265:05crwdnd2935265:02crwdnd2935265:03crwdne2935265:0 Whirlpool WED87HED Dryer Power Cord Replacement, Remove the cord: crwdns2935265:05crwdnd2935265:03crwdnd2935265:03crwdne2935265:0
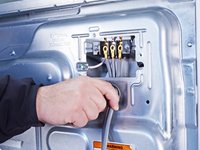
    • Pull the cord carefully down through the round hole.

    • Make sure you replace the connections correctly when you reassemble.

crwdns2915888:0crwdne2915888:0

To reassemble your device, follow these instructions in reverse order.

Repair didn’t go as planned? Ask our Answers community for help.

Bill Gilbert

crwdns2935283:006/30/22crwdne2935283:0

37.518 crwdns2915208:0crwdne2915208:0

crwdns2935297:0261crwdne2935297:0

crwdns2915084:0crwdne2915084:0

iFixit crwdns2935289:0iFixitcrwdne2935289:0

Staff

crwdns2931471:0120crwdne2931471:0

crwdns2935297:020.002crwdne2935297:0

crwdns2947412:00crwdne2947412:0

crwdns2917038:0crwdne2917038:0

crwdns2936625:0crwdne2936625:0:

crwdns2936751:024crwdne2936751:0 0

crwdns2936753:07crwdne2936753:0 0

crwdns2936753:030crwdne2936753:0 6

crwdns2942667:0crwdne2942667:0 311