crwdns2915892:0crwdne2915892:0
This guide includes clear steps on how to properly remove and replace a motherboard in a Wacom Intuos Pro tablet. If you run into a situation where a certain part of your touchpad doesn’t work, then this is the guide for you. You will need a Phillips #00 screwdriver, and soldering kit. Be very careful when using a soldering iron. The element can reach up to 400 degrees celsius! Remember to keep the sponge wet at all times. Lastly, remember to return the iron to its stand when not in use.
crwdns2942213:0crwdne2942213:0
-
-
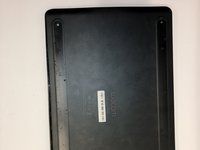
Orient the device so the bottom casing is facing upwards.
-
Use your fingers to gently pull on the rubber covers on the bottom of the device to remove them.
-
-
-
Remove the four 4mm screws from underneath the rubber feet using a Phillips #00 screwdriver.
I think the photos are slightly too zoomed in here. Also, the shots should be taken from the first person perspective. Note that screwdriver is one word.
-
-
-
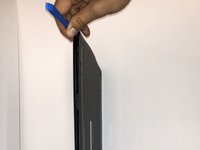
Insert the iFixit Opening Tool between the front and back cover of the device in order to snap and separate the type locks from around the edges.
-
Use the iFixit Opening Tool all the way around the edges until all the snaps have been released.
Make sure to use the first-person perspective and end punctuation on all steps. How should I use the plastic tool? Be sure to be specific. I would also add one final shot of the case being removed.
-
-
-
-
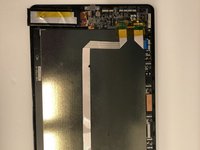
Remove the case backing from the rear of the device with your hands so the internal components are exposed.
Add picture with removing the case.
See previous comment.
-
-
-
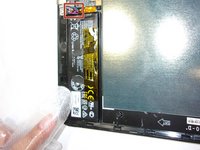
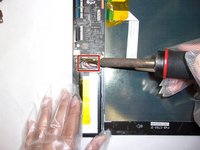
If not already done, desolder the three colored cables that connect the battery to the motherboard.
-
After desoldering the battery, carefully remove it.
Add flip book style shots here so that it’s clear how to do this.
See previous feedback here. If you need it, we have a soldering iron in the studio you can use, but you’ll have to make an appointment. I would also use markup to show where this component is.
But where's the link to source the battery?
-
-
-
Gently pull the blue tabs on the four ribbon cables from the ZIF connectors on the motherboard.
-
-
-
Remove the 4.5mm screw holding down the motherboard using a Phillips #00 screwdriver.
-
-
-
Remove all three ribbon cables by gently pulling on their respective ''Black" and "Blue" tabs.
-
-
-
Gently remove the motherboard from the case.
-


To reassemble your device, follow these instructions in reverse order.
To reassemble your device, follow these instructions in reverse order.
crwdns2935221:0crwdne2935221:0
crwdns2935227:0crwdne2935227:0

crwdns2915084:0crwdne2915084:0

The Citadel Military College of South Carolina, Team 2-13, Eggleston Fall 2021 crwdns2935289:0The Citadel Military College of South Carolina, Team 2-13, Eggleston Fall 2021crwdne2935289:0
CMCSC-EGGLESTON-F21S2G13
crwdns2931471:03crwdne2931471:0
crwdns2935297:06crwdne2935297:0
crwdns2947410:01crwdne2947410:0
i am having a problem with my wacom Intuos pro m 2017, its a Bluetooth issue with the tablet itself self so i am planning to change the Bluetooth connector inside the tablet there is no documentation or anything about the exact device that i should use.
The white balance here is off. I would also indicate the end goal of pulling off the adhesive (e.g., to remove it).
Alex Watkins - crwdns2934203:0crwdne2934203:0