crwdns2933423:0crwdne2933423:0

Verizon Ellipsis 7 Screen Replacement

crwdns2942213:0crwdne2942213:0

  1. Verizon Ellipsis 7 Screen Replacement, Charging Port: crwdns2935265:01crwdnd2935265:01crwdnd2935265:03crwdne2935265:0 Verizon Ellipsis 7 Screen Replacement, Charging Port: crwdns2935265:01crwdnd2935265:02crwdnd2935265:03crwdne2935265:0 Verizon Ellipsis 7 Screen Replacement, Charging Port: crwdns2935265:01crwdnd2935265:03crwdnd2935265:03crwdne2935265:0
    • Hold down the power button until the screen goes black to turn off the device.

    • Remove the SIM card from the device to prevent damage.

    • To remove the SIM card, open the SIM card cover on the side of the device.

    • Push SIM card in and pull it out after hearing a click.

  2. Verizon Ellipsis 7 Screen Replacement: crwdns2935265:02crwdnd2935265:01crwdnd2935265:02crwdne2935265:0 Verizon Ellipsis 7 Screen Replacement: crwdns2935265:02crwdnd2935265:02crwdnd2935265:02crwdne2935265:0
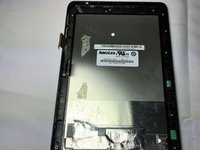
    • Take off the back panel.

    • Pry open the back cover carefully with a plastic opening tool.

    • Use the opening tool to disconnect the cover completely. Do not attempt to pry the back cover off with your hands.

    • Be sure to pry open all sides of the device. Attempting to take off the back cover when part of it is attached may snap the cover.

  3. Verizon Ellipsis 7 Screen Replacement: crwdns2935265:03crwdnd2935265:01crwdnd2935265:03crwdne2935265:0 Verizon Ellipsis 7 Screen Replacement: crwdns2935265:03crwdnd2935265:02crwdnd2935265:03crwdne2935265:0 Verizon Ellipsis 7 Screen Replacement: crwdns2935265:03crwdnd2935265:03crwdnd2935265:03crwdne2935265:0
    • Remove the charging (micro-USB) port.

    • Unscrew the indicated screws using the Phillips #00 screwdriver.

    • The screws shown in the picture are the more common 4.76 mm.

    • Disconnect the ribbon cable connecting the charging port board to the motherboard using tweezers.

    • Use the tweezers to grab the sides of black, plastic connector. Do not grab from the wires or try to wedge it out from the bottom.

    • Be extremely careful when disconnecting the ribbon cable. It is very delicate.

  4. Verizon Ellipsis 7 Screen Replacement: crwdns2935265:04crwdnd2935265:01crwdnd2935265:02crwdne2935265:0 Verizon Ellipsis 7 Screen Replacement: crwdns2935265:04crwdnd2935265:02crwdnd2935265:02crwdne2935265:0
    • Remove the charging port board from the phone using tweezers.

    • Place the replacement charging port into the phone.

    • Be cautious when replacing the ribbon cable onto the new charging port board.

  5. Verizon Ellipsis 7 Screen Replacement, Speaker: crwdns2935265:05crwdnd2935265:01crwdnd2935265:02crwdne2935265:0 Verizon Ellipsis 7 Screen Replacement, Speaker: crwdns2935265:05crwdnd2935265:02crwdnd2935265:02crwdne2935265:0
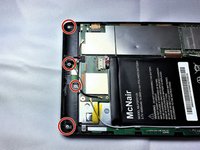
    • Remove 2 screws from each speaker, 4 screws in total, using a Phillips #00 screwdriver.

    • The screws shown in the picture are the more common 4.76 mm.

  6. Verizon Ellipsis 7 Screen Replacement: crwdns2935265:06crwdnd2935265:01crwdnd2935265:03crwdne2935265:0 Verizon Ellipsis 7 Screen Replacement: crwdns2935265:06crwdnd2935265:02crwdnd2935265:03crwdne2935265:0 Verizon Ellipsis 7 Screen Replacement: crwdns2935265:06crwdnd2935265:03crwdnd2935265:03crwdne2935265:0
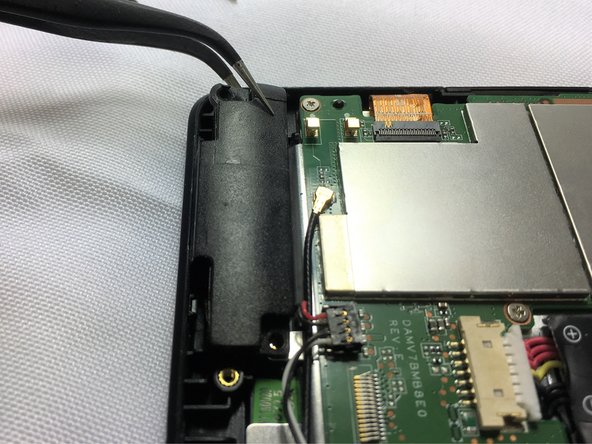
    • Using tweezers carefully lift the connector up to disconnect it from the motherboard.

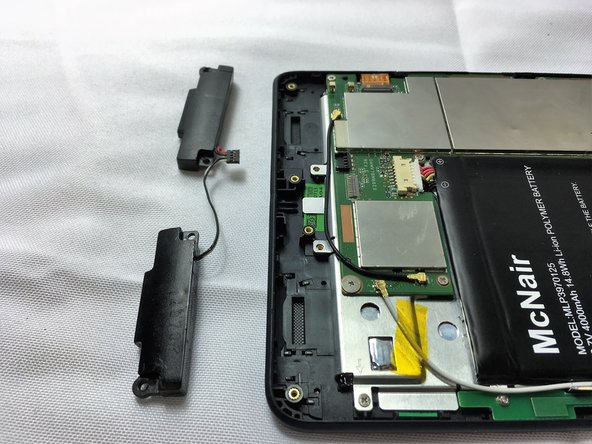
    • Using tweezers carefully pull the speakers up and out of device.

  7. Verizon Ellipsis 7 Screen Replacement, Screen: crwdns2935265:07crwdnd2935265:01crwdnd2935265:01crwdne2935265:0
    • Use the tweezers to carefully disconnect the power cable bundle from the motherboard.

  8. Verizon Ellipsis 7 Screen Replacement: crwdns2935265:08crwdnd2935265:01crwdnd2935265:02crwdne2935265:0 Verizon Ellipsis 7 Screen Replacement: crwdns2935265:08crwdnd2935265:02crwdnd2935265:02crwdne2935265:0
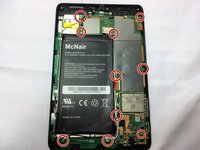
    • Remove the 10 screws from the motherboard using a Phillips #0 screwdriver.

    • The screws shown in the first picture are the more common 4.76 mm.

    • The screw shown in the second picture is shorter, 3.175 mm, than the rest of the screws

  9. Verizon Ellipsis 7 Screen Replacement: crwdns2935265:09crwdnd2935265:01crwdnd2935265:02crwdne2935265:0 Verizon Ellipsis 7 Screen Replacement: crwdns2935265:09crwdnd2935265:02crwdnd2935265:02crwdne2935265:0
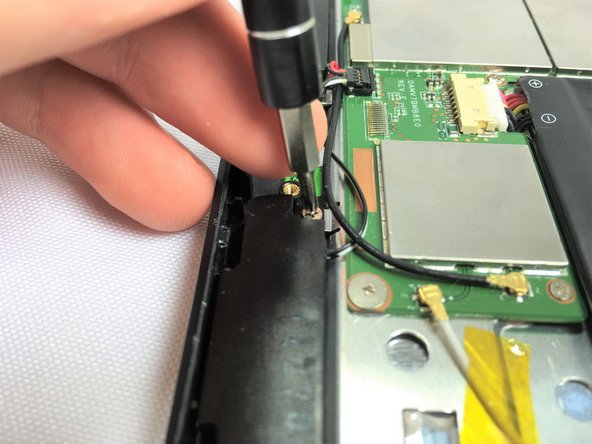
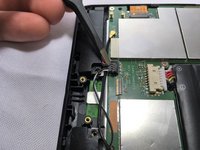
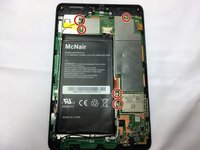
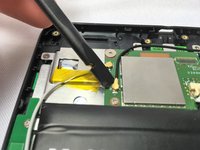
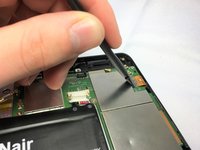
    • Remove the 5 antenna cable connectors from the motherboard using a spudger.

  10. Verizon Ellipsis 7 Screen Replacement: crwdns2935265:010crwdnd2935265:01crwdnd2935265:03crwdne2935265:0 Verizon Ellipsis 7 Screen Replacement: crwdns2935265:010crwdnd2935265:02crwdnd2935265:03crwdne2935265:0 Verizon Ellipsis 7 Screen Replacement: crwdns2935265:010crwdnd2935265:03crwdnd2935265:03crwdne2935265:0
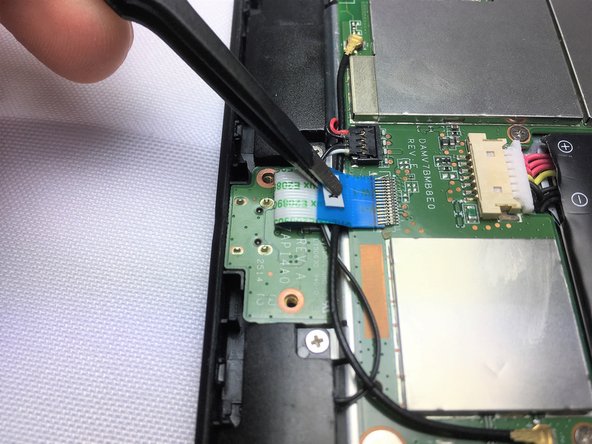
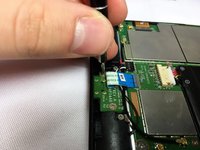
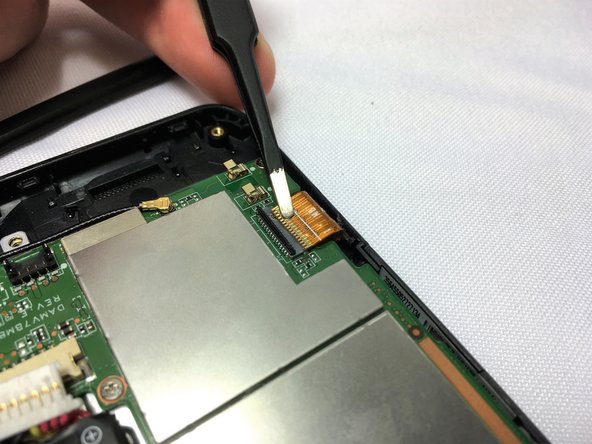
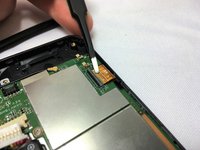
    • Disconnect the two ZIF connectors that are connected to the motherboard with a spudger. Lift up the metal part of the connector and then pull the connector off of its port

    • Once disconnected pull away from its connector carefully with tweezers.

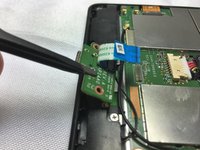
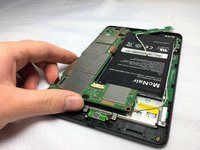
    • Once the connectors have been disconnected you can gently lift up on the motherboard to remove it from the device.

  11. Verizon Ellipsis 7 Screen Replacement: crwdns2935265:011crwdnd2935265:01crwdnd2935265:02crwdne2935265:0 Verizon Ellipsis 7 Screen Replacement: crwdns2935265:011crwdnd2935265:02crwdnd2935265:02crwdne2935265:0
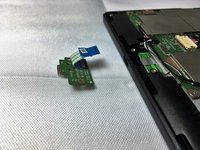
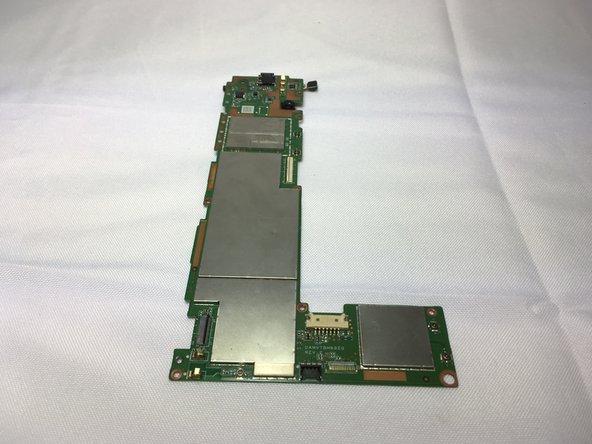
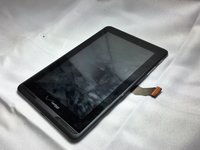
    • Remove the motherboard from the tablet.

    • Use the spudger to disconnect the press lift connector.

  12. Verizon Ellipsis 7 Screen Replacement: crwdns2935265:012crwdnd2935265:01crwdnd2935265:02crwdne2935265:0 Verizon Ellipsis 7 Screen Replacement: crwdns2935265:012crwdnd2935265:02crwdnd2935265:02crwdne2935265:0
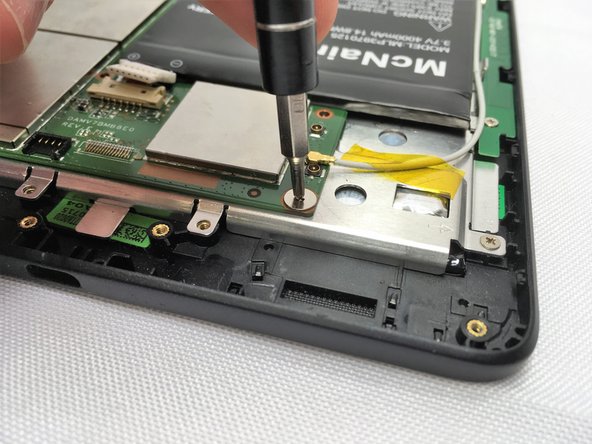
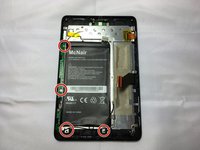
    • After you remove the motherboard, remove the other two boards by unscrewing the 4 screws with a Phillips #00 screwdriver.

    • The screws shown in the picture are the more common 4.76 mm.

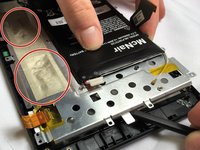
    • Remove the tape section of the sheet metal plate with the flat end of a spudger.

    • This might cause damage to your device. Be very careful when scrapping the plate off of the device.

  13. Verizon Ellipsis 7 Screen Replacement: crwdns2935265:013crwdnd2935265:01crwdnd2935265:02crwdne2935265:0 Verizon Ellipsis 7 Screen Replacement: crwdns2935265:013crwdnd2935265:02crwdnd2935265:02crwdne2935265:0
    • Remove the metal plate from the screen.

crwdns2915888:0crwdne2915888:0

To reassemble your device, follow these instructions in reverse order.

crwdns2935229:010crwdne2935229:0

Scott Mangin

crwdns2935283:001/24/17crwdne2935283:0

609 crwdns2915208:0crwdne2915208:0

crwdns2935297:02crwdne2935297:0

crwdns2915084:0crwdne2915084:0

Cal Poly, Team 13-5, Banghart Winter 2017 crwdns2935289:0Cal Poly, Team 13-5, Banghart Winter 2017crwdne2935289:0

CPSU-BANGHART-W17S13G5

crwdns2931471:04crwdne2931471:0

crwdns2935297:04crwdne2935297:0

crwdns2944067:06crwdne2944067:0

Applause for the person for uploading this repair.

Asadullah Baig - crwdns2934203:0crwdne2934203:0

should go one step further and include digitizer replacement

Daniel Blue - crwdns2934203:0crwdne2934203:0

ok, so to remove the screen from the frame (for digitizer replacement) i set the heat-bed of my 3d printer to 80c, placed the front bezel with screen and digitizer glass side down on the heater and let it sit for about 2 min.

at that point the perimeter glue was soft enough that i could carefully go aroung the lcd with a sharpened gift card and slowly work it away from the glass and frame.

once the lcd is out (hopefully not broken) i used the same method but with a bit more gusto in order to remove the digitizer from the plastic bezel.

revers steps for reinstall.

Daniel Blue - crwdns2934203:0crwdne2934203:0

So if I don't have a heat bed what else would I be able to use?

Jenny Mena - crwdns2934203:0crwdne2934203:0

Too hard i only paid 50$ for it. Oh

Larry Patterson - crwdns2934203:0crwdne2934203:0

crwdns2917038:0crwdne2917038:0

crwdns2936625:0crwdne2936625:0:

crwdns2936751:024crwdne2936751:0 0

crwdns2936753:07crwdne2936753:0 4

crwdns2936753:030crwdne2936753:0 13

crwdns2942667:0crwdne2942667:0 9,550