crwdns2933423:0crwdne2933423:0

Ventilation Plate Removal

crwdns2862623:0crwdne2862623:0
crwdns2942641:0crwdne2942641:0

crwdns2942213:0crwdne2942213:0

  1. Ventilation Plate Removal, Before you begin: crwdns2935265:01crwdnd2935265:01crwdnd2935265:02crwdne2935265:0 Ventilation Plate Removal, Before you begin: crwdns2935265:01crwdnd2935265:02crwdnd2935265:02crwdne2935265:0
    • Unplug all cables and fully shut down your laptop.

    • If your repair requires a spudger, a T5 Torx, or a Phillips screwdriver, you can use the included Framework screwdriver. Whichever works best for you!

  2. Ventilation Plate Removal, Remove the touchpad spacers: crwdns2935265:02crwdnd2935265:01crwdnd2935265:03crwdne2935265:0 Ventilation Plate Removal, Remove the touchpad spacers: crwdns2935265:02crwdnd2935265:02crwdnd2935265:03crwdne2935265:0 Ventilation Plate Removal, Remove the touchpad spacers: crwdns2935265:02crwdnd2935265:03crwdnd2935265:03crwdne2935265:0
    • Use your fingers to slide the touchpad spacer toward the bottom edge of the laptop and unclip it.

    • If you're having trouble, check if the corresponding Input Module latch is properly unlocked.

    • Lift the touchpad spacer off the laptop and remove it.

  3. Ventilation Plate Removal: crwdns2935265:03crwdnd2935265:01crwdnd2935265:01crwdne2935265:0
    • Repeat the same procedure for the other touchpad spacer.

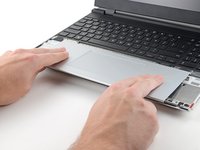
  4. Ventilation Plate Removal, Remove the touchpad: crwdns2935265:04crwdnd2935265:01crwdnd2935265:03crwdne2935265:0 Ventilation Plate Removal, Remove the touchpad: crwdns2935265:04crwdnd2935265:02crwdnd2935265:03crwdne2935265:0 Ventilation Plate Removal, Remove the touchpad: crwdns2935265:04crwdnd2935265:03crwdnd2935265:03crwdne2935265:0
    • Use your fingers to slide the touchpad toward the bottom edge of the laptop and disconnect it.

    • If you're having trouble, check if the Input Module latches are properly unlocked.

    • Lift the touchpad and remove it.

    • During reassembly, perform the following:

    • Place the touchpad flat on its cutout so its clips are properly aligned.

    • Press the touchpad down and slide it into place so it lines up evenly with the bottom edge of the laptop.

  5. Ventilation Plate Removal, Remove the keyboard: crwdns2935265:05crwdnd2935265:01crwdnd2935265:03crwdne2935265:0 Ventilation Plate Removal, Remove the keyboard: crwdns2935265:05crwdnd2935265:02crwdnd2935265:03crwdne2935265:0 Ventilation Plate Removal, Remove the keyboard: crwdns2935265:05crwdnd2935265:03crwdnd2935265:03crwdne2935265:0
    • The keyboard is held in place with strong magnets. Apply gradually increasing force to avoid having the keyboard violently eject.

    • Grip the two pull tabs along the bottom of the keyboard.

    • Lift the pull tabs until the keyboard magnets release.

    • Remove the keyboard.

    • During reassembly, make sure the keyboard is seated properly on its alignment pegs and sits evenly with the edges of the laptop.

  6. Ventilation Plate Removal, Remove the numpad: crwdns2935265:06crwdnd2935265:01crwdnd2935265:03crwdne2935265:0 Ventilation Plate Removal, Remove the numpad: crwdns2935265:06crwdnd2935265:02crwdnd2935265:03crwdne2935265:0 Ventilation Plate Removal, Remove the numpad: crwdns2935265:06crwdnd2935265:03crwdnd2935265:03crwdne2935265:0
    • The numpad is held in place with strong magnets. Apply gradually increasing force to avoid having the numpad violently eject.

    • Grip the pull tab at the bottom of the numpad.

    • Lift the pull tab until the numpad magnets release.

    • Remove the numpad.

    • During reassembly, make sure the numpad is seated properly on its alignment pegs and sits flush with the edges of the laptop.

  7. Ventilation Plate Removal, Disconnect the midframe cable: crwdns2935265:07crwdnd2935265:01crwdnd2935265:02crwdne2935265:0 Ventilation Plate Removal, Disconnect the midframe cable: crwdns2935265:07crwdnd2935265:02crwdnd2935265:02crwdne2935265:0
    • Grip the black pull tab on the midframe cable press connector.

    • Lift up to disconnect the midframe cable.

  8. Ventilation Plate Removal, Loosen the midframe screws: crwdns2935265:08crwdnd2935265:01crwdnd2935265:02crwdne2935265:0 Ventilation Plate Removal, Loosen the midframe screws: crwdns2935265:08crwdnd2935265:02crwdnd2935265:02crwdne2935265:0
    • The midframe screws are ordered from 2–17 (number 1 is the press connector). You don't have to follow the order, but you can use it to help keep track of the screws you've loosened.

    • Use a T5 Torx screwdriver to loosen the 16 captive screws securing the midframe.

    • During reassembly, follow the order (starting with 2) to reinstall the screws across the midframe evenly.

  9. Ventilation Plate Removal, Remove the midframe: crwdns2935265:09crwdnd2935265:01crwdnd2935265:02crwdne2935265:0 Ventilation Plate Removal, Remove the midframe: crwdns2935265:09crwdnd2935265:02crwdnd2935265:02crwdne2935265:0
    • Use your fingernail to lift the bottom edge of the midframe enough to grip it with your fingers.

  10. Ventilation Plate Removal: crwdns2935265:010crwdnd2935265:01crwdnd2935265:02crwdne2935265:0 Ventilation Plate Removal: crwdns2935265:010crwdnd2935265:02crwdnd2935265:02crwdne2935265:0
    • Lift the midframe off the laptop and remove it.

    • During reassembly, make sure the midframe sits evenly on its alignment pegs before tightening the screws.

  11. Ventilation Plate Removal, Loosen the battery screws: crwdns2935265:011crwdnd2935265:01crwdnd2935265:02crwdne2935265:0 Ventilation Plate Removal, Loosen the battery screws: crwdns2935265:011crwdnd2935265:02crwdnd2935265:02crwdne2935265:0
    • Use a T5 Torx screwdriver to loosen the three captive screws securing the battery.

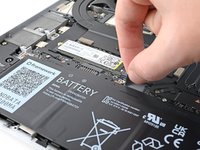
  12. Ventilation Plate Removal, Remove the battery: crwdns2935265:012crwdnd2935265:01crwdnd2935265:03crwdne2935265:0 Ventilation Plate Removal, Remove the battery: crwdns2935265:012crwdnd2935265:02crwdnd2935265:03crwdne2935265:0 Ventilation Plate Removal, Remove the battery: crwdns2935265:012crwdnd2935265:03crwdnd2935265:03crwdne2935265:0
    • Grip the black pull tab at the top of the battery.

    • Lift the pull tab to disconnect the battery connector.

    • Remove the battery.

  13. Ventilation Plate Removal, Lift the interposer door: crwdns2935265:013crwdnd2935265:01crwdnd2935265:02crwdne2935265:0 Ventilation Plate Removal, Lift the interposer door: crwdns2935265:013crwdnd2935265:02crwdnd2935265:02crwdne2935265:0
    • Lift the interposer door by its black pull tab and let it rest upright.

  14. Ventilation Plate Removal, Loosen the interposer screws: crwdns2935265:014crwdnd2935265:01crwdnd2935265:03crwdne2935265:0 Ventilation Plate Removal, Loosen the interposer screws: crwdns2935265:014crwdnd2935265:02crwdnd2935265:03crwdne2935265:0 Ventilation Plate Removal, Loosen the interposer screws: crwdns2935265:014crwdnd2935265:03crwdnd2935265:03crwdne2935265:0
    • If you have the graphics module installed, your interposer will have four screws. Otherwise, you'll have three screws.

    • Lift the pull tab on the interposer and let it rest vertically to access all of its screws.

    • Use a T5 Torx screwdriver to loosen the three captive screws securing the interposer.

    • If you have the graphics module, use a T5 Torx screwdriver to loosen the four captive screws securing the interposer.

  15. Ventilation Plate Removal, Remove the interposer: crwdns2935265:015crwdnd2935265:01crwdnd2935265:02crwdne2935265:0 Ventilation Plate Removal, Remove the interposer: crwdns2935265:015crwdnd2935265:02crwdnd2935265:02crwdne2935265:0
    • Lift the interposer by its pull tab and remove it.

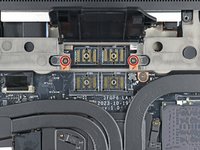
  16. Ventilation Plate Removal, Loosen the expansion bay screws: crwdns2935265:016crwdnd2935265:01crwdnd2935265:02crwdne2935265:0 Ventilation Plate Removal, Loosen the expansion bay screws: crwdns2935265:016crwdnd2935265:02crwdnd2935265:02crwdne2935265:0
    • Use a T5 Torx screwdriver to loosen the two captive screws securing the expansion bay.

    • Close the interposer door before continuing.

  17. Ventilation Plate Removal, Remove the expansion bay: crwdns2935265:017crwdnd2935265:01crwdnd2935265:03crwdne2935265:0 Ventilation Plate Removal, Remove the expansion bay: crwdns2935265:017crwdnd2935265:02crwdnd2935265:03crwdne2935265:0 Ventilation Plate Removal, Remove the expansion bay: crwdns2935265:017crwdnd2935265:03crwdnd2935265:03crwdne2935265:0
    • Close your laptop and flip it over.

    • Slide the expansion bay out of the laptop and remove it.

    • The bay should slide out easily. If you feel any resistance, check if the screws holding it in place are fully loosened.

  18. Ventilation Plate Removal, Disconnect the fingerprint sensor: crwdns2935265:018crwdnd2935265:01crwdnd2935265:03crwdne2935265:0 Ventilation Plate Removal, Disconnect the fingerprint sensor: crwdns2935265:018crwdnd2935265:02crwdnd2935265:03crwdne2935265:0 Ventilation Plate Removal, Disconnect the fingerprint sensor: crwdns2935265:018crwdnd2935265:03crwdnd2935265:03crwdne2935265:0
    • Use the flat end of a spudger, or a clean fingernail, to lift up the locking tab on the fingerprint sensor ZIF connector.

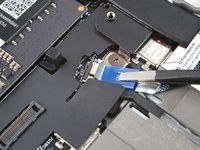
  19. Ventilation Plate Removal: crwdns2935265:019crwdnd2935265:01crwdnd2935265:02crwdne2935265:0 Ventilation Plate Removal: crwdns2935265:019crwdnd2935265:02crwdnd2935265:02crwdne2935265:0
    crwdns2935267:0crwdne2935267:0
    Tweezers
    $4.99
    • Use tweezers, or your fingers, to grip the blue pull tab and slide the fingerprint sensor cable straight out of its socket.

  20. Ventilation Plate Removal: crwdns2935265:020crwdnd2935265:01crwdnd2935265:03crwdne2935265:0 Ventilation Plate Removal: crwdns2935265:020crwdnd2935265:02crwdnd2935265:03crwdne2935265:0 Ventilation Plate Removal: crwdns2935265:020crwdnd2935265:03crwdnd2935265:03crwdne2935265:0
    • The fingerprint sensor cable is lightly adhered to the laptop frame.

    • Use your fingers to peel the fingerprint sensor cable away from the frame and separate the adhesive.

    • During reassembly, if your adhesive is still sticky, press the cable to the frame to re-adhere it. Otherwise, use double-sided tape to replace the adhesive.

  21. Ventilation Plate Removal, Remove the ventilation plate: crwdns2935265:021crwdnd2935265:01crwdnd2935265:03crwdne2935265:0 Ventilation Plate Removal, Remove the ventilation plate: crwdns2935265:021crwdnd2935265:02crwdnd2935265:03crwdne2935265:0 Ventilation Plate Removal, Remove the ventilation plate: crwdns2935265:021crwdnd2935265:03crwdnd2935265:03crwdne2935265:0
    • The ventilation plate is held in place with magnets.

    • Lift the bottom of the ventilation plate and pull it away from the laptop until the magnets release.

    • Remove the ventilation plate.

crwdns2915888:0crwdne2915888:0

To reassemble your device, follow these instructions in reverse order.

Alex Diaz-Kokaisl

crwdns2935283:001/16/22crwdne2935283:0

165,576 crwdns2915208:0crwdne2915208:0

crwdns2935297:0769crwdne2935297:0

crwdns2915084:0crwdne2915084:0

iFixit crwdns2935289:0iFixitcrwdne2935289:0

Staff

crwdns2931471:0120crwdne2931471:0

crwdns2935297:020,002crwdne2935297:0

crwdns2947412:00crwdne2947412:0

crwdns2917038:0crwdne2917038:0

crwdns2936625:0crwdne2936625:0:

crwdns2936751:024crwdne2936751:0 0

crwdns2936753:07crwdne2936753:0 0

crwdns2936753:030crwdne2936753:0 1

crwdns2942667:0crwdne2942667:0 20