crwdns2915892:0crwdne2915892:0
This guide will show you how to replace a cracked or malfunctioning display for your Velocity Micro Tablet T301.
The display, or screen, of the tablet may need to be replaced if the glass cracks or is broken as this can affect its touch screen capabilities. A cracked or broken screen can also potentially lead to injuries. You may also need to replace the display if the light-emitting pixels powering the display are beginning to dim or malfunction, leading to uneven lighting and color.
Be sure to completely power off your tablet and disconnect it from any external power sources before beginning this guide. If your display is shattered, follow this guide to avoid injury while replacing the display. Finally, make sure to acquire the necessary tools listed in the "What you need" section of this guide.
crwdns2942213:0crwdne2942213:0
-
-
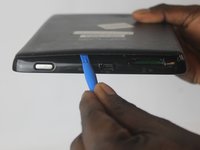
Insert the larger plastic opening tool in the SD port. The edge point should be pointed towards the rear panel.
-
-
-
Insert a small opening tool between the rear panel and the tablet.
-
-
-
The large opening tool can now be removed, leaving only the small opening tool in place.
-
-
-
Slide the small opening tool along the seam of the rear panel to fully remove it.
-
-
-
Using a PH0 Phillips Driver, remove the 4 screws holding down the battery.
-
-
-
Using a plastic spudger, disconnect the wire attaching the battery to the tablet.
-
-
-
Using a PH0 Phillips Driver, remove the 12 screws around the frame.
-
-
-
Insert a metal spudger in the seam of the screen and the back cover.
-
-
-
Slide the spudger around the tablet to release the clips attached to the screen, thus detaching the back and revealing the motherboard.
-
-
-
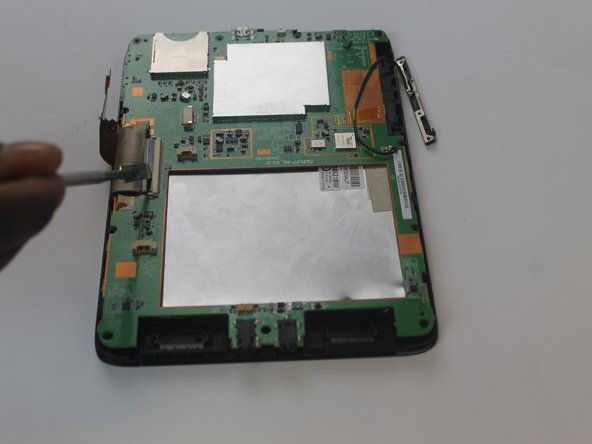
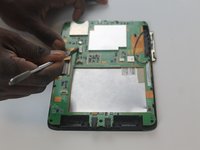
Use a plastic spudger to disconnect the wires between the speakers and the motherboard as shown in the picture.
-
-
-
Using a metal spudger, remove the top plug connector from the motherboard.
-
-
-
Use a metal spudger to remove both screen cable connectors.
-
-
-
Use opening tools to remove the motherboard.
-
-
-
Remove the motherboard cover to access the screen display.
-


To reassemble your device, follow these instructions in reverse order.
crwdns2935287:0crwdne2935287:0

USF Tampa, Team 1-6, Cagle Fall 2016 crwdns2935289:0USF Tampa, Team 1-6, Cagle Fall 2016crwdne2935289:0
USFT-CAGLE-F16S1G6
crwdns2931471:03crwdne2931471:0
crwdns2935297:05crwdne2935297:0