crwdns2933423:0crwdne2933423:0

VTech Write and Learn Creative Center Speaker Replacement

crwdns2942213:0crwdne2942213:0

  1. VTech Write and Learn Creative Center Speaker Replacement, Back Panel: crwdns2935265:01crwdnd2935265:01crwdnd2935265:03crwdne2935265:0 VTech Write and Learn Creative Center Speaker Replacement, Back Panel: crwdns2935265:01crwdnd2935265:02crwdnd2935265:03crwdne2935265:0 VTech Write and Learn Creative Center Speaker Replacement, Back Panel: crwdns2935265:01crwdnd2935265:03crwdnd2935265:03crwdne2935265:0
    • Remove all eleven 9mm PH 2 Phillips screws securing the back of the case.

  2. VTech Write and Learn Creative Center Speaker Replacement, Speaker: crwdns2935265:02crwdnd2935265:01crwdnd2935265:03crwdne2935265:0 VTech Write and Learn Creative Center Speaker Replacement, Speaker: crwdns2935265:02crwdnd2935265:02crwdnd2935265:03crwdne2935265:0 VTech Write and Learn Creative Center Speaker Replacement, Speaker: crwdns2935265:02crwdnd2935265:03crwdnd2935265:03crwdne2935265:0
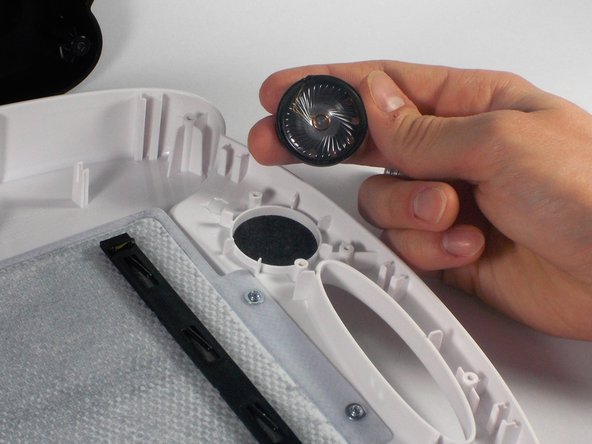
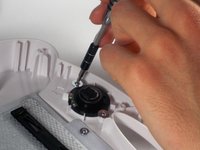
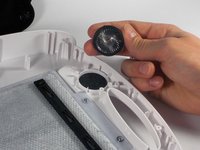
    • In order to remove the speaker, you must desolder the two wires connecting it to the circuit board.

    • When you desolder, apply the tip of the soldering iron to the soldered joint for approximately 5 - 10 seconds.

    • The soldered joint will turn to a liquid consistency. At this moment, remove the wire and soldering iron.

    • Repeat each of the following steps for the second soldered joint.

    • Soldering irons are dangerously hot. The soldering iron should only come in contact with joints being desoldered or soldered.

    • Make sure to allow time for your soldering iron to heat up before using it.

    • Make sure the tip of the soldering iron is cleaned so the tin on the tip is exposed. This will allow the soldering iron to work efficiently.

  3. VTech Write and Learn Creative Center Speaker Replacement: crwdns2935265:03crwdnd2935265:01crwdnd2935265:02crwdne2935265:0 VTech Write and Learn Creative Center Speaker Replacement: crwdns2935265:03crwdnd2935265:02crwdnd2935265:02crwdne2935265:0
    • Remove the 2 5mm PH 0 Phillips screws with 10 mm heads that secure the speaker to the front of the case.

crwdns2915888:0crwdne2915888:0

To reassemble your device, follow these instructions in reverse order.

Victoria Hathaway

crwdns2935283:004/06/16crwdne2935283:0

310 crwdns2915208:0crwdne2915208:0

crwdns2935297:03crwdne2935297:0

crwdns2915084:0crwdne2915084:0

UMass Dartmouth, Team 1-2, Miles Spring 2016 crwdns2935289:0UMass Dartmouth, Team 1-2, Miles Spring 2016crwdne2935289:0

UMASSD-MILES-S16S1G2

crwdns2931471:03crwdne2931471:0

crwdns2935297:012crwdne2935297:0

crwdns2944067:00crwdne2944067:0

crwdns2917038:0crwdne2917038:0

crwdns2936625:0crwdne2936625:0:

crwdns2936751:024crwdne2936751:0 0

crwdns2936753:07crwdne2936753:0 5

crwdns2936753:030crwdne2936753:0 14

crwdns2942667:0crwdne2942667:0 1,089