crwdns2933423:0crwdne2933423:0

crwdns2931315:0crwdnd2931315:0crwdne2931315:0

crwdns2942213:0crwdne2942213:0

  1. crwdns2935201:0crwdne2935201:0 crwdns2935203:0crwdne2935203:0

    : crwdns2935265:01crwdnd2935265:01crwdnd2935265:02crwdne2935265:0 : crwdns2935265:01crwdnd2935265:02crwdnd2935265:02crwdne2935265:0
    • Unscrew 11 PH2 screws (7 mm).

    • Remove black plastic backing.

    • Remove the batteries from the toy before beginning replacement of the whammy bar.

  2. crwdns2935201:0crwdne2935201:0 crwdns2935203:0crwdne2935203:0

    : crwdns2935265:02crwdnd2935265:01crwdnd2935265:02crwdne2935265:0 : crwdns2935265:02crwdnd2935265:02crwdnd2935265:02crwdne2935265:0
    • Remove PH2 screw (5 mm) from yellow/gold colored circuit board and pull back to access the whammy component.

  3. crwdns2935201:0crwdne2935201:0 crwdns2935203:0crwdne2935203:0

    : crwdns2935265:03crwdnd2935265:01crwdnd2935265:02crwdne2935265:0 : crwdns2935265:03crwdnd2935265:02crwdnd2935265:02crwdne2935265:0
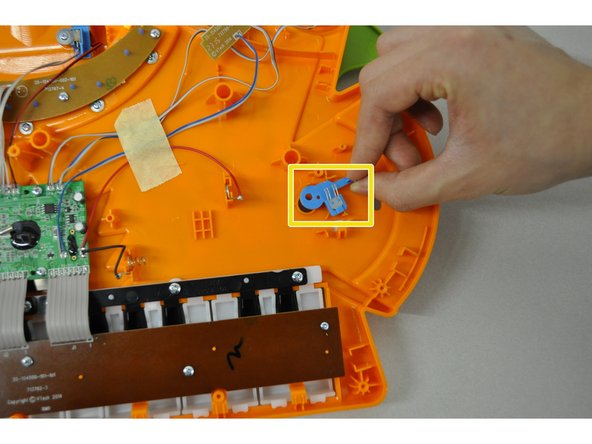
    • Remove 3 PH2 (5 mm) screws connected to the whammy bar component.

    • Remove blue piece from back of the device. This will free the whammy bar. Replace the whammy bar with new part.

crwdns2935217:0crwdne2935217:0

Shaina Carbonel

crwdns2935283:002/01/16crwdne2935283:0

537 crwdns2915208:0crwdne2915208:0

crwdns2935297:05crwdne2935297:0

crwdns2915084:0crwdne2915084:0

UW Tacoma, Team 1-1, Rose Winter 2016 crwdns2935289:0UW Tacoma, Team 1-1, Rose Winter 2016crwdne2935289:0

UWT-ROSE-W16S1G1

crwdns2931471:05crwdne2931471:0

crwdns2935297:010crwdne2935297:0

crwdns2944067:00crwdne2944067:0

crwdns2917038:0crwdne2917038:0

crwdns2936625:0crwdne2936625:0:

crwdns2936751:024crwdne2936751:0 3

crwdns2936753:07crwdne2936753:0 6

crwdns2936753:030crwdne2936753:0 7

crwdns2942667:0crwdne2942667:0 209