crwdns2915892:0crwdne2915892:0
Use this guide to remove and replace the speaker.
crwdns2942213:0crwdne2942213:0
-
-
Locate the four plastic screw covers denoted by the markers and gently pry them up with the metal spudger.
-
-
-
Remove all four (11mm) screws with the Philips #0 screwdriver.
-
-
-
Remove the two battery cartridges located on the underside of the camera.
-
Once cartridges are removed, use the metal spudger to pry open the top, bottom, and both sides of the camera.
-
-
-
The device should now be open and ready for further repair and/or replacement parts.
-
-
-
-
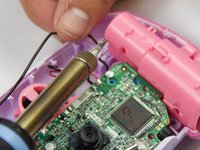
Locate and remove the screws circled in the provided image with a Philips #0 screwdriver.
-
-
-
Unsolder the connection points on the motherboard.
-
-
-
Unsolder the connections to the right battery terminal. Removing the terminal allows easier access to the motherboard.
-
-
-
Carefully pull up on the motherboard and pink plastic underneath the motherboard. The pink plastic contains the display and is connected to the motherboard.
-
-
-
The speaker is glued in so you must use the metal spudger to break the seal made by the glue.
-
-
-
Once the seal is broken the speaker should move freely. Carefully lift and remove the speaker along with its attached red and black wires.
-


To reassemble your device, follow these instructions in reverse order.
crwdns2935221:0crwdne2935221:0
crwdns2935229:02crwdne2935229:0
crwdns2935287:0crwdne2935287:0

USF Tampa, Team 6-4, Eyestone Spring 2016 crwdns2935289:0USF Tampa, Team 6-4, Eyestone Spring 2016crwdne2935289:0
USFT-EYESTONE-S16S6G4
crwdns2931471:04crwdne2931471:0
crwdns2935297:05crwdne2935297:0