crwdns2933423:0crwdne2933423:0

Ubee DVW23C Power Supply Unit Replacement

crwdns2942213:0crwdne2942213:0

  1. Ubee DVW23C Power Supply Unit Replacement, Power Supply Unit: crwdns2935265:01crwdnd2935265:01crwdnd2935265:03crwdne2935265:0 Ubee DVW23C Power Supply Unit Replacement, Power Supply Unit: crwdns2935265:01crwdnd2935265:02crwdnd2935265:03crwdne2935265:0 Ubee DVW23C Power Supply Unit Replacement, Power Supply Unit: crwdns2935265:01crwdnd2935265:03crwdnd2935265:03crwdne2935265:0
    • The DVW32C(B) (The B is only present when provided by certain ISPs) is an easily user-serviceable device

    • It won't turn on and you want to replace the PSU? This guide will show you how.

    • Let's get started. You need a T10 Torx Screwdriver for this guide.

  2. Ubee DVW23C Power Supply Unit Replacement: crwdns2935265:02crwdnd2935265:01crwdnd2935265:03crwdne2935265:0 Ubee DVW23C Power Supply Unit Replacement: crwdns2935265:02crwdnd2935265:02crwdnd2935265:03crwdne2935265:0 Ubee DVW23C Power Supply Unit Replacement: crwdns2935265:02crwdnd2935265:03crwdnd2935265:03crwdne2935265:0
    • Unscrew these 4 screws. All screws on this device are T10.

    • Then, flip over the device

  3. Ubee DVW23C Power Supply Unit Replacement: crwdns2935265:03crwdnd2935265:01crwdnd2935265:01crwdne2935265:0
    • Take a pry tool and pull the cover off, on the side facing up from the last step. This is the side without the label.

  4. Ubee DVW23C Power Supply Unit Replacement: crwdns2935265:04crwdnd2935265:01crwdnd2935265:02crwdne2935265:0 Ubee DVW23C Power Supply Unit Replacement: crwdns2935265:04crwdnd2935265:02crwdnd2935265:02crwdne2935265:0
    • You can now see inside.

    • The PSU is marked in red

    • The lights are marked in yellow

    • The Broadcom Chip is marked in green

  5. Ubee DVW23C Power Supply Unit Replacement: crwdns2935265:05crwdnd2935265:01crwdnd2935265:02crwdne2935265:0 Ubee DVW23C Power Supply Unit Replacement: crwdns2935265:05crwdnd2935265:02crwdnd2935265:02crwdne2935265:0
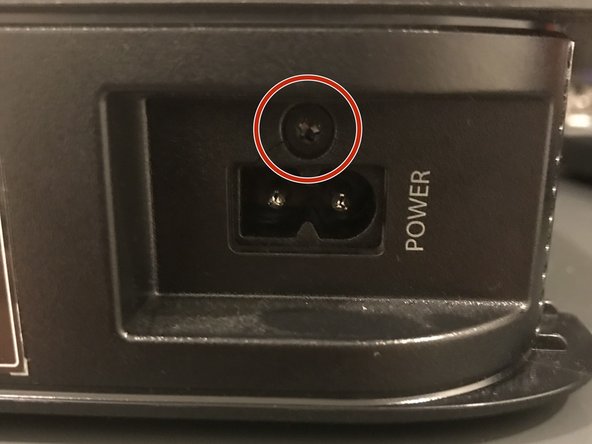
    • Unscrew the 2 screws marked in red.

    • WARNING: The screw by the connector is a different size than the chassis screw. Keep PSU screws and chassis screws separate.

    • Disconnect the PSU Cable from the motherboard.

  6. Ubee DVW23C Power Supply Unit Replacement: crwdns2935265:06crwdnd2935265:01crwdnd2935265:01crwdne2935265:0
    • You can now remove the PSU.

    • Great job! Make sure you properly reconnect the cable connecting the motherboard and PSU after replacement.

crwdns2915888:0crwdne2915888:0

To reassemble your device, follow these instructions in reverse order, and plug in the PSU into the motherboard.

crwdns2935227:0crwdne2935227:0

9021007

crwdns2935283:007/13/18crwdne2935283:0

4.599 crwdns2915208:0crwdne2915208:0

crwdns2935297:025crwdne2935297:0

crwdns2944067:00crwdne2944067:0

crwdns2917038:0crwdne2917038:0

crwdns2936625:0crwdne2936625:0:

crwdns2936751:024crwdne2936751:0 0

crwdns2936753:07crwdne2936753:0 1

crwdns2936753:030crwdne2936753:0 5

crwdns2942667:0crwdne2942667:0 90