crwdns2933423:0crwdne2933423:0

Turtle Beach Elite 800 Audio Board Replacement

crwdns2942213:0crwdne2942213:0

  1. Turtle Beach Elite 800 Audio Board Replacement, Ear Cushion: crwdns2935265:01crwdnd2935265:01crwdnd2935265:02crwdne2935265:0 Turtle Beach Elite 800 Audio Board Replacement, Ear Cushion: crwdns2935265:01crwdnd2935265:02crwdnd2935265:02crwdne2935265:0
    • To remove the ear cushions, press firmly down and rotate them clockwise, it should twist about 2mm and release, allowing you to pull it off.

    • When reassembling, be sure to line up the locking plates.

  2. Turtle Beach Elite 800 Audio Board Replacement, Audio Board: crwdns2935265:02crwdnd2935265:01crwdnd2935265:02crwdne2935265:0 Turtle Beach Elite 800 Audio Board Replacement, Audio Board: crwdns2935265:02crwdnd2935265:02crwdnd2935265:02crwdne2935265:0
    • Remove the screws (9.47 mm Phillips head) from the blue plating on the headset to reveal the inside.

  3. Turtle Beach Elite 800 Audio Board Replacement: crwdns2935265:03crwdnd2935265:01crwdnd2935265:02crwdne2935265:0 Turtle Beach Elite 800 Audio Board Replacement: crwdns2935265:03crwdnd2935265:02crwdnd2935265:02crwdne2935265:0
    • If you are working on the LEFT side ear, you will first have to detach the battery by gently unplugging the white plug on the top of the board.

    • Make sure when unplugging the battery to not pull the manilla colored part which is attached to the board, but the white plug instead.

    • If you are working on the RIGHT side ear, you will first have to remove the charging contacts (2 7.92 mm Phillips screws).

  4. Turtle Beach Elite 800 Audio Board Replacement: crwdns2935265:04crwdnd2935265:01crwdnd2935265:03crwdne2935265:0 Turtle Beach Elite 800 Audio Board Replacement: crwdns2935265:04crwdnd2935265:02crwdnd2935265:03crwdne2935265:0 Turtle Beach Elite 800 Audio Board Replacement: crwdns2935265:04crwdnd2935265:03crwdnd2935265:03crwdne2935265:0
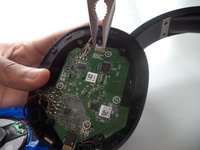
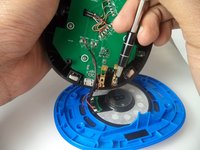
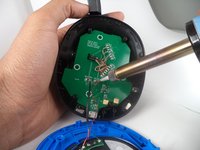
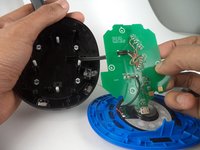
    • Desolder the necessary wires. (Each side will be slightly different.)

    • Be careful when using a soldering iron. Refer to the desoldering guide for tips.

    • For the purpose of this guide we clipped the wires connected to the board.

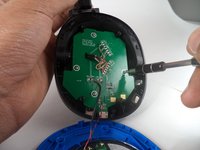
    • Remove the 4 screws (7.71mm Phillips head) using the #0 screw bit, that are holding the board in place.

    • Finally, remove the audio board.

crwdns2915888:0crwdne2915888:0

To reassemble your device, follow these instructions in reverse order.

crwdns2935229:02crwdne2935229:0

Johnny Lofton

crwdns2935283:001/18/17crwdne2935283:0

861 crwdns2915208:0crwdne2915208:0

crwdns2935297:05crwdne2935297:0

crwdns2915084:0crwdne2915084:0

Arkansas State University, Team 1-5, Chamberlain Spring 2017 crwdns2935289:0Arkansas State University, Team 1-5, Chamberlain Spring 2017crwdne2935289:0

ARSU-CHAMBERLAIN-S17S1G5

crwdns2931471:03crwdne2931471:0

crwdns2935297:010crwdne2935297:0

crwdns2944067:00crwdne2944067:0

crwdns2917038:0crwdne2917038:0

crwdns2936625:0crwdne2936625:0:

crwdns2936751:024crwdne2936751:0 0

crwdns2936753:07crwdne2936753:0 0

crwdns2936753:030crwdne2936753:0 10

crwdns2942667:0crwdne2942667:0 1,901