crwdns2933423:0crwdne2933423:0

Turtle Beach Ear Force P11 Speakers Replacement

crwdns2942213:0crwdne2942213:0

  1. Turtle Beach Ear Force P11 Speakers Replacement, Ear Cushion: crwdns2935265:01crwdnd2935265:01crwdnd2935265:01crwdne2935265:0
    • Pinch the inner edge of the ear cushion from the bottom.

  2. Turtle Beach Ear Force P11 Speakers Replacement: crwdns2935265:02crwdnd2935265:01crwdnd2935265:01crwdne2935265:0
    • Now slowly pull down the ear cushion as it completely separates from the speaker.

    • Carry out the pulling down action as slowly as possible or you might risk tearing the ear cushion otherwise

  3. Turtle Beach Ear Force P11 Speakers Replacement, Speakers: crwdns2935265:03crwdnd2935265:01crwdnd2935265:01crwdne2935265:0
    • Remove the 4 screws on the red speaker cover.

    • It is recommended to use a #000 Philips Screw Driver

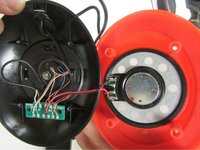
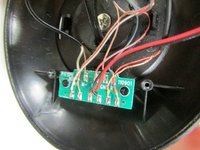
  4. Turtle Beach Ear Force P11 Speakers Replacement: crwdns2935265:04crwdnd2935265:01crwdnd2935265:02crwdne2935265:0 Turtle Beach Ear Force P11 Speakers Replacement: crwdns2935265:04crwdnd2935265:02crwdnd2935265:02crwdne2935265:0
    • Inspect the wires for damage as illustrated

  5. Turtle Beach Ear Force P11 Speakers Replacement: crwdns2935265:05crwdnd2935265:01crwdnd2935265:01crwdne2935265:0
    • De-solder the speaker wires and remove the speaker.

    • Use low heat for de - soldering

  6. Turtle Beach Ear Force P11 Speakers Replacement: crwdns2935265:06crwdnd2935265:01crwdnd2935265:01crwdne2935265:0
    • Solder the new speaker wires in the same position as the old one.

    • It is advisable to use a lead free solder

    • Use a small amount of solder to not mix up the connections and prevent short circuiting.

    • In case you use a large amount of solder, use a solder wick to absorb the excess solder.

    • You can find more information on "How To Solder" here:How To Solder and Desolder Connections

crwdns2915888:0crwdne2915888:0

To reassemble your device, follow these instructions in reverse order.

crwdns2935229:04crwdne2935229:0

Bhavesh Gandhi

crwdns2935283:009/26/15crwdne2935283:0

585 crwdns2915208:0crwdne2915208:0

crwdns2935297:03crwdne2935297:0

crwdns2915084:0crwdne2915084:0

IUPUI, Team 1-2, Wilson Fall 2015 crwdns2935289:0IUPUI, Team 1-2, Wilson Fall 2015crwdne2935289:0

IUPUI-WILSON-F15S1G2

crwdns2931471:02crwdne2931471:0

crwdns2935297:06crwdne2935297:0

crwdns2944067:06crwdne2944067:0

can you fix mine contact me a jtrent238@outlook.com

jtrent238 - crwdns2934203:0crwdne2934203:0

I am sorry jtrent238 , but i can further guide you on how you could solve the problem

Bhavesh Gandhi - crwdns2934203:0crwdne2934203:0

If you look at step four you will see the black wire has a knot and a silver metal part. Well My wire has broken right there any advice? Please help!

Dev - crwdns2934203:0crwdne2934203:0

Do you know where I can get the speakers from?

James Patrick - crwdns2934203:0crwdne2934203:0

my problem exist in this area https://imgur.com/grLwOkt cant figure out how to detach the entire bud to get access to the internal wires

John - crwdns2934203:0crwdne2934203:0

crwdns2917038:0crwdne2917038:0

crwdns2936625:0crwdne2936625:0:

crwdns2936751:024crwdne2936751:0 0

crwdns2936753:07crwdne2936753:0 5

crwdns2936753:030crwdne2936753:0 28

crwdns2942667:0crwdne2942667:0 3,673