crwdns2933423:0crwdne2933423:0
crwdns2947577:0crwdnd2947577:0crwdne2947577:0

TotalPond Pond Pump O-ring Replacement

  1. TotalPond Pond Pump O-ring Replacement, Inlet Screen Removal: crwdns2935265:01crwdnd2935265:01crwdnd2935265:03crwdne2935265:0 TotalPond Pond Pump O-ring Replacement, Inlet Screen Removal: crwdns2935265:01crwdnd2935265:02crwdnd2935265:03crwdne2935265:0 TotalPond Pond Pump O-ring Replacement, Inlet Screen Removal: crwdns2935265:01crwdnd2935265:03crwdnd2935265:03crwdne2935265:0
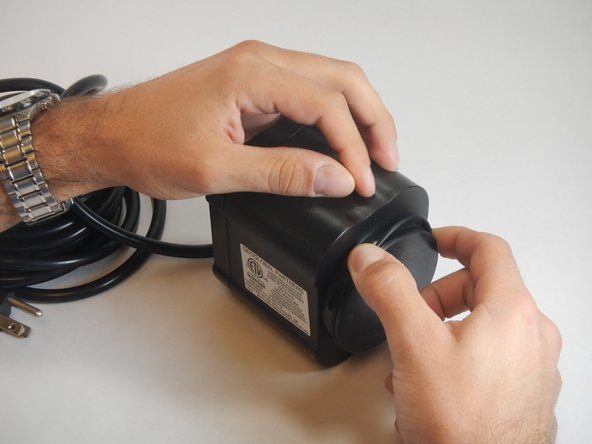
    • Hold the inlet screen and rotate it counterclockwise to unscrew it. It is helpful to remove the inlet screen so that it is not damaged during the replacement process.

    crwdns2952109:0crwdne2952109:0
  2. TotalPond Pond Pump O-ring Replacement, Impeller Assembly Detachment: crwdns2935265:02crwdnd2935265:01crwdnd2935265:02crwdne2935265:0 TotalPond Pond Pump O-ring Replacement, Impeller Assembly Detachment: crwdns2935265:02crwdnd2935265:02crwdnd2935265:02crwdne2935265:0
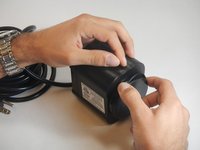
    • Firmly hold the pump block with one hand and the impeller housing with the other hand. Rotate impeller housing counterclockwise until it is released.

    crwdns2952109:0crwdne2952109:0
  3. TotalPond Pond Pump O-ring Replacement, Impeller Assembly Removal: crwdns2935265:03crwdnd2935265:01crwdnd2935265:01crwdne2935265:0
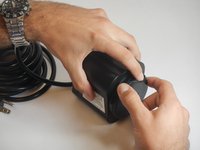
    • Carefully pull out the impeller. A magnetic pull should be felt.

    crwdns2952109:0crwdne2952109:0
  4. TotalPond Pond Pump O-ring Replacement, O-Ring Removal: crwdns2935265:04crwdnd2935265:01crwdnd2935265:02crwdne2935265:0 TotalPond Pond Pump O-ring Replacement, O-Ring Removal: crwdns2935265:04crwdnd2935265:02crwdnd2935265:02crwdne2935265:0
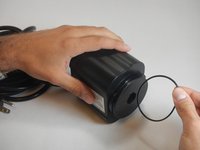
    • While holding the pump with one hand, pinch the O-ring and slide it upward with your free hand so that a portion of the ring is lifted.

    crwdns2952109:0crwdne2952109:0
  5. TotalPond Pond Pump O-ring Replacement, O-Ring Removal continued: crwdns2935265:05crwdnd2935265:01crwdnd2935265:02crwdne2935265:0 TotalPond Pond Pump O-ring Replacement, O-Ring Removal continued: crwdns2935265:05crwdnd2935265:02crwdnd2935265:02crwdne2935265:0
    • With one finger from the hand that is holding the pump, push the lifted portion of the ring forward until it is completely detached from the pump.

    crwdns2952109:0crwdne2952109:0
crwdns2915888:0crwdne2915888:0

To reassemble your device, follow these instructions in reverse order.

Nicole Santana

crwdns2935283:001/13/15crwdne2935283:0

612 crwdns2915208:0crwdne2915208:0

crwdns2935297:05crwdne2935297:0

crwdns2935287:0crwdne2935287:0

USF Tampa, Team 3-6, Hickman Winter 2015 crwdns2935289:0USF Tampa, Team 3-6, Hickman Winter 2015crwdne2935289:0

USFT-HICKMAN-W15S3G6

crwdns2931471:04crwdne2931471:0

crwdns2935297:05crwdne2935297:0

crwdns2947412:00crwdne2947412:0

crwdns2917038:0crwdne2917038:0

crwdns2936625:0crwdne2936625:0:

crwdns2936751:024crwdne2936751:0 0

crwdns2936753:07crwdne2936753:0 2

crwdns2936753:030crwdne2936753:0 27

crwdns2942667:0crwdne2942667:0 1,010