crwdns2933423:0crwdne2933423:0

Toshiba Satellite p875 s7200 Screen Replacement

crwdns2942213:0crwdne2942213:0

  1. Toshiba Satellite p875 s7200 Screen Replacement, Screen: crwdns2935265:01crwdnd2935265:01crwdnd2935265:01crwdne2935265:0
    • Remove the battery by sliding the tabs to the left.

    • Use the spudger to lift out the battery.

  2. Toshiba Satellite p875 s7200 Screen Replacement: crwdns2935265:02crwdnd2935265:01crwdnd2935265:01crwdne2935265:0
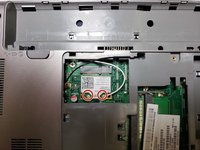
    • Use the Phillips head screw driver to remove the screw holding the back plate on.

  3. Toshiba Satellite p875 s7200 Screen Replacement: crwdns2935265:03crwdnd2935265:01crwdnd2935265:02crwdne2935265:0 Toshiba Satellite p875 s7200 Screen Replacement: crwdns2935265:03crwdnd2935265:02crwdnd2935265:02crwdne2935265:0
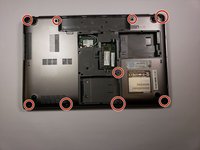
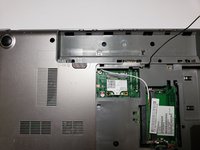
    • Remove the 6 mm screws around the edges with the Phillips head screw driver. Then remove the 6mm screw holding the disc drive into place.

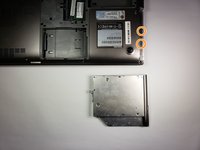
    • Sliding out the disc drive will reveal the final two 4 mm screws on the bottom of the device.

  4. Toshiba Satellite p875 s7200 Screen Replacement: crwdns2935265:04crwdnd2935265:01crwdnd2935265:01crwdne2935265:0
    • Flip the laptop over to begin the process of removing the keyboard.

    • Use the spudger to pop the keyboard off. Start at the bottom of the keyboard and work your way around.

  5. Toshiba Satellite p875 s7200 Screen Replacement: crwdns2935265:05crwdnd2935265:01crwdnd2935265:01crwdne2935265:0
    • Use the Phillips head screw driver to remove the last 6mm screws holding the case together.

    • The screws are held into elevated columns which are fairly easy to break. Be cautious when removing the screws.

    • After removing the keyboard and the screws, use the spudger around the edges of the laptop to remove the face plate.

  6. Toshiba Satellite p875 s7200 Screen Replacement: crwdns2935265:06crwdnd2935265:01crwdnd2935265:02crwdne2935265:0 Toshiba Satellite p875 s7200 Screen Replacement: crwdns2935265:06crwdnd2935265:02crwdnd2935265:02crwdne2935265:0
    • Use the Phillips head screwdriver to remove the 5mm screws on the right speaker.

    • Repeat the process for the left side.

  7. Toshiba Satellite p875 s7200 Screen Replacement: crwdns2935265:07crwdnd2935265:01crwdnd2935265:02crwdne2935265:0 Toshiba Satellite p875 s7200 Screen Replacement: crwdns2935265:07crwdnd2935265:02crwdnd2935265:02crwdne2935265:0
    • Flip the laptop over and disconnect the black and white display wires by pulling them upwards.

    • The second image shows the disconnected wires.

    • Flip the laptop back over and pull the black and white wires through their holes in the motherboard.

  8. Toshiba Satellite p875 s7200 Screen Replacement: crwdns2935265:08crwdnd2935265:01crwdnd2935265:01crwdne2935265:0
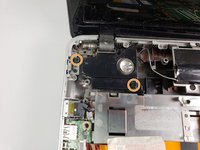
    • Move the speakers out of the way after removing their holding screws.

    • Remove the two 4mm screws on the hinges on each side of the laptop.

  9. Toshiba Satellite p875 s7200 Screen Replacement: crwdns2935265:09crwdnd2935265:01crwdnd2935265:02crwdne2935265:0 Toshiba Satellite p875 s7200 Screen Replacement: crwdns2935265:09crwdnd2935265:02crwdnd2935265:02crwdne2935265:0
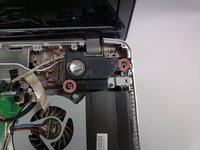
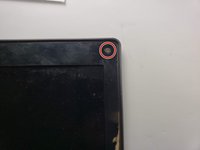
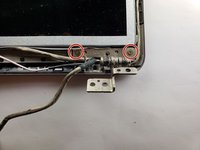
    • Use the screw driver to remove the two black disks from the top corners of the display.

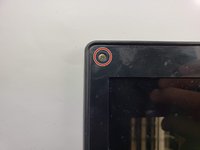
    • Remove the 5mm screws that were hidden behind the little black disks.

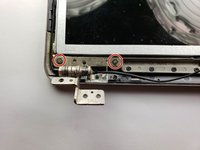
    • Use the spudger tool to pop the cover off of the edge.

  10. Toshiba Satellite p875 s7200 Screen Replacement: crwdns2935265:010crwdnd2935265:01crwdnd2935265:02crwdne2935265:0 Toshiba Satellite p875 s7200 Screen Replacement: crwdns2935265:010crwdnd2935265:02crwdnd2935265:02crwdne2935265:0
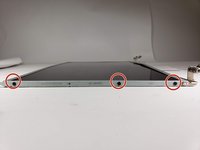
    • Remove the two 3 mm screws holding the display in place. Repeat this step for both the left and right sides.

  11. Toshiba Satellite p875 s7200 Screen Replacement: crwdns2935265:011crwdnd2935265:01crwdnd2935265:01crwdne2935265:0
    • Slide the display upwards to remove it.

  12. Toshiba Satellite p875 s7200 Screen Replacement: crwdns2935265:012crwdnd2935265:01crwdnd2935265:02crwdne2935265:0 Toshiba Satellite p875 s7200 Screen Replacement: crwdns2935265:012crwdnd2935265:02crwdnd2935265:02crwdne2935265:0
    • Use the screw driver to remove the six 3 mm screws holding the brackets and hinges onto the display.

    • Do not misplace these brackets because they will be used on the new screen.

crwdns2915888:0crwdne2915888:0

To reassemble your device, follow these instructions in reverse order.

Danny Amado

crwdns2935283:010/29/18crwdne2935283:0

823 crwdns2915208:0crwdne2915208:0

crwdns2935297:05crwdne2935297:0

crwdns2915084:0crwdne2915084:0

Baylor, Team S1-G3, Williams Fall 2018 crwdns2935289:0Baylor, Team S1-G3, Williams Fall 2018crwdne2935289:0

BU-WILLIAMS-F18S1G3

crwdns2931471:04crwdne2931471:0

crwdns2935297:05crwdne2935297:0

crwdns2944067:00crwdne2944067:0

crwdns2917038:0crwdne2917038:0

crwdns2936625:0crwdne2936625:0:

crwdns2936751:024crwdne2936751:0 0

crwdns2936753:07crwdne2936753:0 0

crwdns2936753:030crwdne2936753:0 15

crwdns2942667:0crwdne2942667:0 1,026