crwdns2933423:0crwdne2933423:0

Toshiba Satellite P55W-C5316 Screen Replacement

crwdns2942213:0crwdne2942213:0

  1. Toshiba Satellite P55W-C5316 Screen Replacement, Back Panel: crwdns2935265:01crwdnd2935265:01crwdnd2935265:02crwdne2935265:0 Toshiba Satellite P55W-C5316 Screen Replacement, Back Panel: crwdns2935265:01crwdnd2935265:02crwdnd2935265:02crwdne2935265:0
    • To prevent injury, ensure the laptop is powered off before starting your work.

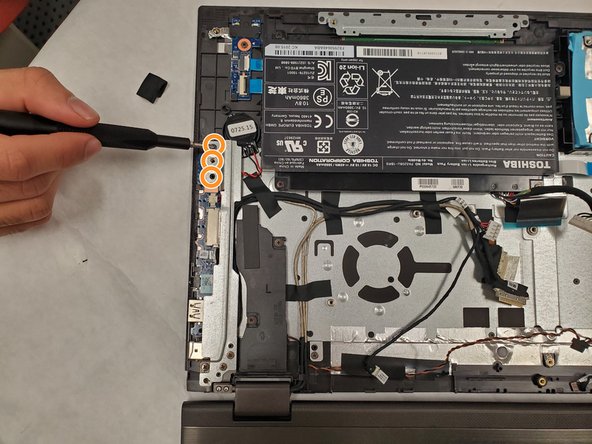
    • Unscrew the .3mm Phillips head screws on the back panel using the PH1 screwdriver.

  2. Toshiba Satellite P55W-C5316 Screen Replacement: crwdns2935265:02crwdnd2935265:01crwdnd2935265:03crwdne2935265:0 Toshiba Satellite P55W-C5316 Screen Replacement: crwdns2935265:02crwdnd2935265:02crwdnd2935265:03crwdne2935265:0 Toshiba Satellite P55W-C5316 Screen Replacement: crwdns2935265:02crwdnd2935265:03crwdnd2935265:03crwdne2935265:0
    • Be careful to not crack the panel where the USB and power cord ports are.

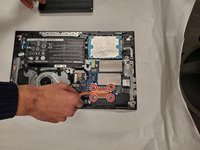
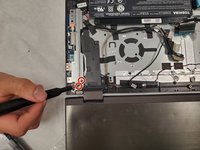
    • Insert the opening tool in between the back panel and the laptop to pry it open.

    • The back panel is magnetically attached at the front of the laptop so you may have to move the opening tool along the length of the panel.

    • Lift the panel from the front off of the laptop.

  3. Toshiba Satellite P55W-C5316 Screen Replacement, Fan: crwdns2935265:03crwdnd2935265:01crwdnd2935265:01crwdne2935265:0
    • Remove both screws from the fan.

  4. Toshiba Satellite P55W-C5316 Screen Replacement: crwdns2935265:04crwdnd2935265:01crwdnd2935265:02crwdne2935265:0 Toshiba Satellite P55W-C5316 Screen Replacement: crwdns2935265:04crwdnd2935265:02crwdnd2935265:02crwdne2935265:0
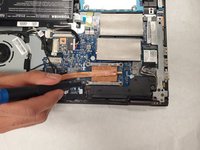
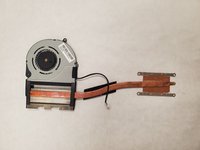
    • Remove the screws securing the 4 corners of the heatsink.

    • Gently remove the heatsink. Keep in mind thermal paste is used and it may be slightly difficult to remove.

  5. Toshiba Satellite P55W-C5316 Screen Replacement: crwdns2935265:05crwdnd2935265:01crwdnd2935265:03crwdne2935265:0 Toshiba Satellite P55W-C5316 Screen Replacement: crwdns2935265:05crwdnd2935265:02crwdnd2935265:03crwdne2935265:0 Toshiba Satellite P55W-C5316 Screen Replacement: crwdns2935265:05crwdnd2935265:03crwdnd2935265:03crwdne2935265:0
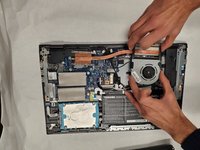
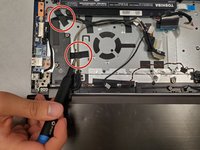
    • Remove the small, beige colored connector securing the fan to the laptop and remove the fan and heatsink assembly from the laptop.

  6. Toshiba Satellite P55W-C5316 Screen Replacement, Screen: crwdns2935265:06crwdnd2935265:01crwdnd2935265:02crwdne2935265:0 Toshiba Satellite P55W-C5316 Screen Replacement, Screen: crwdns2935265:06crwdnd2935265:02crwdnd2935265:02crwdne2935265:0
    • Using the Phillips #00 screwdriver, remove the two screws securing the silver USB protector located on the far right side of the laptop, and pry off the protector.

    • Remove the three screws at the top end of the USB protector using the Phillips #00 screwdriver.

  7. Toshiba Satellite P55W-C5316 Screen Replacement: crwdns2935265:07crwdnd2935265:01crwdnd2935265:01crwdne2935265:0
    • Using the Phillips #0 screwdriver, remove the screws on metal hinge securing the screen to the laptop.

    • There was only a single screw at the time of guide creation but you should remove any screws from the hinge.

  8. Toshiba Satellite P55W-C5316 Screen Replacement: crwdns2935265:08crwdnd2935265:01crwdnd2935265:01crwdne2935265:0
    • Repeat the previous step to remove the screws on the other hinge securing the display to the device.

  9. Toshiba Satellite P55W-C5316 Screen Replacement: crwdns2935265:09crwdnd2935265:01crwdnd2935265:02crwdne2935265:0 Toshiba Satellite P55W-C5316 Screen Replacement: crwdns2935265:09crwdnd2935265:02crwdnd2935265:02crwdne2935265:0
    • Remove all of the black tape securing the hinge to the laptop.

  10. Toshiba Satellite P55W-C5316 Screen Replacement: crwdns2935265:010crwdnd2935265:01crwdnd2935265:01crwdne2935265:0
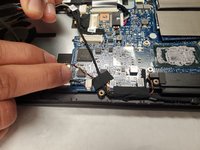
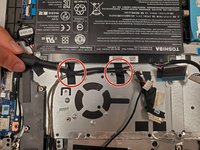
    • Disconnect the connector directly above the IO cable.

  11. Toshiba Satellite P55W-C5316 Screen Replacement: crwdns2935265:011crwdnd2935265:01crwdnd2935265:01crwdne2935265:0
    • Remove the display assembly from the device.

crwdns2915888:0crwdne2915888:0

To reassemble your device, follow these instructions in reverse order.

Kyle Dierking

crwdns2935283:011/07/19crwdne2935283:0

133 crwdns2915208:0crwdne2915208:0

crwdns2935295:0crwdne2935295:0

crwdns2915084:0crwdne2915084:0

IUPUI, Team S2-G1, Harley Fall 2019 crwdns2935289:0IUPUI, Team S2-G1, Harley Fall 2019crwdne2935289:0

IUPUI-HARLEY-F19S2G1

crwdns2931471:03crwdne2931471:0

crwdns2935297:03crwdne2935297:0

crwdns2944067:00crwdne2944067:0

crwdns2917038:0crwdne2917038:0

crwdns2936625:0crwdne2936625:0:

crwdns2936751:024crwdne2936751:0 1

crwdns2936753:07crwdne2936753:0 2

crwdns2936753:030crwdne2936753:0 14

crwdns2942667:0crwdne2942667:0 664