crwdns2915892:0crwdne2915892:0
For this replacement you will have remove the keyboard to get to the CD drive. Steps to remove the keyboard can be found in prerequisite guide at the top of the page. After the keyboard is remove then you are able to move on to the CD drive.
crwdns2942213:0crwdne2942213:0
-
-
Place the laptop with the screen facing you and grab the opening tool.
-
Insert it into the top corner of the keyboard and slide it to the right along the length of the keyboard.
-
You will feel the popping sensation as it slides along.
-
-
-
Lit up the left side of the small plastic bar at the top of the keyboard.
-
-
-
Use a PH0 screwdriver to unscrew the 4 screws at the top of the keyboard.
-
-
-
-
Lift up the keyboard and pull it toward the screen.
-
-
-
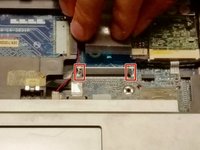
To remove the ribbon cable, push upward on the small tabs located on either side of the ribbon.
-
-
-
Once the ribbon is released the keyboard can be removed .
-
-
-
Flip the computer over with the hinge facing you.
-
Remove one screw that is located in the Toshiba lable on the bottom of the computer.
-
-
-
Flip the computer back over and push the metal tab to the right to release the CD drive from its docking port.
-


To reassemble your device, follow these instructions in reverse order.
To reassemble your device, follow these instructions in reverse order.
crwdns2915084:0crwdne2915084:0

Baylor, Team 3-2, Whitney Spring 2017 crwdns2935289:0Baylor, Team 3-2, Whitney Spring 2017crwdne2935289:0
BU-WHITNEY-S17S3G2
crwdns2931471:04crwdne2931471:0
crwdns2935297:04crwdne2935297:0