crwdns2915892:0crwdne2915892:0
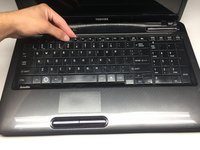
If you are trying to access the fan or the screen, this guide will show you how to remove the top house casing so that you can access these parts.
crwdns2942213:0crwdne2942213:0
-
-
Power down the computer and unplug the power adapter.
-
-
-
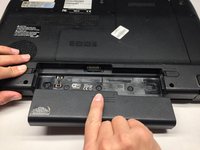
Flip the laptop upside down. Locate the two latches on both sides of the battery.
-
-
-
Slide the latch on the right outwards, releasing the lock. The latch stays unlocked once moved.
-
Simultaneously slide the latch on the left outwards while pulling the battery towards you.
-
-
-
Remove the single captive screw on the back panel with your Phillips #1 screwdriver.
-
-
-
Pry the removal tab up. You will feel and hear the first clip release, popping up slightly.
-
Work your way around the border of the panel, releasing the rest of the clips.
-
Once all clips are released, lift the cover up and pull towards you.
****Warning****---The long top edge should not be pried up! It has longer tabs that could break. Pull straight towards the front edge.
-
-
-
-
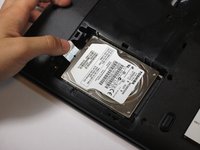
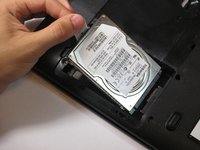
Slide the hard drive to the left, using the silver tab.
-
Pull up the silver tab, removing the hard drive from the slot.
-
-
crwdns2935267:0crwdne2935267:0Heavy-Duty Spudger$4.99
-
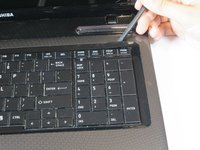
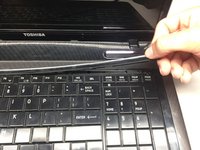
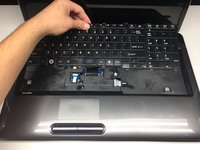
Pry under the plastic strip, starting on the top right side of the key board with a Heavy Duty Spudger.
-
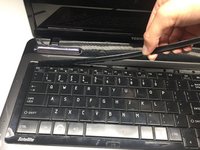
Once the first corner is raised, use your hand pulling upwards and release the rest of the strip.
-
-
-
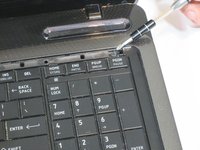
Remove the first 3mm screw with the Phillips #1 screwdriver.
-
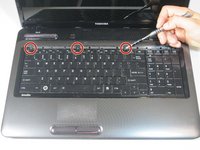
Remove the next three 3mm screws.
-
-
-
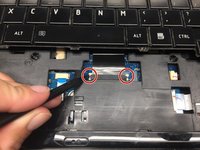
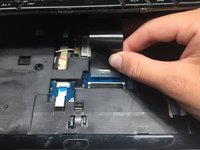
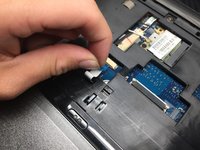
Use the pointed end of the Heavy-Duty Spudger and push the pins toward the screen, leaving them in this position.
-
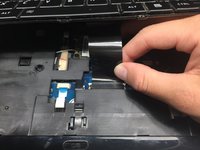
Carefully slide the connector out of the port.
-
-
-
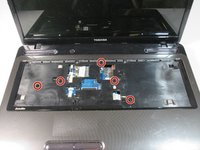
Remove the following screws with a Phillips #1 screwdriver.
-
Seventeen 5mm screws (recessed)
-
Three 2mm screws in the battery bay (flush-mounted)
-
Single 5mm screw does not need removal unless working on the screen
In step 13 you must remove the yellow circled screw or you will break the plastic nut holder from the top case.
-
-
-
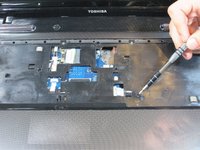
Remove five 5mm screws with the screwdriver.
-
-
-
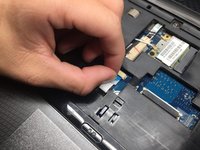
Locate the trackpad connector.
-
Pull the ribbon from the connector.
-
-
-
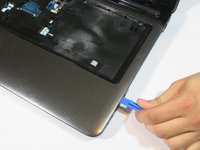
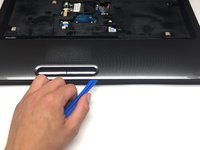
Pry under the top case housing along the perimeter with a plastic opening tool.
-


To reassemble your device, follow these instructions in reverse order.
To reassemble your device, follow these instructions in reverse order.
crwdns2935221:0crwdne2935221:0
crwdns2935229:02crwdne2935229:0
crwdns2915084:0crwdne2915084:0

UC Davis, Team 2-2, Oliver Fall 2016 crwdns2935289:0UC Davis, Team 2-2, Oliver Fall 2016crwdne2935289:0
UCD-OLIVER-F16S2G2
crwdns2931471:05crwdne2931471:0
crwdns2935297:010crwdne2935297:0
crwdns2947410:01crwdne2947410:0
Great help this tutorial helped