crwdns2933423:0crwdne2933423:0

Toshiba Satellite L50-B Keyboard / Palm Rest Replacement

crwdns2942213:0crwdne2942213:0

  1. Toshiba Satellite L50-B Keyboard / Palm Rest Replacement, Verify the replacement part: crwdns2935265:01crwdnd2935265:01crwdnd2935265:01crwdne2935265:0
    • Visually check that the replacement keyboard is similar to the existing one.

  2. Toshiba Satellite L50-B Keyboard / Palm Rest Replacement, Battery removal: crwdns2935265:02crwdnd2935265:01crwdnd2935265:02crwdne2935265:0 Toshiba Satellite L50-B Keyboard / Palm Rest Replacement, Battery removal: crwdns2935265:02crwdnd2935265:02crwdnd2935265:02crwdne2935265:0
    • Unscrew the 2 upper screws using a PH1 Phillips screwdriver

    • Remove the battery by pulling it lengthwise

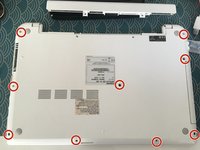
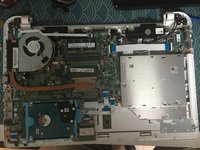
  3. Toshiba Satellite L50-B Keyboard / Palm Rest Replacement, Remove the lower case: crwdns2935265:03crwdnd2935265:01crwdnd2935265:02crwdne2935265:0 Toshiba Satellite L50-B Keyboard / Palm Rest Replacement, Remove the lower case: crwdns2935265:03crwdnd2935265:02crwdnd2935265:02crwdne2935265:0
    • Take out the 9 screws with a PH1 Phillips screwdriver.

    • Using a Spudger or an iFixit Opening Tool available on the iFixit store, remove the cover, taking care at the various attachment points.

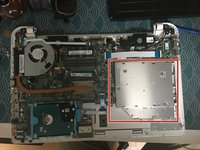
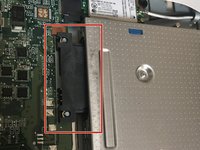
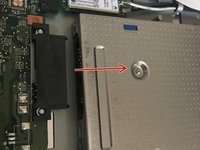
  4. Toshiba Satellite L50-B Keyboard / Palm Rest Replacement, Remove the Optical Drive: crwdns2935265:04crwdnd2935265:01crwdnd2935265:03crwdne2935265:0 Toshiba Satellite L50-B Keyboard / Palm Rest Replacement, Remove the Optical Drive: crwdns2935265:04crwdnd2935265:02crwdnd2935265:03crwdne2935265:0 Toshiba Satellite L50-B Keyboard / Palm Rest Replacement, Remove the Optical Drive: crwdns2935265:04crwdnd2935265:03crwdnd2935265:03crwdne2935265:0
    • Take a look at the connector to the motherboard, then pull the disk drive straight out away from it to remove it.

    • Take the optical drive out.

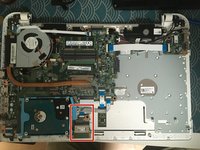
  5. Toshiba Satellite L50-B Keyboard / Palm Rest Replacement, Remove the SD Card Reader: crwdns2935265:05crwdnd2935265:01crwdnd2935265:03crwdne2935265:0 Toshiba Satellite L50-B Keyboard / Palm Rest Replacement, Remove the SD Card Reader: crwdns2935265:05crwdnd2935265:02crwdnd2935265:03crwdne2935265:0 Toshiba Satellite L50-B Keyboard / Palm Rest Replacement, Remove the SD Card Reader: crwdns2935265:05crwdnd2935265:03crwdnd2935265:03crwdne2935265:0
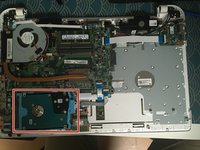
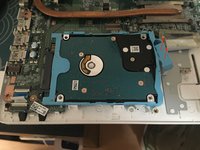
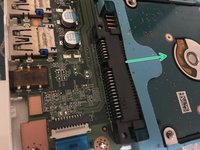
  6. Toshiba Satellite L50-B Keyboard / Palm Rest Replacement, Remove the hard drive: crwdns2935265:06crwdnd2935265:01crwdnd2935265:03crwdne2935265:0 Toshiba Satellite L50-B Keyboard / Palm Rest Replacement, Remove the hard drive: crwdns2935265:06crwdnd2935265:02crwdnd2935265:03crwdne2935265:0 Toshiba Satellite L50-B Keyboard / Palm Rest Replacement, Remove the hard drive: crwdns2935265:06crwdnd2935265:03crwdnd2935265:03crwdne2935265:0
    • Remove the plastic wedge that secures the hard drive in place.

    • Pull the hard drive away from the black connector to disconnect it from the motherboard.

    • Remove the hard drive.

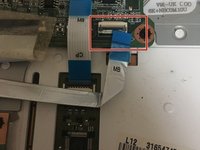
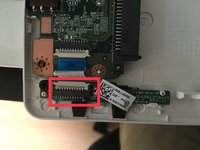
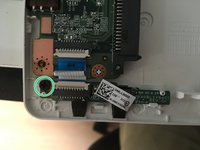
  7. Toshiba Satellite L50-B Keyboard / Palm Rest Replacement, Remove the LED Status Board: crwdns2935265:07crwdnd2935265:01crwdnd2935265:03crwdne2935265:0 Toshiba Satellite L50-B Keyboard / Palm Rest Replacement, Remove the LED Status Board: crwdns2935265:07crwdnd2935265:02crwdnd2935265:03crwdne2935265:0 Toshiba Satellite L50-B Keyboard / Palm Rest Replacement, Remove the LED Status Board: crwdns2935265:07crwdnd2935265:03crwdnd2935265:03crwdne2935265:0
    • Disconnect up the cable connecting the LED status board to the motherboard. It is a ZIF connector.
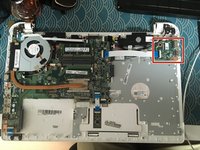
    • Remove the screw using a PH1 Phillips screwdriver.

    • Remove the LED Status Board.

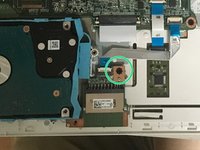
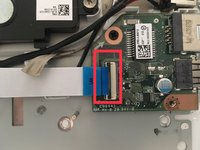
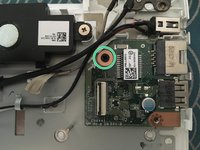
  8. Toshiba Satellite L50-B Keyboard / Palm Rest Replacement, Remove the Ethernet / USB Board: crwdns2935265:08crwdnd2935265:01crwdnd2935265:03crwdne2935265:0 Toshiba Satellite L50-B Keyboard / Palm Rest Replacement, Remove the Ethernet / USB Board: crwdns2935265:08crwdnd2935265:02crwdnd2935265:03crwdne2935265:0 Toshiba Satellite L50-B Keyboard / Palm Rest Replacement, Remove the Ethernet / USB Board: crwdns2935265:08crwdnd2935265:03crwdnd2935265:03crwdne2935265:0
    • Disconnect the cable connecting the Ethernet / USB card to the motherboard. It is a ZIF type connector.

    • Remove the screw using a PH1 Phillips screwdriver.

    • Remove the Ethernet / USB board.

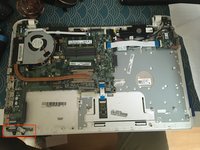
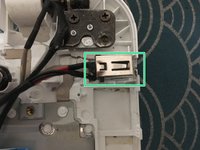
  9. Toshiba Satellite L50-B Keyboard / Palm Rest Replacement, Remove the DC Power Cable: crwdns2935265:09crwdnd2935265:01crwdnd2935265:03crwdne2935265:0 Toshiba Satellite L50-B Keyboard / Palm Rest Replacement, Remove the DC Power Cable: crwdns2935265:09crwdnd2935265:02crwdnd2935265:03crwdne2935265:0 Toshiba Satellite L50-B Keyboard / Palm Rest Replacement, Remove the DC Power Cable: crwdns2935265:09crwdnd2935265:03crwdnd2935265:03crwdne2935265:0
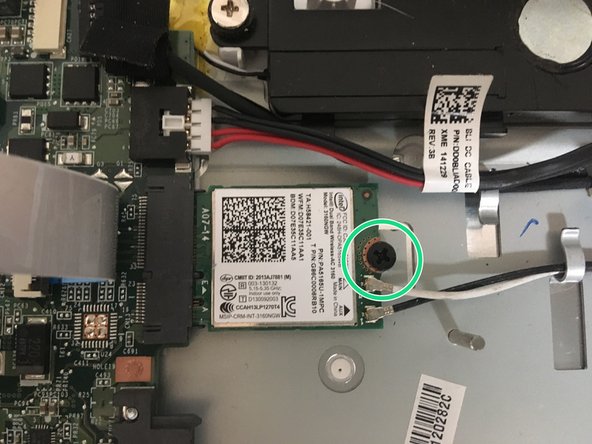
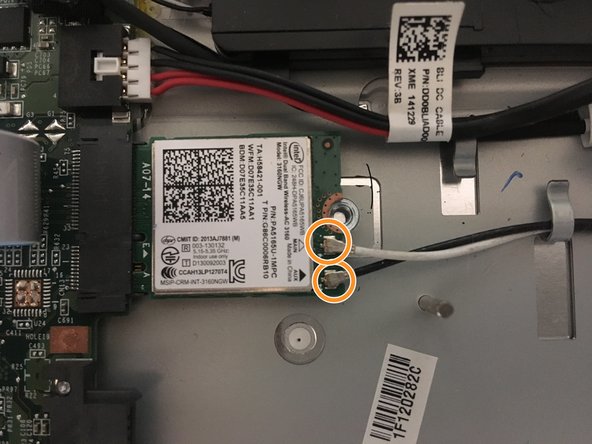
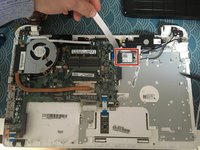
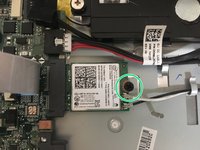
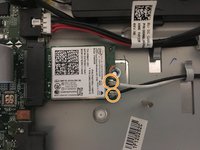
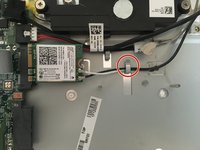
  10. Toshiba Satellite L50-B Keyboard / Palm Rest Replacement, Disconnect the WiFi Card: crwdns2935265:010crwdnd2935265:01crwdnd2935265:03crwdne2935265:0 Toshiba Satellite L50-B Keyboard / Palm Rest Replacement, Disconnect the WiFi Card: crwdns2935265:010crwdnd2935265:02crwdnd2935265:03crwdne2935265:0 Toshiba Satellite L50-B Keyboard / Palm Rest Replacement, Disconnect the WiFi Card: crwdns2935265:010crwdnd2935265:03crwdnd2935265:03crwdne2935265:0
    • Remove the screw using a PH1 Phillips screwdriver.

    • Disconnect the 2 antenna cables.

    • Pay attention to the colors when reconnecting the two cables during reassembly.

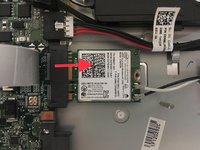
  11. Toshiba Satellite L50-B Keyboard / Palm Rest Replacement, Remove the WiFi Card: crwdns2935265:011crwdnd2935265:01crwdnd2935265:02crwdne2935265:0 Toshiba Satellite L50-B Keyboard / Palm Rest Replacement, Remove the WiFi Card: crwdns2935265:011crwdnd2935265:02crwdnd2935265:02crwdne2935265:0
    • Pull the card straight out away from the motherboard to remove it.

    • Take note of the cable routing for reassembly.

  12. Toshiba Satellite L50-B Keyboard / Palm Rest Replacement, Disconnect the Webcam Connector: crwdns2935265:012crwdnd2935265:01crwdnd2935265:01crwdne2935265:0
    • Unplug the webcam connector.

  13. Toshiba Satellite L50-B Keyboard / Palm Rest Replacement, Disconnect the Trackpad: crwdns2935265:013crwdnd2935265:01crwdnd2935265:01crwdne2935265:0
    • Unplug the ZIF connector on the trackpad securing the ribbon cable to the motherboard.

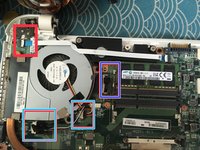
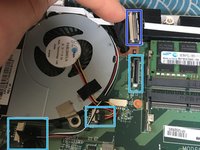
  14. Toshiba Satellite L50-B Keyboard / Palm Rest Replacement, Disconnect 4 connectors: crwdns2935265:014crwdnd2935265:01crwdnd2935265:02crwdne2935265:0 Toshiba Satellite L50-B Keyboard / Palm Rest Replacement, Disconnect 4 connectors: crwdns2935265:014crwdnd2935265:02crwdnd2935265:02crwdne2935265:0
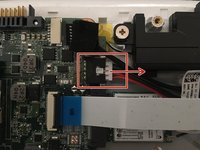
    • Disconnect the ZIF connector on the power button board.

    • Unplug the LCD screen video cable.

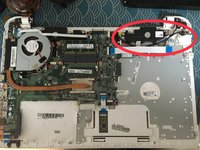
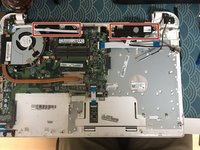
    • Disconnect the two plugs indicated:

    • The speaker cable (left)

    • The fan cable (right)

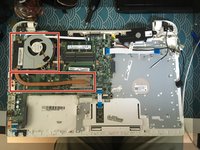
  15. Toshiba Satellite L50-B Keyboard / Palm Rest Replacement, Remove the CPU Fan and Heat Sink: crwdns2935265:015crwdnd2935265:01crwdnd2935265:03crwdne2935265:0 Toshiba Satellite L50-B Keyboard / Palm Rest Replacement, Remove the CPU Fan and Heat Sink: crwdns2935265:015crwdnd2935265:02crwdnd2935265:03crwdne2935265:0 Toshiba Satellite L50-B Keyboard / Palm Rest Replacement, Remove the CPU Fan and Heat Sink: crwdns2935265:015crwdnd2935265:03crwdnd2935265:03crwdne2935265:0
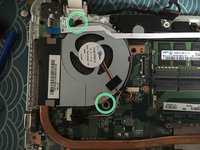
    • Using a PH1 Phillips screwdriver, remove the two screws securing the CPU fan.

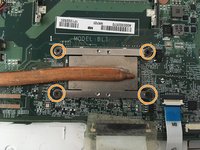
    • Remove the four screws holding the heat sink to the processor with a PH1 Phillips screwdriver.

    • Remove the fan and heatsink.

    • Use care when separating the heatsink from the CPU; it is bonded with thermal grease which may act as an adhesive when it is old.

    • Always replace the thermal grease when reinstalling the heat sink to ensure a good thermal bond between the CPU and the heat sink.

  16. Toshiba Satellite L50-B Keyboard / Palm Rest Replacement, Disconnect the Speakers: crwdns2935265:016crwdnd2935265:01crwdnd2935265:02crwdne2935265:0 Toshiba Satellite L50-B Keyboard / Palm Rest Replacement, Disconnect the Speakers: crwdns2935265:016crwdnd2935265:02crwdnd2935265:02crwdne2935265:0
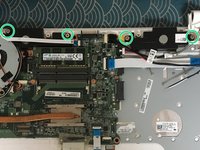
    • Remove the 4 screws securing the speakers with a PH1 Phillips screwdriver.

  17. Toshiba Satellite L50-B Keyboard / Palm Rest Replacement, Disconnecting the Motherboard: crwdns2935265:017crwdnd2935265:01crwdnd2935265:02crwdne2935265:0 Toshiba Satellite L50-B Keyboard / Palm Rest Replacement, Disconnecting the Motherboard: crwdns2935265:017crwdnd2935265:02crwdnd2935265:02crwdne2935265:0
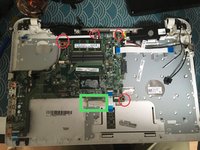
    • Using a PH1 Phillips screwdriver, remove the four screws securing the motherboard to the chassis.

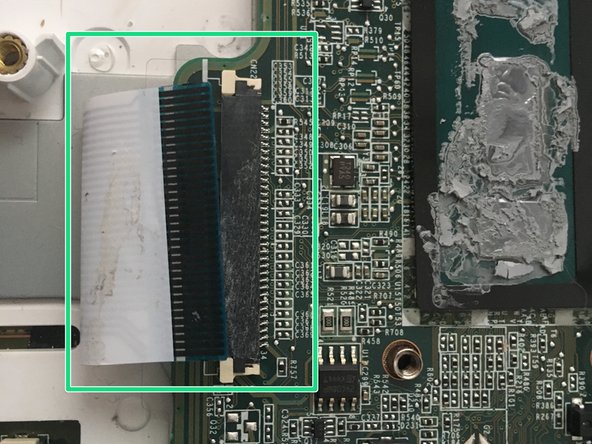
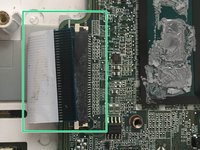
    • Remove the cable connecting the keyboard to the motherboard. Lift the tape holding the cable to the connector, then use a spudger to press out the two small tabs on either side of the cable side connector in a walking motion, alternating one side then the other.

  18. Toshiba Satellite L50-B Keyboard / Palm Rest Replacement, Remove the Motherboard: crwdns2935265:018crwdnd2935265:01crwdnd2935265:01crwdne2935265:0
    • Remove the motherboard, taking care with the speaker cables, the various cables, and any fasteners bordering the sides of the motherboard.

  19. Toshiba Satellite L50-B Keyboard / Palm Rest Replacement, Remove the Speakers: crwdns2935265:019crwdnd2935265:01crwdnd2935265:02crwdne2935265:0 Toshiba Satellite L50-B Keyboard / Palm Rest Replacement, Remove the Speakers: crwdns2935265:019crwdnd2935265:02crwdnd2935265:02crwdne2935265:0
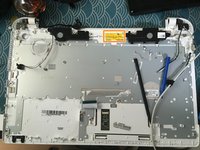
    • Remove the speakers, taking care with the cable retainers, and any Scotch tape securing the cables to the chassis.

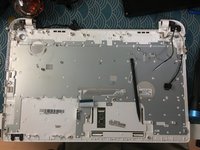
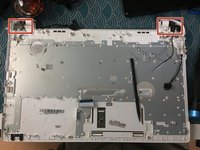
  20. Toshiba Satellite L50-B Keyboard / Palm Rest Replacement, Remove the Display Hinges: crwdns2935265:020crwdnd2935265:01crwdnd2935265:02crwdne2935265:0 Toshiba Satellite L50-B Keyboard / Palm Rest Replacement, Remove the Display Hinges: crwdns2935265:020crwdnd2935265:02crwdnd2935265:02crwdne2935265:0
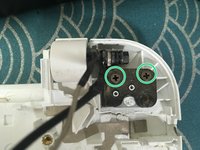
    • Unscrew the two screws on each hinge using a PH1 Phillips screwdriver.

    • To easily remove the hinges, raise the them by hand as if you were opening the screen in order to remove the them from the upper case.

    • Use a hair dryer, heat gun or iOpener to soften the adhesive that attaches the Trackpad to the upper case.

    • Press on the trackpad to unstick it and separate it from the case.

    • Too much head risks melting the micro-welds on the Trackpad, so be cautious with the use of a heat gun.

    • Be careful not to damage the Trackpad when taking it off. Although it is a relatively solid part, the glue is present on a large part of its surface and is strongly adhered. You can see the adhesive strip on a new part.
crwdns2915888:0crwdne2915888:0

Congratulations! You have completed the disassembly!

To reassemble your device, follow the instructions in reverse, using the new keyboard assembly instead of the old one.

crwdns2934873:0crwdne2934873:0

fr en

100%

crwdns2934885:0crwdne2934885:0 crwdns2934875:0crwdne2934875:0
crwdns2934877:0crwdne2934877:0 ›

Arnaud Milesi

crwdns2935283:011/21/16crwdne2935283:0

323 crwdns2915208:0crwdne2915208:0

crwdns2935295:0crwdne2935295:0

crwdns2944067:00crwdne2944067:0

crwdns2917038:0crwdne2917038:0

crwdns2936625:0crwdne2936625:0:

crwdns2936751:024crwdne2936751:0 2

crwdns2936753:07crwdne2936753:0 9

crwdns2936753:030crwdne2936753:0 40

crwdns2942667:0crwdne2942667:0 2,236