crwdns2933423:0crwdne2933423:0

Toshiba Satellite L35-S2174 Hard Drive Replacement

crwdns2942213:0crwdne2942213:0

  1. Toshiba Satellite L35-S2174 Hard Drive Replacement, Battery: crwdns2935265:01crwdnd2935265:01crwdnd2935265:01crwdne2935265:0
    • Turn the laptop off to prevent the possibility of electric shock or damage to the computer.

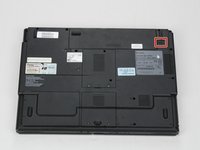
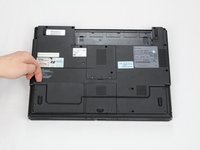
    • Flip the laptop so that the bottom is facing upwards.

  2. Toshiba Satellite L35-S2174 Hard Drive Replacement: crwdns2935265:02crwdnd2935265:01crwdnd2935265:02crwdne2935265:0 Toshiba Satellite L35-S2174 Hard Drive Replacement: crwdns2935265:02crwdnd2935265:02crwdnd2935265:02crwdne2935265:0
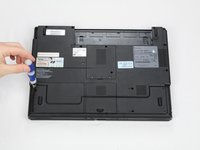
    • Slide the battery lock switch to the left.

  3. Toshiba Satellite L35-S2174 Hard Drive Replacement: crwdns2935265:03crwdnd2935265:01crwdnd2935265:02crwdne2935265:0 Toshiba Satellite L35-S2174 Hard Drive Replacement: crwdns2935265:03crwdnd2935265:02crwdnd2935265:02crwdne2935265:0
    • Pull the sliding switch to the right and continue to hold it in this position.

  4. Toshiba Satellite L35-S2174 Hard Drive Replacement: crwdns2935265:04crwdnd2935265:01crwdnd2935265:01crwdne2935265:0
    • While holding the switch, slide the battery away from you.

    • You do not need to hold the switch when putting the battery back into the laptop.

  5. Toshiba Satellite L35-S2174 Hard Drive Replacement, Hard Drive: crwdns2935265:05crwdnd2935265:01crwdnd2935265:03crwdne2935265:0 Toshiba Satellite L35-S2174 Hard Drive Replacement, Hard Drive: crwdns2935265:05crwdnd2935265:02crwdnd2935265:03crwdne2935265:0 Toshiba Satellite L35-S2174 Hard Drive Replacement, Hard Drive: crwdns2935265:05crwdnd2935265:03crwdnd2935265:03crwdne2935265:0
    • Use a J1 screwdriver to unscrew the two circled screws. The screws will remain attached to the plastic panel.

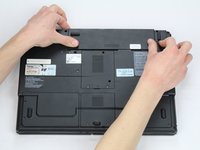
    • Lift the panel and remove it from the laptop.

  6. Toshiba Satellite L35-S2174 Hard Drive Replacement: crwdns2935265:06crwdnd2935265:01crwdnd2935265:02crwdne2935265:0 Toshiba Satellite L35-S2174 Hard Drive Replacement: crwdns2935265:06crwdnd2935265:02crwdnd2935265:02crwdne2935265:0
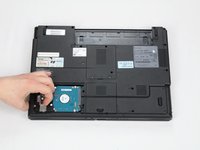
    • Slide the hard drive to the left to detach it from the computer.

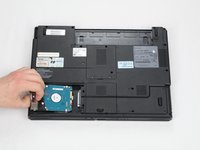
    • Lift the hard drive from the computer.

crwdns2915888:0crwdne2915888:0

To reassemble your device, follow these instructions in reverse order.

Amani Mitchell

crwdns2935283:010/18/16crwdne2935283:0

401 crwdns2915208:0crwdne2915208:0

crwdns2935297:04crwdne2935297:0

crwdns2915084:0crwdne2915084:0

UMass Dartmouth, Team 1-4, Catania Fall 2016 crwdns2935289:0UMass Dartmouth, Team 1-4, Catania Fall 2016crwdne2935289:0

UMASSD-CATANIA-F16S1G4

crwdns2931471:03crwdne2931471:0

crwdns2935297:05crwdne2935297:0

crwdns2944067:00crwdne2944067:0

crwdns2917038:0crwdne2917038:0

crwdns2936625:0crwdne2936625:0:

crwdns2936751:024crwdne2936751:0 1

crwdns2936753:07crwdne2936753:0 2

crwdns2936753:030crwdne2936753:0 10

crwdns2942667:0crwdne2942667:0 562