crwdns2915892:0crwdne2915892:0
This guide teaches you how to replace the motherboard in a Toshiba Satellite C655 series laptop.
crwdns2942213:0crwdne2942213:0
-
-
With the battery side facing you, first move the right locking latch to the right.
-
Afterwards, move the left spring latch to the left, but keep your finger there, and pull the battery out with your other hand.
-
-
-
Remove the single screw securing the hard drive cover to the base.
-
-
-
Remove the single screw securing the hard drive caddy to the base.
-
-
-
Remove the four screws securing the hard drive to the caddy.
-
You're done!
-
-
-
-
Remove the twelve "F6"/M2.5x6 screws.
-
Remove the two "F2" screws under where the battery was.
-
Remove the "F3" screw securing the optical drive, and slide the optical drive out.
-
Remove the two "F2" screws from where the optical drive faceplate was.
-
Remove the memory cover screw, pull the memory door open, and remove the two "F6"/M2.5x6 screws from underneath.
-
-
-
Use your fingernail or a spudget to get under the keyboard trim, and pry it up. Go along the keyboard trim, pulling it up.
-
-
-
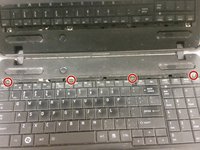
Remove the four screws securing the keyboard to the palmrest.
-
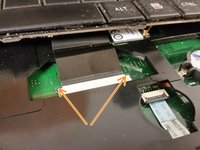
Lift the keyboard at the top a little, and pull the keyboard towards the screen, so that you see the locking connector below the keyboard.
-
Push the locking connector's lock towards the screen at both the left and the right points, very gently.
-
Pull the now-loose keyboard cable out of the connector.
-
-
-
Remove the three palmrest cables from the motherboard, that being the power button cable, the speaker cable, and the touchpad cable.
-
Use a spudger to separate the palmrest from the base.
-
-
-
Remove the fan cable.
-
Remove the two silver-colored fan screws.
-
Remove the single black-colored fan screw.
-
-
-
Remove the single screw securing the motherboard to the base.
-
Remove the two wireless antenna connectors.
-
Remove the LCD cable.
-
Lift the motherboard out of the base.
-
-
-
Remove the four screws securing the heatsink to the motherboard.
-
Remove the processor, memory, and optionally, the clock battery. Install the first two in the replacement motherboard. You're done!
-


To reassemble your device, follow these instructions in reverse order.
crwdns2935221:0crwdne2935221:0
crwdns2935229:04crwdne2935229:0

crwdns2947410:01crwdne2947410:0
is there any processor upgrades compatible with this specific computer? other than ram and ssd any upgrade info would be appreciated.