crwdns2933423:0crwdne2933423:0

Toshiba Satellite C55D-A5108 Heat Sink Replacement

crwdns2942213:0crwdne2942213:0

  1. Toshiba Satellite C55D-A5108 Heat Sink Replacement, Battery: crwdns2935265:01crwdnd2935265:01crwdnd2935265:01crwdne2935265:0
    • Flip over the device so that the model stickers are facing up.

  2. Toshiba Satellite C55D-A5108 Heat Sink Replacement: crwdns2935265:02crwdnd2935265:01crwdnd2935265:01crwdne2935265:0
    • Move the right notch to the unlock position by sliding it to the right.

  3. Toshiba Satellite C55D-A5108 Heat Sink Replacement: crwdns2935265:03crwdnd2935265:01crwdnd2935265:01crwdne2935265:0
    • Hold the left notch in an unlocked position with one hand and use the other hand to slide the battery out.

  4. Toshiba Satellite C55D-A5108 Heat Sink Replacement, Hard Drive: crwdns2935265:04crwdnd2935265:01crwdnd2935265:01crwdne2935265:0
    • Remove the Phillips #0 screw from the memory cover.

  5. Toshiba Satellite C55D-A5108 Heat Sink Replacement: crwdns2935265:05crwdnd2935265:01crwdnd2935265:01crwdne2935265:0
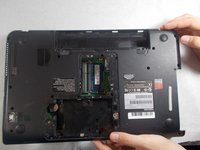
    • Grasp the side of the hard drive opposite the circular battery, and carefully pull out the drive by moving it away from the circular battery.

  6. Toshiba Satellite C55D-A5108 Heat Sink Replacement, Back Cover: crwdns2935265:06crwdnd2935265:01crwdnd2935265:03crwdne2935265:0 Toshiba Satellite C55D-A5108 Heat Sink Replacement, Back Cover: crwdns2935265:06crwdnd2935265:02crwdnd2935265:03crwdne2935265:0 Toshiba Satellite C55D-A5108 Heat Sink Replacement, Back Cover: crwdns2935265:06crwdnd2935265:03crwdnd2935265:03crwdne2935265:0
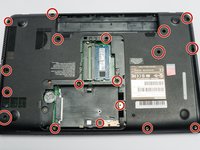
    • Remove the 16 screws holding the back cover with a Phillips #0 screwdriver.

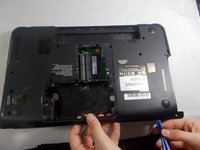
    • Pry the cover off with an opening tool.

    • Gently remove the cover with your hands and place to the side.

  7. Toshiba Satellite C55D-A5108 Heat Sink Replacement, Heat Sink: crwdns2935265:07crwdnd2935265:01crwdnd2935265:02crwdne2935265:0 Toshiba Satellite C55D-A5108 Heat Sink Replacement, Heat Sink: crwdns2935265:07crwdnd2935265:02crwdnd2935265:02crwdne2935265:0
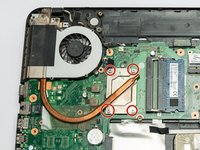
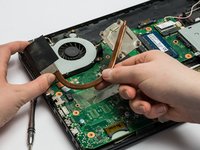
    • Remove the four Phillips #0 screws from each corner of the heat sink.

    • Gently lift the heat sink out of the computer.

crwdns2915888:0crwdne2915888:0

To reassemble your device, follow these instructions in reverse order.

crwdns2935227:0crwdne2935227:0

Ryan Smith

crwdns2935283:010/25/19crwdne2935283:0

187 crwdns2915208:0crwdne2915208:0

crwdns2935297:02crwdne2935297:0

crwdns2915084:0crwdne2915084:0

UMass Dartmouth, Team S1-G5, O'Connell Fall 2019 crwdns2935289:0UMass Dartmouth, Team S1-G5, O'Connell Fall 2019crwdne2935289:0

UMASSD-O'CONNELL-F19S1G5

crwdns2931471:03crwdne2931471:0

crwdns2935297:012crwdne2935297:0

crwdns2944067:00crwdne2944067:0

crwdns2917038:0crwdne2917038:0

crwdns2936625:0crwdne2936625:0:

crwdns2936751:024crwdne2936751:0 1

crwdns2936753:07crwdne2936753:0 2

crwdns2936753:030crwdne2936753:0 8

crwdns2942667:0crwdne2942667:0 279