crwdns2933423:0crwdne2933423:0

Toshiba Satellite C55-C5268 Heat Sink Replacement

crwdns2942213:0crwdne2942213:0

  1. Toshiba Satellite C55-C5268 Heat Sink Replacement, Battery: crwdns2935265:01crwdnd2935265:01crwdnd2935265:01crwdne2935265:0
    • Unplug and power off the laptop.

    • Unscrew the two 9 mm Phillips #1screws holding the battery in place.

  2. Toshiba Satellite C55-C5268 Heat Sink Replacement: crwdns2935265:02crwdnd2935265:01crwdnd2935265:02crwdne2935265:0 Toshiba Satellite C55-C5268 Heat Sink Replacement: crwdns2935265:02crwdnd2935265:02crwdnd2935265:02crwdne2935265:0
    • Grab the battery and pull it away from the laptop to remove it.

    • This doesn't require a lot of effort, so you don't have to pull too hard.

  3. Toshiba Satellite C55-C5268 Heat Sink Replacement, Back Panel: crwdns2935265:03crwdnd2935265:01crwdnd2935265:01crwdne2935265:0
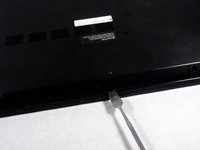
    • Unscrew the 10 9.0 mm screws holding the back panel on using a Phillips head #1 screwdriver.

  4. Toshiba Satellite C55-C5268 Heat Sink Replacement: crwdns2935265:04crwdnd2935265:01crwdnd2935265:02crwdne2935265:0 Toshiba Satellite C55-C5268 Heat Sink Replacement: crwdns2935265:04crwdnd2935265:02crwdnd2935265:02crwdne2935265:0
    • Using a metal spudger can damage sensitive components.

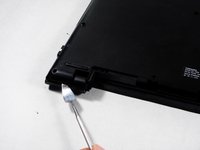
    • Insert a metal spudger tool in the seam between the back cover and the laptop itself. Gently run the spudger around the edge to pop the cover off.

  5. Toshiba Satellite C55-C5268 Heat Sink Replacement: crwdns2935265:05crwdnd2935265:01crwdnd2935265:02crwdne2935265:0 Toshiba Satellite C55-C5268 Heat Sink Replacement: crwdns2935265:05crwdnd2935265:02crwdnd2935265:02crwdne2935265:0
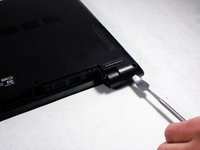
    • Pry up the back panel from the rest of the laptop using a spudger.

    • It is best to start around the USB port and work your way around the edge until the panel completely snaps off.

  6. Toshiba Satellite C55-C5268 Heat Sink Replacement, Heat Sink: crwdns2935265:06crwdnd2935265:01crwdnd2935265:02crwdne2935265:0 Toshiba Satellite C55-C5268 Heat Sink Replacement, Heat Sink: crwdns2935265:06crwdnd2935265:02crwdnd2935265:02crwdne2935265:0
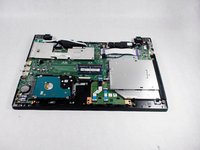
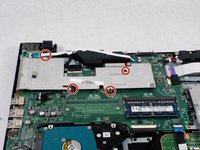
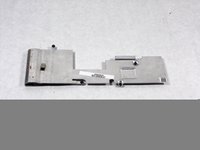
    • Unscrew the four 5.0 mm screws holding the heat sink in place using #1 Phillips screwdriver.

    • The 5.0 mm screws can unscrew from the laptop, but stay attached to the heat sink.

    • One of the screws is underneath a ribbon. Be sure to gently move the ribbon out of the way first.

    • Be sure to screw the replacement heat sink in the correct way.

crwdns2915888:0crwdne2915888:0

To reassemble your device, follow these instructions in reverse order.

Ben Rounseville

crwdns2935283:010/21/16crwdne2935283:0

471 crwdns2915208:0crwdne2915208:0

crwdns2935297:04crwdne2935297:0

crwdns2915084:0crwdne2915084:0

UMass Dartmouth, Team 4-1, Catania Fall 2016 crwdns2935289:0UMass Dartmouth, Team 4-1, Catania Fall 2016crwdne2935289:0

UMASSD-CATANIA-F16S4G1

crwdns2931471:02crwdne2931471:0

crwdns2935297:012crwdne2935297:0

crwdns2944067:00crwdne2944067:0

crwdns2917038:0crwdne2917038:0

crwdns2936625:0crwdne2936625:0:

crwdns2936751:024crwdne2936751:0 0

crwdns2936753:07crwdne2936753:0 7

crwdns2936753:030crwdne2936753:0 8

crwdns2942667:0crwdne2942667:0 603