crwdns2915892:0crwdne2915892:0
Before starting this process you will need to remove the battery and take off the cover. It's easier than it looks and only requires a Phillips #0 screwdriver and a plastic opening tool. Expect to take about 10 minutes for this process from start to finish.
crwdns2942213:0crwdne2942213:0
-
-
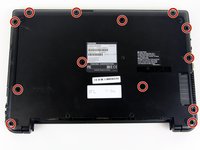
Flip laptop upside down so you can see the screws.
-
-
-
Using the Phillips #0 screwdriver, remove the two 7 mm screws from the back casing.
-
-
-
-
Pull the battery from the back of the laptop for removal from the laptop.
-
-
-
Remove the remaining 7 mm screws on the back panel of the laptop with a Phillips #0 screwdriver.
-
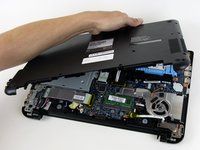
Use the plastic opening tool to pry up a corner of the back panel and continue to pop the back panel off.
-
-
-
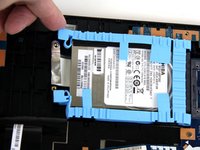
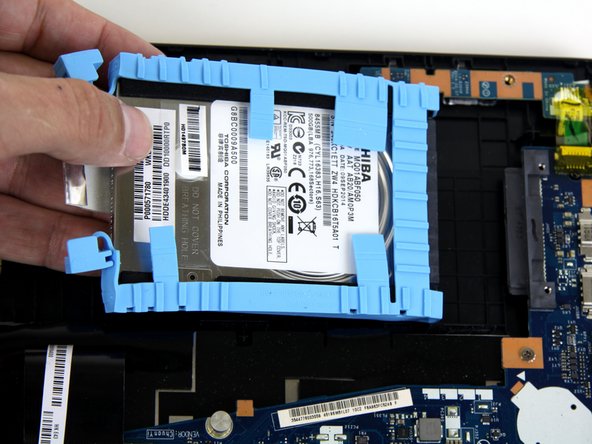
The hard drive is held in place with a soft, blue rubber retainer. The retainer can be disconnected by pulling up on the two tabs at the left side of the hard drive in these images.
-
-
-
Gently pull the hard drive away from the connection to remove it from the laptop.
-


To reassemble your device, follow these instructions in reverse order.
To reassemble your device, follow these instructions in reverse order.
crwdns2935221:0crwdne2935221:0
crwdns2935229:03crwdne2935229:0
crwdns2915084:0crwdne2915084:0

Linn Benton Community College, Team S1-G6, Karnes Fall 2018 crwdns2935289:0Linn Benton Community College, Team S1-G6, Karnes Fall 2018crwdne2935289:0
LBCC-KARNES-F18S1G6
crwdns2931471:04crwdne2931471:0
crwdns2935297:011crwdne2935297:0