crwdns2915892:0crwdne2915892:0
This guide will show you how to disassemble the parts necessary to remove and replace the screen.
crwdns2942213:0crwdne2942213:0
-
-
Power down the laptop and remove all power cords. After this is done, turn the laptop over.
-
-
-
Slide the battery latches outwards away from the center of the device.
-
-
-
Lift and remove the battery from the device.
-
-
-
crwdns2935267:0crwdne2935267:0Tweezers$4.99
-
Use tweezers to remove the screw covers in the lower corners of the screen.
-
-
-
Use the Phillips #1 screwdriver to unscrew the two screws in the lower corners of the screen.
-
-
-
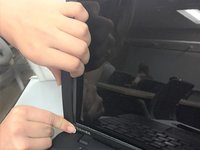
Start popping off the cover all the way around the screen until it comes off.
-
-
-
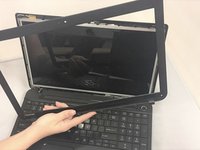
Remove the two screws in the top corners with a Phillips #1 screwdriver. The screen will pop forward after removing the two screws.
-
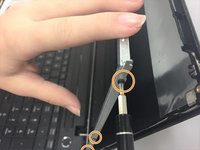
Using the same Phillips #1 screwdriver, remove the three screws on the side of screen frame.
-
-
-
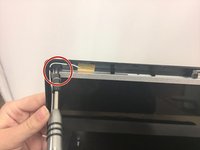
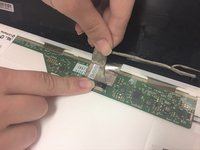
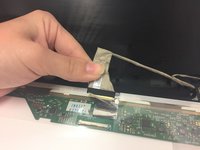
On the back of screen, lift up the plastic film and screen connector. Pop out the connector, and gently remove the screen.
-


To reassemble your device, follow these instructions in reverse order.
To reassemble your device, follow these instructions in reverse order.
crwdns2935221:0crwdne2935221:0
crwdns2935227:0crwdne2935227:0

crwdns2915084:0crwdne2915084:0

Eastern Washington University, Team S2-G2, Ramos Spring 2018 crwdns2935289:0Eastern Washington University, Team S2-G2, Ramos Spring 2018crwdne2935289:0
EWU-RAMOS-S18S2G2
crwdns2931471:04crwdne2931471:0
crwdns2935297:015crwdne2935297:0