crwdns2915892:0crwdne2915892:0
This guide will help you if you need to replace the fan in your laptop. Replacing the fan will fix any issues caused by a old or faulty fan. It is very straightforward and can be completed regardless of technical knowledge or skill level.
crwdns2942213:0crwdne2942213:0
-
-
With the Laptop off, turn it over.
-
The battery is located next to the screen hinges.
-
Move the locking tab located directly above the battery on the right side, all the way to the left. It will stay in place by itself.
-
-
-
Slide the tab identical to the first one on the right side above the battery pack to the right. This tab is spring loaded, so be sure to hold it.
-
Insert your tool or your fingernail into the notch just above the center of the battery pack, and lift the battery pack out of the device.
-
-
-
Unscrew the screw on the back panel of the laptop covering the hard drive.
-
-
-
Use the plastic opening tools to remove the panel.
-
-
-
-
Remove the screw next to the hard drive using the PH1 screwdriver.
-
-
-
Pull the silver tab connected to the hard drive up to take it out.
-
-
-
Using the PH1 screwdriver, remove the remaining screws from the back casing of the laptop.
-
-
-
Use a nylon spudger or plastic opening tool to carefully wedge the casing apart and remove the back plate of the laptop.
-
-
-
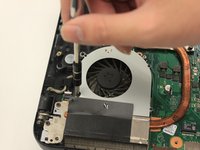
Remove the 2 screws holding the fan in place.
-
-
-
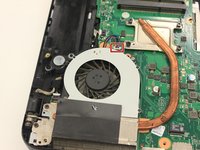
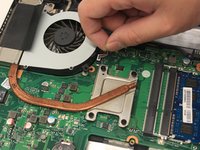
Detach the multi-colored wire connecting the fan to the motherboard and pull the fan out.
-


To reassemble your device, follow these instructions in reverse order.
To reassemble your device, follow these instructions in reverse order.
crwdns2915084:0crwdne2915084:0

Appalachian State University, Team S2-G1, Menagarishvili Fall 2018 crwdns2935289:0Appalachian State University, Team S2-G1, Menagarishvili Fall 2018crwdne2935289:0
APSU-MENAGARISHVILI-F18S2G1
crwdns2931471:03crwdne2931471:0
crwdns2935297:015crwdne2935297:0