crwdns2933423:0crwdne2933423:0

Toshiba Satellite A75-S226 Display Assembly Replacement

crwdns2942213:0crwdne2942213:0

  1. Toshiba Satellite A75-S226 Display Assembly Replacement, Wi-Fi/Memory Cover: crwdns2935265:01crwdnd2935265:01crwdnd2935265:02crwdne2935265:0 Toshiba Satellite A75-S226 Display Assembly Replacement, Wi-Fi/Memory Cover: crwdns2935265:01crwdnd2935265:02crwdnd2935265:02crwdne2935265:0
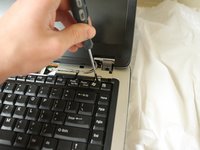
    • Remove the 5.75 mm screw from the cover panel.

    • Turn the laptop over with the screen facing down.

  2. Toshiba Satellite A75-S226 Display Assembly Replacement: crwdns2935265:02crwdnd2935265:01crwdnd2935265:01crwdne2935265:0
    • Lift up the cover panel using a plastic opening tool.

  3. Toshiba Satellite A75-S226 Display Assembly Replacement, Wi-Fi Card: crwdns2935265:03crwdnd2935265:01crwdnd2935265:02crwdne2935265:0 Toshiba Satellite A75-S226 Display Assembly Replacement, Wi-Fi Card: crwdns2935265:03crwdnd2935265:02crwdnd2935265:02crwdne2935265:0
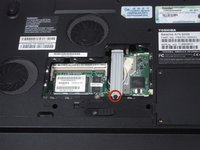
    • Remove the 5.64 mm screw from the bottom of the crossing bar.

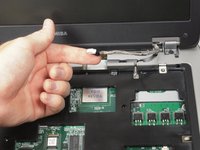
    • Remove the crossing bar.

  4. Toshiba Satellite A75-S226 Display Assembly Replacement: crwdns2935265:04crwdnd2935265:01crwdnd2935265:02crwdne2935265:0 Toshiba Satellite A75-S226 Display Assembly Replacement: crwdns2935265:04crwdnd2935265:02crwdnd2935265:02crwdne2935265:0
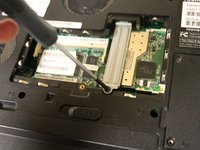
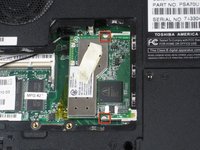
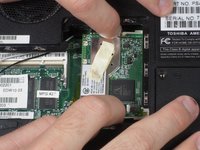
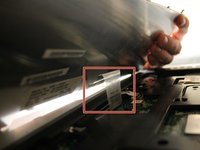
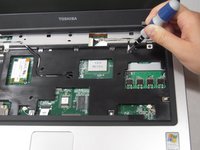
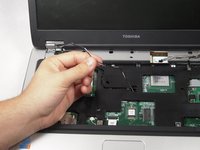
    • Use a plastic opening tool to disconnect the black and white antenna cable's connectors from the Wi-Fi card.

    • Note that the black wire is connected to the port that is labeled main.

  5. Toshiba Satellite A75-S226 Display Assembly Replacement: crwdns2935265:05crwdnd2935265:01crwdnd2935265:02crwdne2935265:0 Toshiba Satellite A75-S226 Display Assembly Replacement: crwdns2935265:05crwdnd2935265:02crwdnd2935265:02crwdne2935265:0
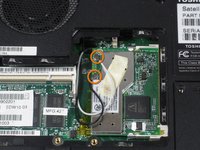
    • Use fingers to push the clips away from memory card.

  6. Toshiba Satellite A75-S226 Display Assembly Replacement: crwdns2935265:06crwdnd2935265:01crwdnd2935265:01crwdne2935265:0
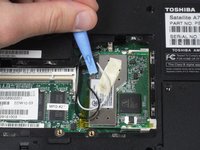
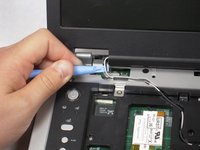
    • Use fingers to remove the Wi-Fi card.

  7. Toshiba Satellite A75-S226 Display Assembly Replacement, Keyboard: crwdns2935265:07crwdnd2935265:01crwdnd2935265:03crwdne2935265:0 Toshiba Satellite A75-S226 Display Assembly Replacement, Keyboard: crwdns2935265:07crwdnd2935265:02crwdnd2935265:03crwdne2935265:0 Toshiba Satellite A75-S226 Display Assembly Replacement, Keyboard: crwdns2935265:07crwdnd2935265:03crwdnd2935265:03crwdne2935265:0
    • Use the plastic opening tool to lift up the top panel all the way along the keyboard until it loosens.

    • It may be helpful to first pry at the rear of the hinge covers (not shown) to release them. Then Insert the plastic opening tool underneath the top panel's sides and then front edge.

  8. Toshiba Satellite A75-S226 Display Assembly Replacement: crwdns2935265:08crwdnd2935265:01crwdnd2935265:02crwdne2935265:0 Toshiba Satellite A75-S226 Display Assembly Replacement: crwdns2935265:08crwdnd2935265:02crwdnd2935265:02crwdne2935265:0
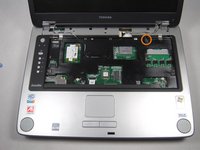
    • Remove the top panel by popping the panel out the top left socket, then do the same with the right side.

  9. Toshiba Satellite A75-S226 Display Assembly Replacement: crwdns2935265:09crwdnd2935265:01crwdnd2935265:03crwdne2935265:0 Toshiba Satellite A75-S226 Display Assembly Replacement: crwdns2935265:09crwdnd2935265:02crwdnd2935265:03crwdne2935265:0 Toshiba Satellite A75-S226 Display Assembly Replacement: crwdns2935265:09crwdnd2935265:03crwdnd2935265:03crwdne2935265:0
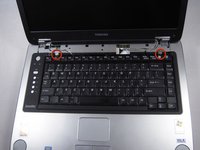
    • Remove the two 3.67 mm screws from the top corners of the keyboard.

  10. Toshiba Satellite A75-S226 Display Assembly Replacement: crwdns2935265:010crwdnd2935265:01crwdnd2935265:01crwdne2935265:0
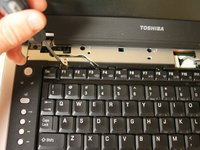
    • Use fingers to lift up the keyboard from the top.

    • Do not try to remove the keyboard completely because it is still attached to the motherboard.

  11. Toshiba Satellite A75-S226 Display Assembly Replacement: crwdns2935265:011crwdnd2935265:01crwdnd2935265:03crwdne2935265:0 Toshiba Satellite A75-S226 Display Assembly Replacement: crwdns2935265:011crwdnd2935265:02crwdnd2935265:03crwdne2935265:0 Toshiba Satellite A75-S226 Display Assembly Replacement: crwdns2935265:011crwdnd2935265:03crwdnd2935265:03crwdne2935265:0
    • Remove the cable connecting the keyboard with the motherboard.

    • Be aware of the locking tabs on each side of the ribbon-cable connector—they slide back about 2mm to free the cable.

    • Lift up and remove the keyboard.

  12. Toshiba Satellite A75-S226 Display Assembly Replacement, Display Assembly: crwdns2935265:012crwdnd2935265:01crwdnd2935265:02crwdne2935265:0 Toshiba Satellite A75-S226 Display Assembly Replacement, Display Assembly: crwdns2935265:012crwdnd2935265:02crwdnd2935265:02crwdne2935265:0
    • Remove the 3.76mm screw from the ground wire.

  13. Toshiba Satellite A75-S226 Display Assembly Replacement: crwdns2935265:013crwdnd2935265:01crwdnd2935265:02crwdne2935265:0 Toshiba Satellite A75-S226 Display Assembly Replacement: crwdns2935265:013crwdnd2935265:02crwdnd2935265:02crwdne2935265:0
    • Use the plastic opening tool to remove the wire.

  14. Toshiba Satellite A75-S226 Display Assembly Replacement: crwdns2935265:014crwdnd2935265:01crwdnd2935265:02crwdne2935265:0 Toshiba Satellite A75-S226 Display Assembly Replacement: crwdns2935265:014crwdnd2935265:02crwdnd2935265:02crwdne2935265:0
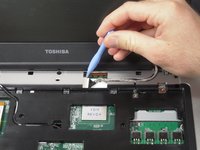
    • Gently pull the black and white wires out of the upper case.

    • Do not pull the wire too much, or you can damage the wire.

  15. Toshiba Satellite A75-S226 Display Assembly Replacement: crwdns2935265:015crwdnd2935265:01crwdnd2935265:01crwdne2935265:0
    • Remove the 8.6 mm screw on left side of upper case.

  16. Toshiba Satellite A75-S226 Display Assembly Replacement: crwdns2935265:016crwdnd2935265:01crwdnd2935265:02crwdne2935265:0 Toshiba Satellite A75-S226 Display Assembly Replacement: crwdns2935265:016crwdnd2935265:02crwdnd2935265:02crwdne2935265:0
    • Remove two 8.6 mm screws on the back corners of the laptop.

  17. Toshiba Satellite A75-S226 Display Assembly Replacement: crwdns2935265:017crwdnd2935265:01crwdnd2935265:01crwdne2935265:0
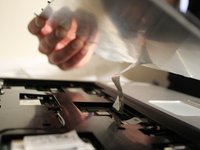
    • Lift up the display assembly to remove it.

crwdns2915888:0crwdne2915888:0

Replace the old display assembly with your new assembly. To reassemble your device, follow these instructions in reverse order.

crwdns2935229:02crwdne2935229:0

Garrett Gudgel

crwdns2935283:010/05/10crwdne2935283:0

763 crwdns2915208:0crwdne2915208:0

crwdns2935297:013crwdne2935297:0

crwdns2915084:0crwdne2915084:0

Cal Poly, Team 4-43, Amido Fall 2010 crwdns2935289:0Cal Poly, Team 4-43, Amido Fall 2010crwdne2935289:0

CPSU-AMIDO-F10S4G43

crwdns2931471:05crwdne2931471:0

crwdns2935297:039crwdne2935297:0

crwdns2944067:00crwdne2944067:0

crwdns2917038:0crwdne2917038:0

crwdns2936625:0crwdne2936625:0:

crwdns2936751:024crwdne2936751:0 0

crwdns2936753:07crwdne2936753:0 0

crwdns2936753:030crwdne2936753:0 5

crwdns2942667:0crwdne2942667:0 6,390