crwdns2933423:0crwdne2933423:0

Toshiba Satellite A65-S126 Optical Drive Replacement

crwdns2942213:0crwdne2942213:0

  1. Toshiba Satellite A65-S126 Optical Drive Replacement, Battery: crwdns2935265:01crwdnd2935265:01crwdnd2935265:01crwdne2935265:0
    • Flip the laptop over so the bottom is facing up.

    • Slide each of the three tabs on the bottom half of the assembly into the unlocked position.

  2. Toshiba Satellite A65-S126 Optical Drive Replacement: crwdns2935265:02crwdnd2935265:01crwdnd2935265:01crwdne2935265:0
    • Gently lift the battery out of the computer.

  3. Toshiba Satellite A65-S126 Optical Drive Replacement, Upper Assembly: crwdns2935265:03crwdnd2935265:01crwdnd2935265:01crwdne2935265:0
    • Remove the single 3mm Phillips #00 screw that secures the wireless card cover.

  4. Toshiba Satellite A65-S126 Optical Drive Replacement: crwdns2935265:04crwdnd2935265:01crwdnd2935265:01crwdne2935265:0
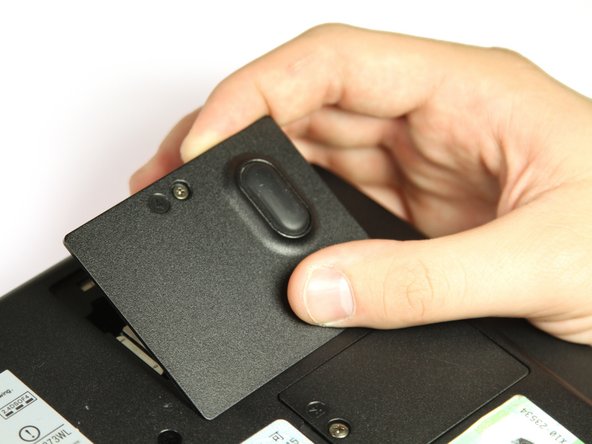
    • Remove the WIFI module cover. It will pull right off.

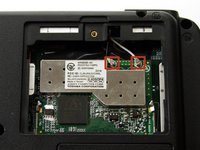
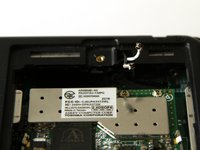
  5. Toshiba Satellite A65-S126 Optical Drive Replacement: crwdns2935265:05crwdnd2935265:01crwdnd2935265:02crwdne2935265:0 Toshiba Satellite A65-S126 Optical Drive Replacement: crwdns2935265:05crwdnd2935265:02crwdnd2935265:02crwdne2935265:0
    • Unplug the white and black wires from the WiFi module.

  6. Toshiba Satellite A65-S126 Optical Drive Replacement: crwdns2935265:06crwdnd2935265:01crwdnd2935265:01crwdne2935265:0
    • Remove the twelve 8mm button head Phillips #00 B8 screws.

    • Remove the two 14 mm button head Phillips #00 B14 screws.

    • Remove the two 10 mm Phillips #00 battery compartment screws.

    • Remove the two 8 mm Phillips #00 screws.

  7. Toshiba Satellite A65-S126 Optical Drive Replacement: crwdns2935265:07crwdnd2935265:01crwdnd2935265:01crwdne2935265:0
    • Remove the seven 4mm flat Phillips #00 screws.

    • Remove the seven 20mm button head Phillips #00 screws.

  8. Toshiba Satellite A65-S126 Optical Drive Replacement: crwdns2935265:08crwdnd2935265:01crwdnd2935265:01crwdne2935265:0
    • Use the plastic opening tool to pry the two halves apart.

  9. Toshiba Satellite A65-S126 Optical Drive Replacement, Optical Drive: crwdns2935265:09crwdnd2935265:01crwdnd2935265:01crwdne2935265:0
    • Orient the bottom assembly as displayed.

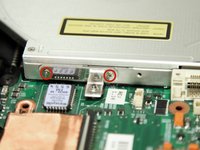
  10. Toshiba Satellite A65-S126 Optical Drive Replacement: crwdns2935265:010crwdnd2935265:01crwdnd2935265:02crwdne2935265:0 Toshiba Satellite A65-S126 Optical Drive Replacement: crwdns2935265:010crwdnd2935265:02crwdnd2935265:02crwdne2935265:0
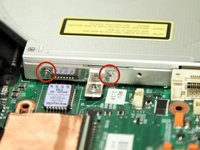
    • Remove the two 3 mm Phillips #00 screws.

  11. Toshiba Satellite A65-S126 Optical Drive Replacement: crwdns2935265:011crwdnd2935265:01crwdnd2935265:01crwdne2935265:0
    • Slide the optical drive out of the laptop through the opening on the left side of the bottom assembly.

crwdns2915888:0crwdne2915888:0

To reassemble your device, follow these instructions in reverse order.

Geoff Wacker

crwdns2935283:009/30/13crwdne2935283:0

89,889 crwdns2915208:0crwdne2915208:0

crwdns2935297:089crwdne2935297:0

crwdns2917034:0crwdne2917034:0

Or, simply remove the screw (the center one in this photo) from the bottom case that holds the bracket in and pull the drive out.

J Howard Markley - crwdns2934203:0crwdne2934203:0

crwdns2917038:0crwdne2917038:0

crwdns2936625:0crwdne2936625:0:

crwdns2936751:024crwdne2936751:0 0

crwdns2936753:07crwdne2936753:0 1

crwdns2936753:030crwdne2936753:0 1

crwdns2942667:0crwdne2942667:0 974