crwdns2933423:0crwdne2933423:0

Toshiba Satellite A210 Fan Replacement

crwdns2942213:0crwdne2942213:0

  1. Toshiba Satellite A210 Fan Replacement, Battery: crwdns2935265:01crwdnd2935265:01crwdnd2935265:02crwdne2935265:0 Toshiba Satellite A210 Fan Replacement, Battery: crwdns2935265:01crwdnd2935265:02crwdnd2935265:02crwdne2935265:0
    • Unplug the AC adapter and all other auxiliary components from the laptop.

    • Slide the battery lock tab away from the center of the laptop to unlock the battery.

  2. Toshiba Satellite A210 Fan Replacement: crwdns2935265:02crwdnd2935265:01crwdnd2935265:02crwdne2935265:0 Toshiba Satellite A210 Fan Replacement: crwdns2935265:02crwdnd2935265:02crwdnd2935265:02crwdne2935265:0
    • Slide the battery release tab away from the center of the laptop and hold it.

    • Lifting from the small notch between the two tabs, pull the battery out of the laptop.

  3. Toshiba Satellite A210 Fan Replacement, Optical Disc Drive: crwdns2935265:03crwdnd2935265:01crwdnd2935265:03crwdne2935265:0 Toshiba Satellite A210 Fan Replacement, Optical Disc Drive: crwdns2935265:03crwdnd2935265:02crwdnd2935265:03crwdne2935265:0 Toshiba Satellite A210 Fan Replacement, Optical Disc Drive: crwdns2935265:03crwdnd2935265:03crwdnd2935265:03crwdne2935265:0
    • Use a PH0 screwdriver to remove the screw holding the optical drive in place.

    • Using your index finger, push the metal tab inside the RAM bay which is located directly underneath the screw-hole.

    • The optical drive will then slide out.

  4. Toshiba Satellite A210 Fan Replacement, Keyboard: crwdns2935265:04crwdnd2935265:01crwdnd2935265:01crwdne2935265:0
    • Unscrew the 4 highlighted screws with a PH1 screwdriver.

  5. Toshiba Satellite A210 Fan Replacement: crwdns2935265:05crwdnd2935265:01crwdnd2935265:03crwdne2935265:0 Toshiba Satellite A210 Fan Replacement: crwdns2935265:05crwdnd2935265:02crwdnd2935265:03crwdne2935265:0 Toshiba Satellite A210 Fan Replacement: crwdns2935265:05crwdnd2935265:03crwdnd2935265:03crwdne2935265:0
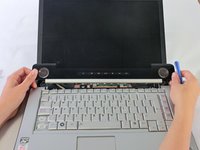
    • Orient the laptop so that the screen is open and facing you.

    • Slide the plastic opening tool underneath the top edge of the black plastic insert.

    • Pull it off and set aside.

  6. Toshiba Satellite A210 Fan Replacement: crwdns2935265:06crwdnd2935265:01crwdnd2935265:02crwdne2935265:0 Toshiba Satellite A210 Fan Replacement: crwdns2935265:06crwdnd2935265:02crwdnd2935265:02crwdne2935265:0
    • Remove the 2 PH1 screws.

    • Lift the keyboard from the top being carful not to remove it fully. There is still a ribbon cable that connects the keyboard to the laptop.

  7. Toshiba Satellite A210 Fan Replacement: crwdns2935265:07crwdnd2935265:01crwdnd2935265:01crwdne2935265:0
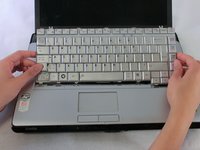
    • Disconnect the keyboard ribbon cable and remove the keyboard from the laptop.

  8. Toshiba Satellite A210 Fan Replacement, Fan: crwdns2935265:08crwdnd2935265:01crwdnd2935265:01crwdne2935265:0
    • Close the laptop and flip it over.

    • Unscrew the 11 yellow circled screws with a PH1 screwdriver. These screws are larger in size.

    • Unscrew the 2 red and yellow circled screws with a PH1 screwdriver. These screws are shorter and thicker than the previous.

    • Unscrew the 1 green and yellow circled screw with a PH1 screwdriver. This screw is longer and thinner than the previous.

  9. Toshiba Satellite A210 Fan Replacement: crwdns2935265:09crwdnd2935265:01crwdnd2935265:03crwdne2935265:0 Toshiba Satellite A210 Fan Replacement: crwdns2935265:09crwdnd2935265:02crwdnd2935265:03crwdne2935265:0 Toshiba Satellite A210 Fan Replacement: crwdns2935265:09crwdnd2935265:03crwdnd2935265:03crwdne2935265:0
    • Flip the laptop over and open it so that the screen is facing you.

    • Locate the hinges on either side of the screen, which secure the display to the body of the laptop.

    • Unscrew the 2 screws in each hinge with a PH1 screwdriver.

    • The display is no longer connected to the laptop and could fall. Be careful not to drop it during the next steps.

  10. Toshiba Satellite A210 Fan Replacement: crwdns2935265:010crwdnd2935265:01crwdnd2935265:03crwdne2935265:0 Toshiba Satellite A210 Fan Replacement: crwdns2935265:010crwdnd2935265:02crwdnd2935265:03crwdne2935265:0 Toshiba Satellite A210 Fan Replacement: crwdns2935265:010crwdnd2935265:03crwdnd2935265:03crwdne2935265:0
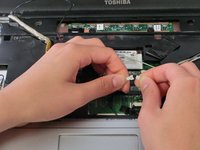
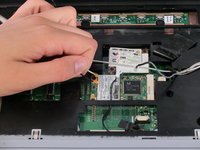
    • Unfasten the connectors from the highlighted locations.

    • Disconnect by gently pulling on the fasteners which connect the wires to the laptop.

    • Pulling directly on the wires could cause permanent damage to the connectors or the wires themselves.

    • Unscrew the screw indicated by the yellow circle.

  11. Toshiba Satellite A210 Fan Replacement: crwdns2935265:011crwdnd2935265:01crwdnd2935265:02crwdne2935265:0 Toshiba Satellite A210 Fan Replacement: crwdns2935265:011crwdnd2935265:02crwdnd2935265:02crwdne2935265:0
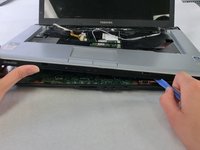
    • Slide the plastic opening tool underneath the edges of the upper casing, which is shown in the images.

  12. Toshiba Satellite A210 Fan Replacement: crwdns2935265:012crwdnd2935265:01crwdnd2935265:01crwdne2935265:0
    • The LCD screen can now be removed from the laptop.

    • Lift the upper plastic casing and remove it from the lower half of the laptop.

  13. Toshiba Satellite A210 Fan Replacement: crwdns2935265:013crwdnd2935265:01crwdnd2935265:03crwdne2935265:0 Toshiba Satellite A210 Fan Replacement: crwdns2935265:013crwdnd2935265:02crwdnd2935265:03crwdne2935265:0 Toshiba Satellite A210 Fan Replacement: crwdns2935265:013crwdnd2935265:03crwdnd2935265:03crwdne2935265:0
    • Unfasten the two connections shown.

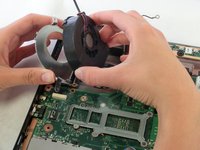
    • Unscrew the two screws securing the fan to the laptop. Use a PH1 for the screw that is adjacent to the speaker and a PH0 for the other screw.

    • Lift up the fan and pull the black plastic tab away from the fan housing. Remove the fan.

    • Do not remove the metal fan housing. It is taped to a metal heat-sink and should not be removed.

crwdns2915888:0crwdne2915888:0

To reassemble your device, follow these instructions in reverse order.

crwdns2935229:03crwdne2935229:0

Youlen

crwdns2935283:004/11/13crwdne2935283:0

40 crwdns2915208:0crwdne2915208:0

crwdns2935297:02crwdne2935297:0

crwdns2915084:0crwdne2915084:0

Cal Poly, Team 17-5, Regan Spring 2013 crwdns2935289:0Cal Poly, Team 17-5, Regan Spring 2013crwdne2935289:0

CPSU-REGAN-S13S17G5

crwdns2931471:04crwdne2931471:0

crwdns2935297:018crwdne2935297:0

crwdns2944067:02crwdne2944067:0

THANKS , very useful,clear, lifesaver guide !!!

ANDREAS - crwdns2934203:0crwdne2934203:0

Very good. I am impressed. Only one screw over at the end, for me that’s good! And the fan is sooo much quieter :)

les.moore - crwdns2934203:0crwdne2934203:0

crwdns2917038:0crwdne2917038:0

crwdns2936625:0crwdne2936625:0:

crwdns2936751:024crwdne2936751:0 0

crwdns2936753:07crwdne2936753:0 0

crwdns2936753:030crwdne2936753:0 17

crwdns2942667:0crwdne2942667:0 3,930